Table of Contents
Alarm device

Alarm Object
This object is used to integrate the central alarm in the project; it allows the server to arm or disarm the central, to read partitions or sensor status and to singularly control them. All alarm panels integrated in the system provide the user with the same graphical effect; they can be selected from the following list of models:
- Device type This property allows to select the alarm panel model.
- ArrowHead Elit SX
- AVS Electronics XTream 640
- Bentel Absoluta
- Bentel Kyo 320
- Bentel Kyo Unit 8 Zones
- Bentel Kyo Unit 16 Zones
- Bentel Kyo Unit 32 Zones
- Brahms series B4 CMP16
- Brahms series B4 CMP32
- Brahms series B4 CMP64
- Elkron MP508 TG
- Elmo (ETRx, ET8plus, NETx, Villegio, Pregio, Tacora)
- GE security/Aritech ATS
- GE security/Aritech ATS Adviser Master
- Honeywell Galaxy Dimension
- Iess (Genio)
- Inim Prime webAPI
- Inim Smartliving 10100
- Inim Smartliving 1050
- Inim Smartliving 515
- Paradox EVO
- Rokonet RP128
- Rokonet RP128 BRTE
- Satel Integra
- Siemens SPC
- Tecnoalarm TP16-256
- Tecnoalarm TP20-440
- Tecnoalarm TP8-64
- Tecnoalarm TP8-88
- Urmet 1067
- Wago Switzerland
- Communication: This property allows to select the type of communication established with the server; it can be selected from the following list:
- RS232: Connected through serial cable.
- RS232overTCP_IP: Connected through link with TCP media converter.
- TCP_IP: Connected through network link.
If the property ”Communication” is set to ”RS232”, the following properties will appear:- Serial Port: Serial port number that changes depending on the server used. Click here to get the correct port number.
If the property ”Communication” is set to ”TCP/IP”, the following properties will appear: - IP Address: Device IP address or RS232overIP address.
- Port Number: TCP/IP port number for ethernet connection.
- Partitions Group of sensors that can be armed or disarmed together.
- Max. partitions Maximum number of partitions supported by the device.
- Partitions reading Time interval between two consecutive partitions state readings.
- Sensors List of all sensors connected to the alarm panel.
- Max.sensors Maximum number of sensors supported by the device.
- Sensors reading Time interval between two consecutive sensors state readings.
- KNX reading Enable/disable functions that allow to establish a KNX communication with central alarm system.
If in the property ”Device Type” are selected ”AVS Electronics XTream 640”, ”Bentel Absoluta”, ”Elkron MP508 TG”, ”Honeywell Galaxy Dimension”, ”Tecnoalarm TP16-256”, ”Tecnoalarm TP8-64”, ”Tecnoalarm TP8-88” the following property will appear:- Default code: Enabled code for plant status quering.
If in the property ”Device Type” is selected ”AVS Electronics XTream 640” the following property will appear:
- Use special functions: Will enable the usage of AVS special way of arming a single partition (ON, HOME, AREA, PERIMETER). Can be applied only when using a single partition.
If in the property ”Device Type” are selected ”Elkron MP508 TG”, ”Urmet 1067” the following property will appear: - System code: System code of the panel. Elkron default value is 55555555. Urmet default value is 99999999.
If in the property ”Device Type” are selected ”GE security/Aritech ATS”, ”Honeywell Galaxy Dimension” the following property will appear: - Force Arm: Force Arm partition when arming.
If in the property ”Device Type” is selected ”GE security/Aritech ATS” the following property will appear: - Users: List of security users associated to this control.
If in the property ”Device Type” are selected ”Tecnoalarm TP16-256”, ”Tecnoalarm TP8-64”, ”Tecnoalarm TP8-88”, ”Urmet 1067” the following property will appear: - Passphrase: Encryption passphrase used during panel configuration.
Object Commands
After adding an alarm device to the system, it is possible to send a number of commands when using other objects such as the Generic Command button.

After selecting Security from the tree, a list of all the alarm devices and centrale added in System will be shown. The available commands when selecting one of the devices are the following:
Arm a particular partition with a specified code
Disarm a particular partition with a specified code
Arm all partitions with a specified code
Centrale
After selecting Security from the tree, a list of all the alarm devices and centrale added in System will be shown. The available commands when selecting one of the devices are the following:
Arm a particular partition with a specified code
Disarm a particular partition with a specified code
Arm all partitions with a specified code
Adding partitions
Click on the button displayed on the right to open partitions editor window, click on ”Add” and then adjust the properties in the grid:
- Area Name Label of text to identify the area.
- Central index Insert the number of the partition programmed in the security system.
- Disarming Enable/disable the option to deactivate the alarm system through a KNX command.
- Arming Enable/disable the option to activate the alarm system through a KNX command.
- Command bit KNX group address to command arming of the area (1 bit - 1=arm, 0=disarm)
- Command Byte KNX group address to command area in byte.
- Command 14 Byte KNX group address to command area in with 14 bytes object. The string should be in the form 1|xxxx or 0|xxxx where xxxx represents the user code and 0 or 1 is used to decide if the partition should be armed or disarmed.
- Status byte 1 byte KNX group address sent by the server containing the partition status.
- Area name Insert the partition name.
Adding sensors
Click on the button displayed on the right to open sensors editor window, click on ”Add” and then adjust the properties in the grid:
- Index number Insert the number of the sensor you programmed in your security system.
- Group Insert a KNX group address to communicate with the sensor (f.e. to turn on a light using an alarm system motion sensor).
- Name of the sensor Sensor name.
- Send all states If enabled, the sensor sends all states, if disabled, the sensor sends only alarm state (only value 1).
- Send on change If enabled the sensor sends its state only on change (otherwise, sensor status will be sent on every polling).
Bentel Interface
The system allows to manage Kyo8, Kyo16 and Kyo32 panels. Those panels can establish only a serial connection with ThinKnx system using a null-modem cable. Partitions, in ThinKnx, take numbers starting from 0 for the first one; sensors take numbers starting from 0 for the first one as well.
Tecnoalarm Interface
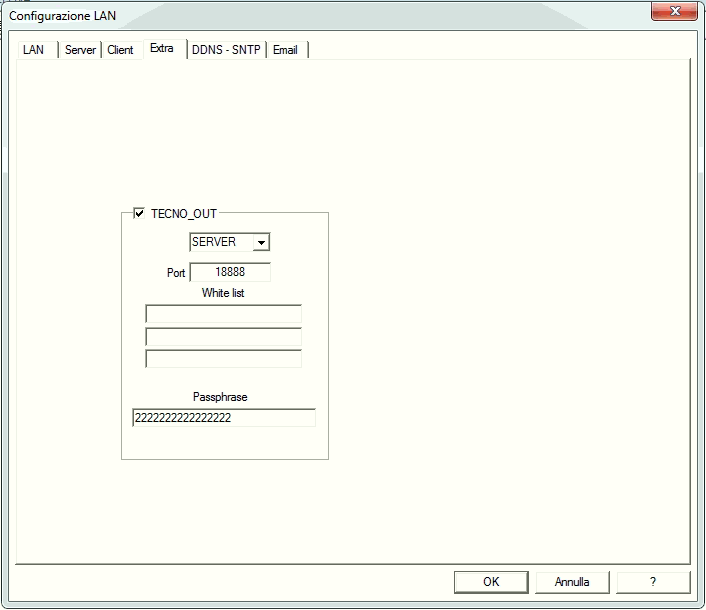
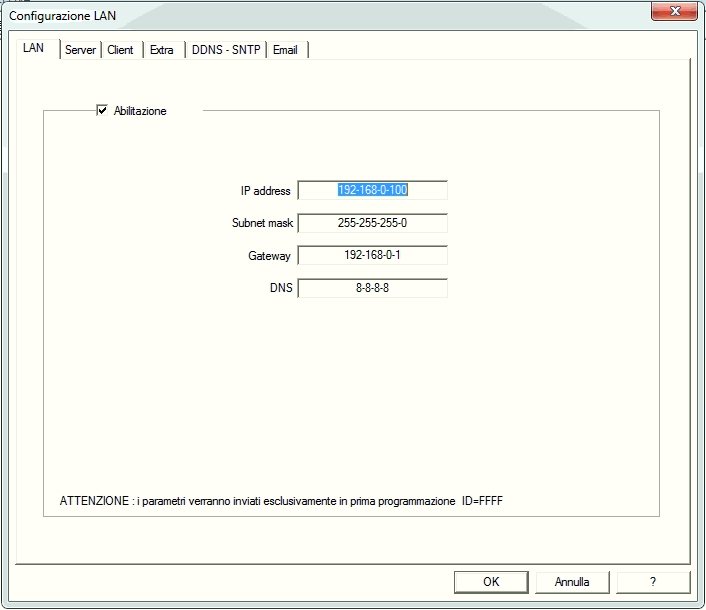
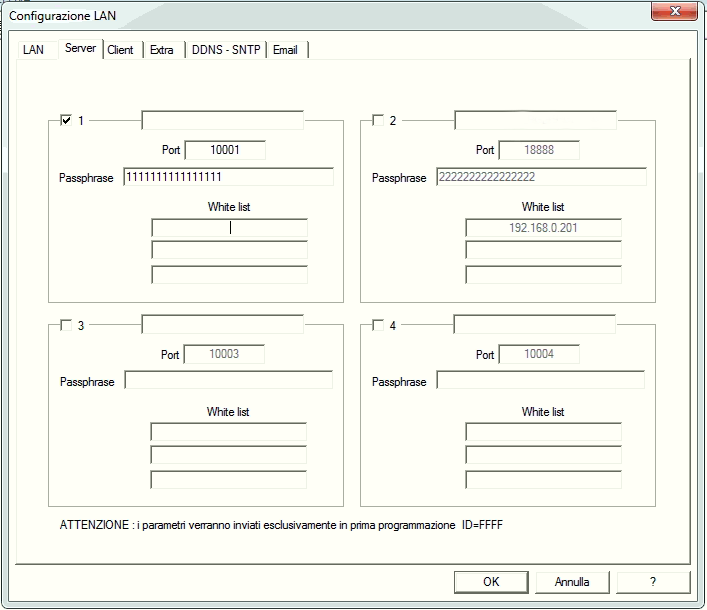
To interact with a TecnoAlarm device, the licence Tecnoout must be enabled on the alarm device following the manufacturer’s instructions. Furthermore, through the Centro software, the alarm device must be configured on the network as illustrated in following pictures.
In the “Extra” tab, check the box corresponding to “Tecnoout” and specify the correct port (10500 is recommended) and a password with 16 characters.

In the “LAN” tab, configure the network settings.

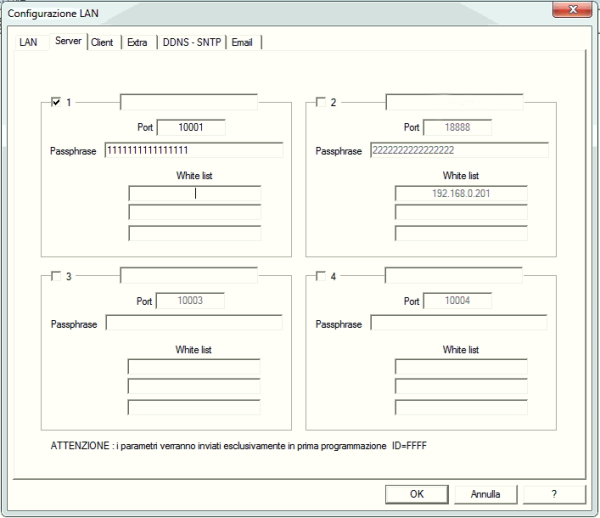
The port specified in the “Extra” tab must be different from those specified in the “Server” tab, even if ports specified in the “Server” tab are unchecked.
Parameters for alarm device can be set just during the first configuration. To change those values a complete reset of the device is needed.
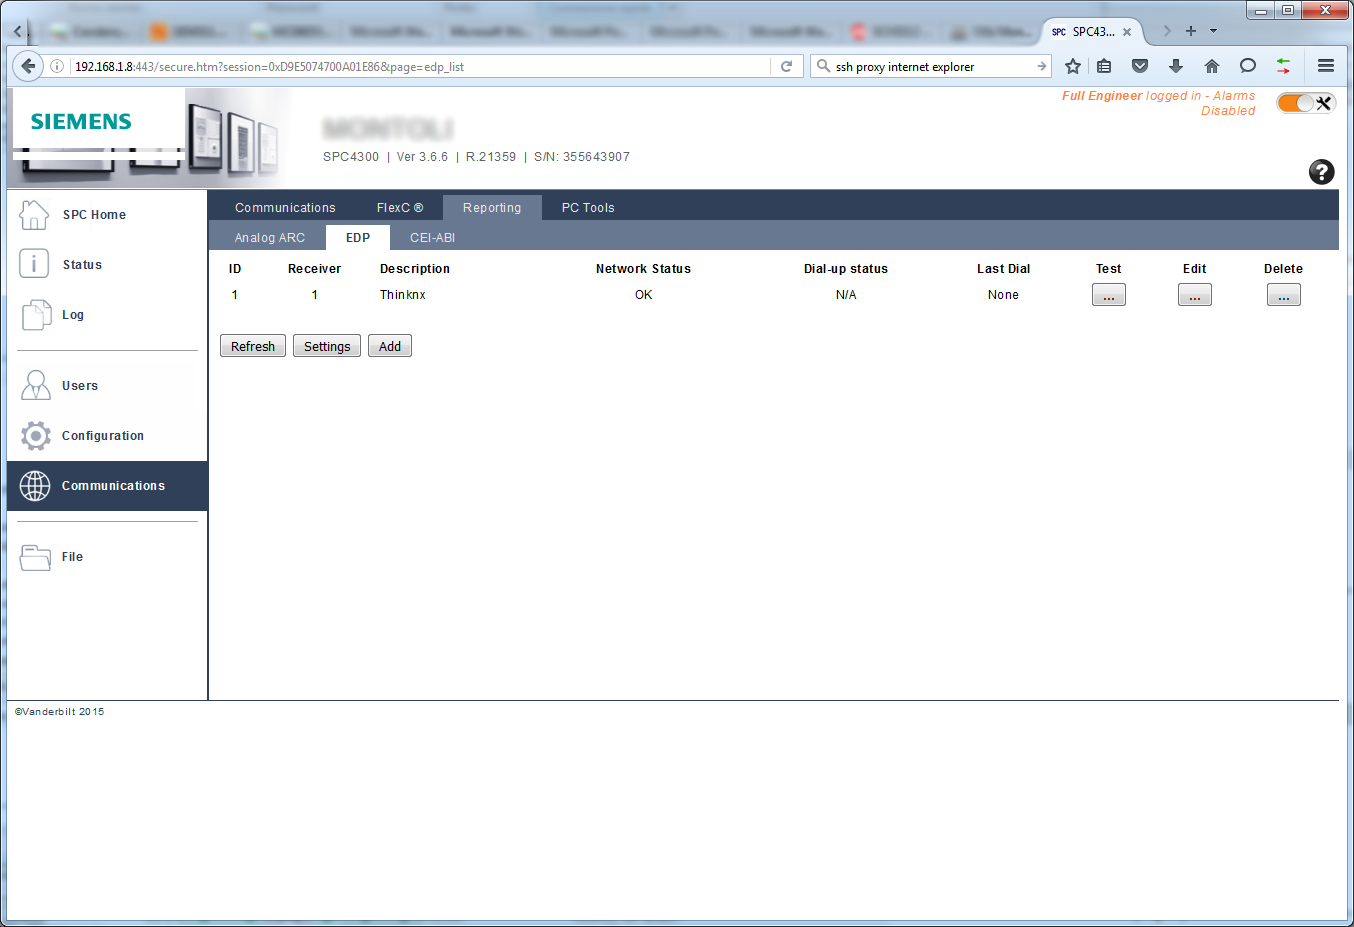
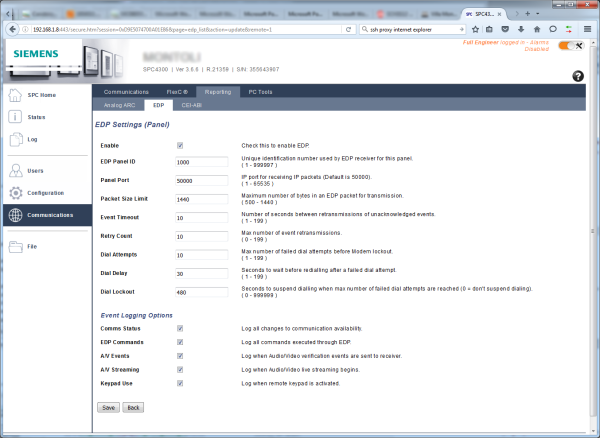
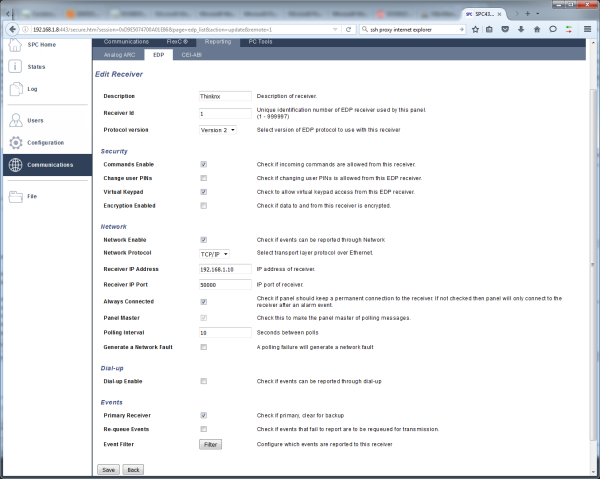
Siemens/Vanderbilt SPC
To interact with a Siemens SPC panels, please enable communications options from the Panel software as in the following screenshots (please change IP of thinknx server (in this case 192.168.1.10) according to your installation needs.

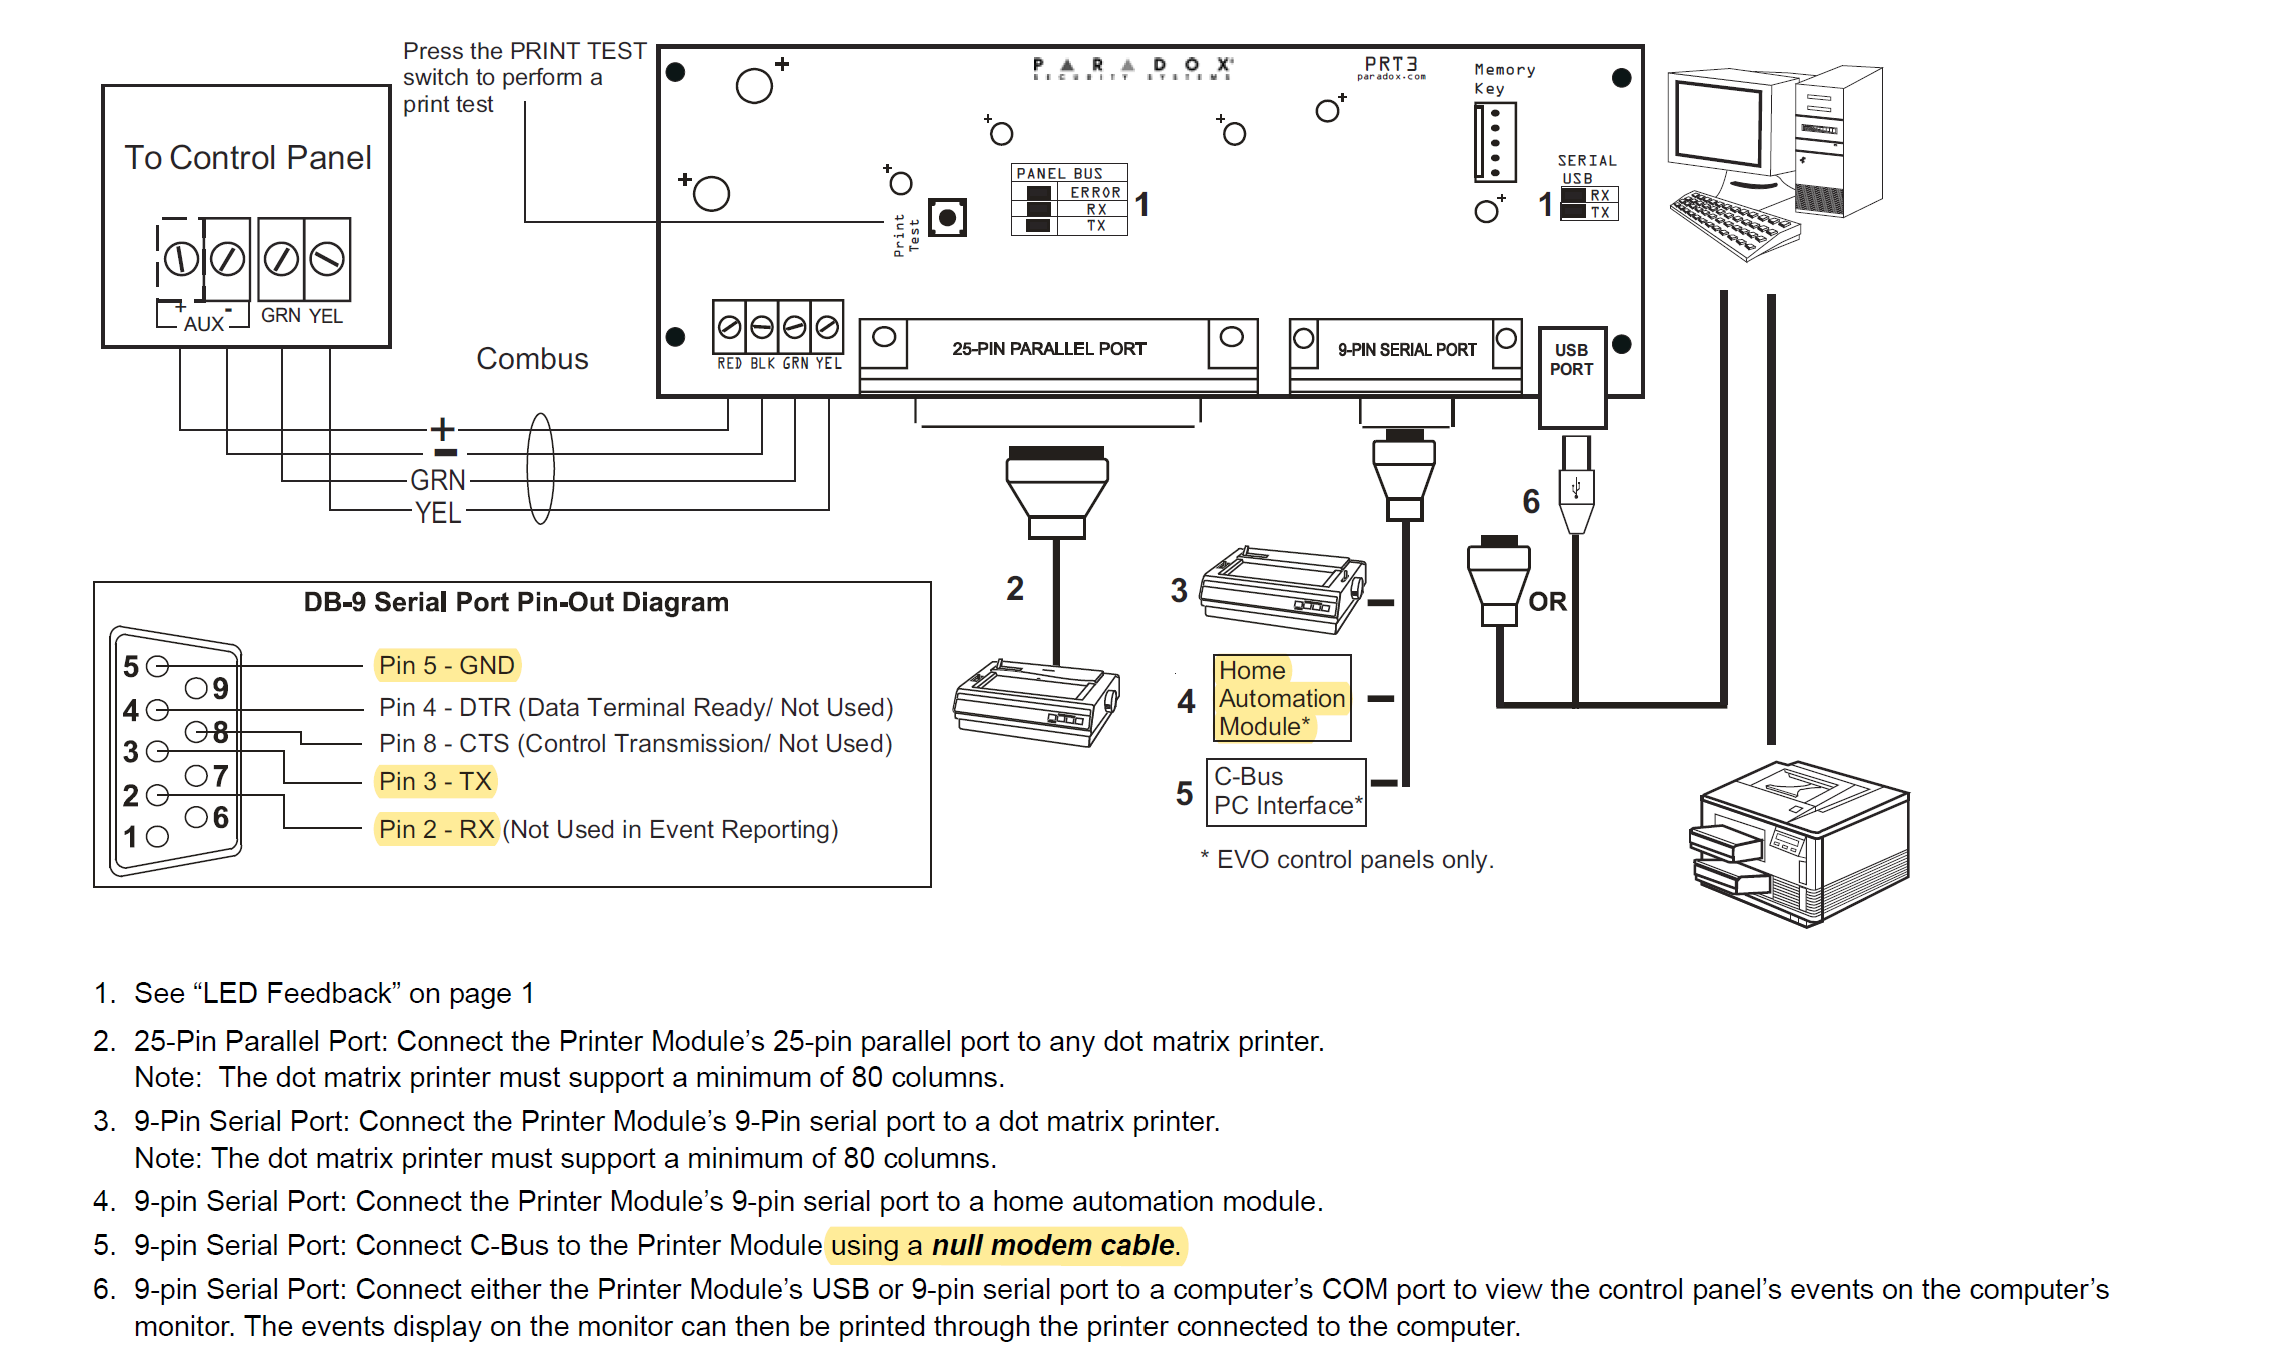
Paradox Evo
To interact with a Paradox Evo device, the Printer Module PRT3 must be used as an interface between the home automation system and the control panel.

To ensure correct communication with the Thinknx server, the device must be configured as seen in the picture below:
- Set Baud Rate: 57600
- Set Printer Module's serial port to either “Event Reporting (off)” or “Home Automation (on)”.
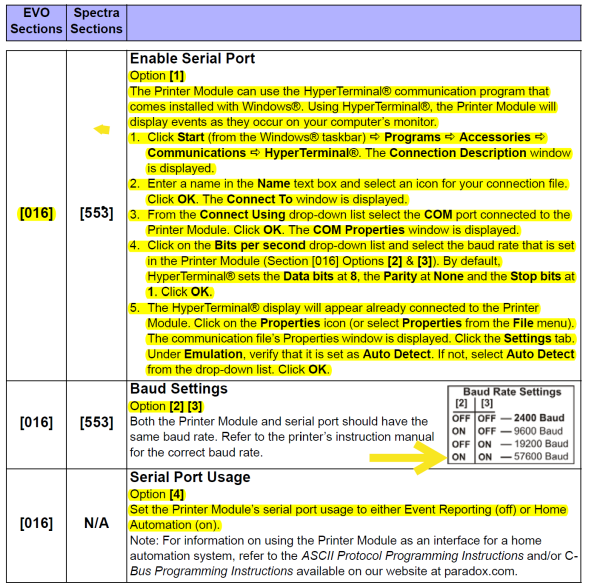
To properly connect the device to the Thinknx server, see below diagram:

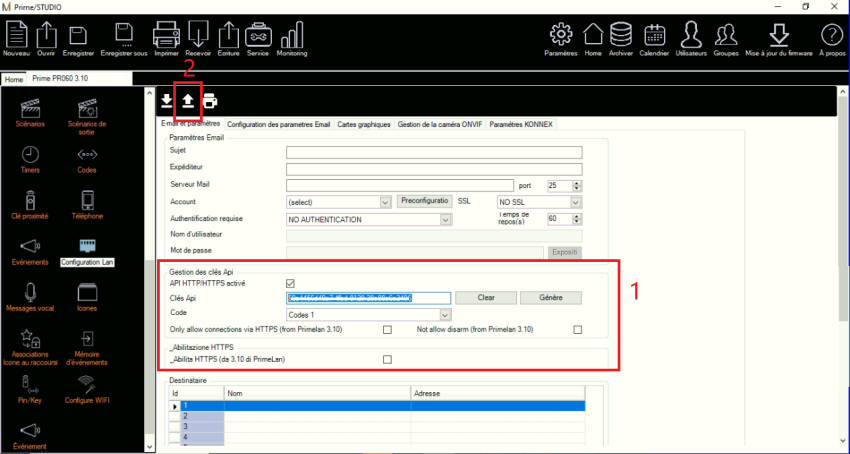
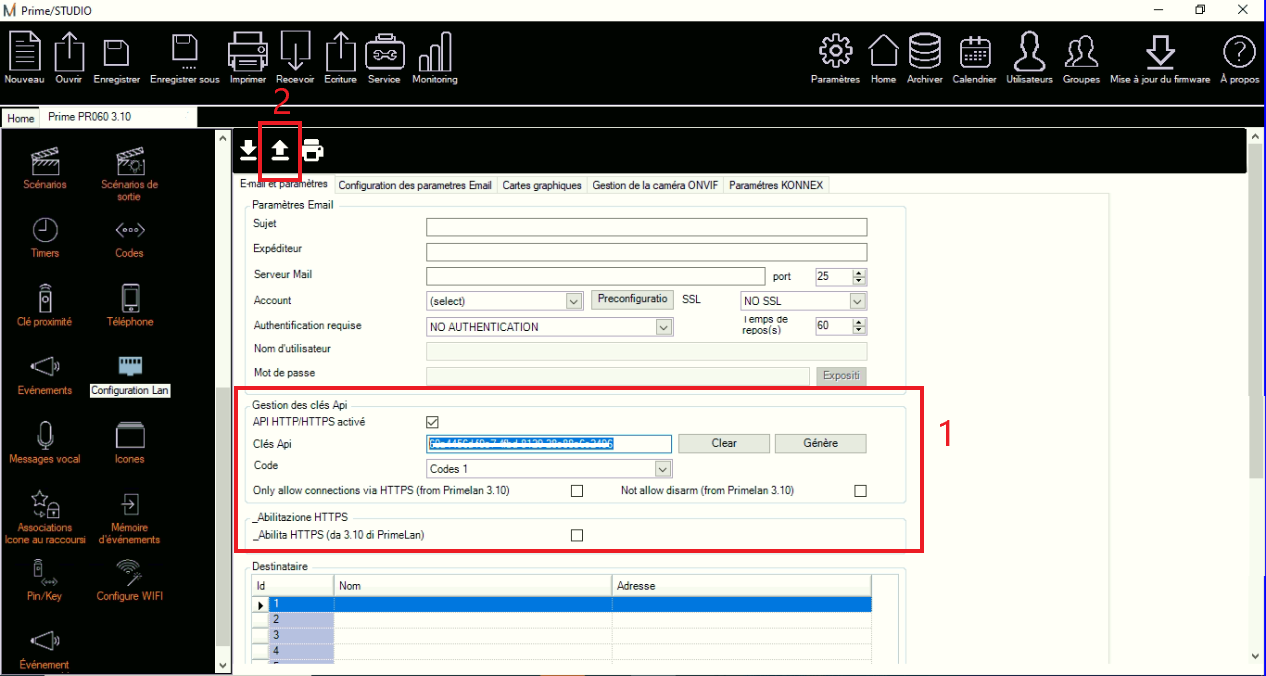
Inim Prime webAPI
To interact with Inim Prim webAPI, it is necessary to generate an API key from the alarm's configuration page. The API key should be copied inside the Alarm object in the configurator. Make sure to save and reboot the alarm panel after generating the API key.