Table of Contents
Log Manager
The Log Manager allows the user to record, organize and view the events generated by the Thinknx system.
The configuration is carried out from the Configurator, where it is possible to choose which types of logs to enable, create custom categories and define events to be recorded according to specific sources and conditions.
Admin users can view the logs available in the project. For non-Admin users, access to the log list depends on the Log access permission, which can be configured in the Groups and users section.
Configuration in the Configurator
To use the Log Manager, add the object from the System section of the Configurator, inside the Logic area.

Log Manager parameters
The main parameters of the object allow the user to enable the predefined log types and configure custom categories and events.

- Label: name of the object.
- Log connection events: if enabled, records the events related to user connections to the server.
- Log cloud events: if enabled, records the events related to cloud services.
- Log access control events: if enabled, records the events generated by the access control system.
- Log security events: if enabled, records the events generated by users.
- Categories: collection of custom log categories.
- Events to log: collection of custom events to be recorded.
Categories
The Categories allow the user to create custom categories to be associated with log events.
Categories are useful for organizing recorded events according to their type or priority, making it easier for the user to view and manage the logs.

For each category, it is possible to configure:
- Name: name of the category.
- Priority: priority associated with the category.
The priority allows the user to distinguish the importance of the recorded events and organize the information in a more structured way.
The editor also allows the user to import or export the configured categories, so they can be reused in other projects.
Events to log
The Events to log allow the user to configure custom events to be recorded by the Log Manager.
Each event can be linked to a source, for example a KNX group, and can be generated when the read value satisfies a specific condition.

For each event, it is possible to configure:
- Name: name of the event.
- Event category: allows the user to associate a category with the generated event.
- Multiplication factor: factor applied to the read value before evaluating the condition.
- Source: allows the user to select the source of the value used to generate the event. The available sources are:
- KNX: uses a KNX group as the source of the value to monitor.
- System objects: uses an internal Thinknx system object as the source.
- Modbus: uses a value coming from Modbus communication.
Type: data type used by the selected source. The type defines how the read value must be interpreted before evaluating the condition. The available types are:- 1 bit boolean - DPT 1
- 1 byte signed integer - DPT 6
- 2 byte signed integer - DPT 8
- 4 byte signed integer - DPT 13
- 1 byte unsigned integer - DPT 5
- 2 bytes unsigned integer - DPT 7
- 4 byte unsigned integer - DPT 12
- 2 byte floating point - DPT 9
- 4 byte floating point - DPT 14
- Counter values - DPT 229.001
- 3 byte long integer - DPT 29
- 3 byte Time - DPT 10
- 3 byte Date - DPT 11
- 2 or 4 bits - DPT 2 / 3
- 14 byte string - DPT 16
- 6 byte unsigned integer
- 8 bytes array of setpoints - DPT 275.100
KNX group: KNX group address to be monitored, available when the selected source is KNX.Event cause: allows the user to define the condition that must be satisfied to generate a new event.Specific value: value to be compared with the read value, when required by the event cause.Evaluate on value change: defines when the value must be evaluated:- if enabled, the value is evaluated only when it is different from the previous value;
- if disabled, the value is evaluated at every update, even if it is identical to the previous one.
Track event release: if enabled, the system also records the event release when the configured condition is no longer satisfied.Alarm release: defines how the event release is managed:- Manually by operator: the release must be manually confirmed by an operator;
- Automatically by condition not satisfied: the release is recorded automatically when the event condition is no longer satisfied.
Enable push notifications: allows the user to enable push notifications for the event.Push notification on event: defines when the push notification is sent:- On alarm: sends the notification when the event enters alarm state;
- On alarm acknowledge: sends the notification when the alarm is acknowledged;
- On release: sends the notification when the event is released;
- On release acknowledge: sends the notification when the release is acknowledged.
Enable email notification: allows the user to enable an email notification for the event.Send email on event: defines when the email is sent:- On alarm: sends the email when the event enters alarm state;
- On alarm acknowledge: sends the email when the alarm is acknowledged;
- On release: sends the email when the event is released;
- On release acknowledge: sends the email when the release is acknowledged.
Sender: allows the user to select the email account used to send the notification.Recipient group: allows the user to select the recipient group configured in the Email Address Book of the System object.The editor also allows the user to import or export the configured events, so they can be reused in other projects.
Log access and consultation
Admin users can view the logs generated by the system.
To allow a non-Admin user to view the logs, it is necessary to enable access from the Groups and users editor.
From the System object, open the Groups and users property, select the desired user and enable the Log access parameter.
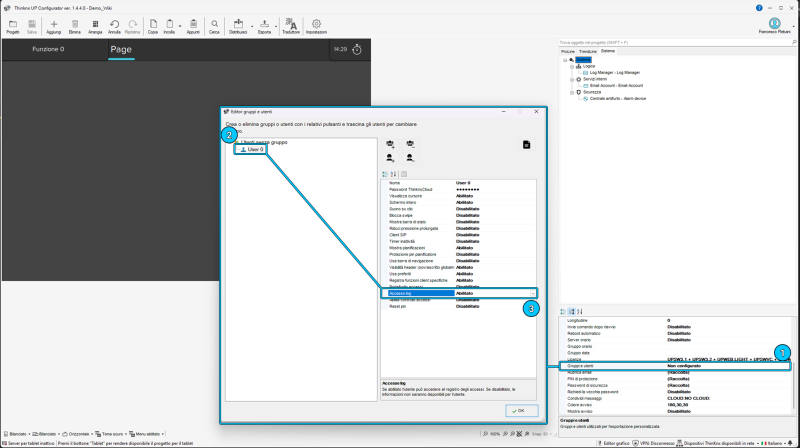
The required parameter is:
- Log access: if enabled, the user can access the log list. If disabled, the log information will not be available to the user.
Using the Log Manager from Client
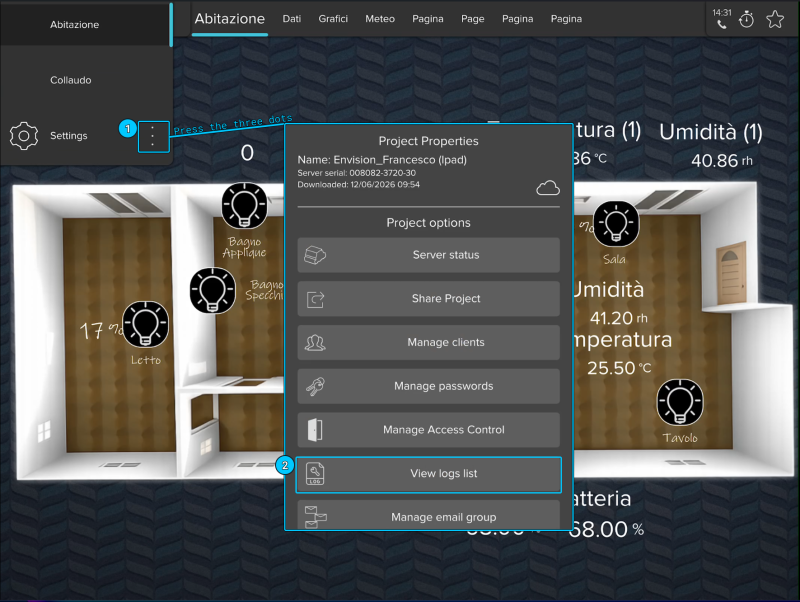
To use the Log Manager from Client, open the side menu and press the three dots in the settings section.
The Project properties window will open. From this window, press the Open logs list button.
The Logs list window shows the events recorded by the system and allows the user to view, filter and manage them.
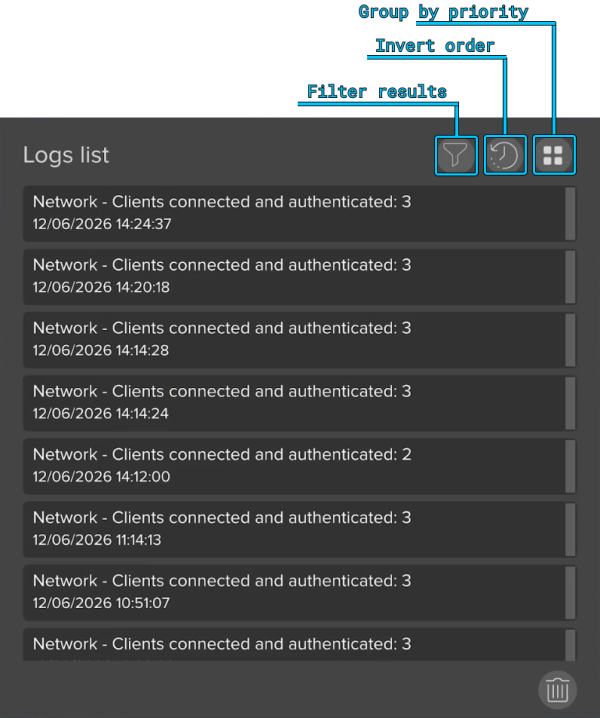
The main commands are available in the upper part of the window:
- Filter results: allows the user to filter the displayed logs according to the available categories.
- Group by priority: allows the user to group logs according to the event priority.
- Invert: reorders the logs from oldest to newest or vice versa.
Logs can also be identified by the status of the icon associated with the event:
- Yellow: alarm to be acknowledged.
- Red: alarm acknowledged but not released.
- Green: alarm acknowledged and released.
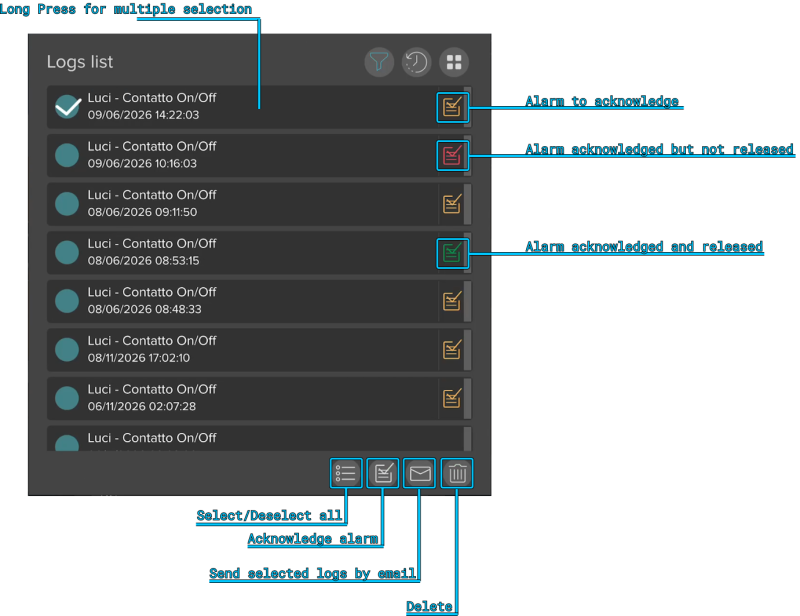
Additional commands are available in the lower part of the window:
- Select/Deselect all: allows the user to select or deselect all logs in the list.
- Acknowledge alarm: allows the user to acknowledge the selected alarm.
- Send selected emails: allows the user to send the selected logs by email.
- Delete: allows the user to delete the selected logs.
By pressing an event in the list, it is possible to open the log details.
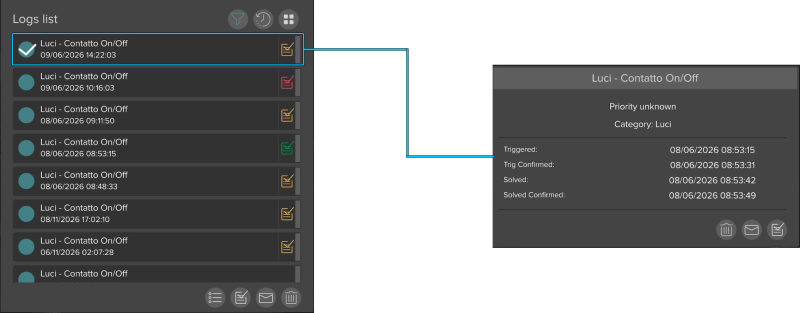
The detail window shows the main information of the event, including category, priority, detection date, alarm acknowledgement and alarm release.
From this window, it is also possible to perform quick actions, such as deleting the log, sending it by email or acknowledging the event.
Sending logs by email
When the email sending function is used, a dedicated window opens and allows the user to configure the message to be sent.
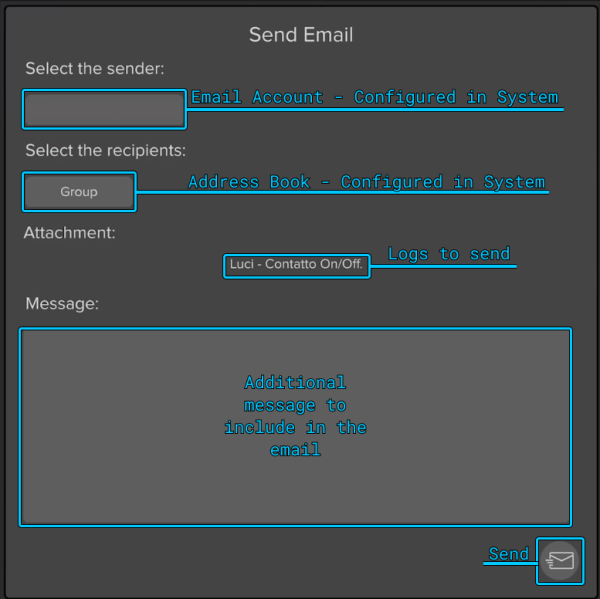
The available fields are:
- Email Account: sender email account, configured in the System object.
- Email Address Book Group: recipient group configured in the Email Address Book of the System object.
- Logs to send: selected logs to be included in the email.
- Message: additional text to be included in the email body.
Press Send to send the email to the selected recipients.


