This is an old revision of the document!
Voip PBX & Doorcom

Every Thinknx server embeds a software VOIP telephony PBX. It is optimized for the VOIP functionalities between clients and for door communication. This object allows to configure the PBX (extensions, ring groups and door stations).
- PBX port This property allows to specify the PBX port if different from the default one (5060).
- Accounts PBX This property represents the list of extensions (clients) to be registered in the PBX.
- Ring groups This property represents the list of ring groups to be registered in the PBX. Ring groups allow to call more than one extension using a single number. The outdoor station can forward the call to several clients using a single number.
- Intercom devices This property represents the list of intercom devices to be registered in the PBX.
Adding PBX accounts
Click on the button displayed on the right to open the PBX users editor window, then click on ”Add” and adjust the properties in the grid:
- Extension This property allows to specify the extension number used by the client to join the PBX.
- Password This property allows to specify the password associated to the extension number.
Adding ring groups
Click on the button displayed on the right to open the ring groups editor window, then click on ”Add” and adjust the properties in the grid:
- Ring Group Number Number associated to this group in PBX. Group Numbers start from 9000
- Accounts PBX PBX accounts associated to this ring group
Adding intercom devices
Click on the button displayed on the right to open the intercom devices editor, click on ”Add” and adjust the properties in the grid:
- Device type It can be selected from the following list:
- 2N Elios IP
- Mobotix M24
- TCS gateway
- TCS Native
- Generic IP doorstation
Username web This property corresponds to on of the login parameters of intercom management web page.Password web This property corresponds to on of the login parameters of intercom management web page.Username PBX This property corresponds to the extension used by the intercom to register in the PBX; it is automatically generated and it cannot be edited. For devices the numeration starts from 901.IP address Outdoor station address.Port Outdoor station port.Intercom buttons This property allows to configure the intercom button panel, associating to each button the extension or ring group to be called. Click on the button displayed on the right to open the intercom buttons editor, click on ”Add” and adjust the properties in the grid:- Label: Label associated to the button in the configurator.
- Button number: This property represents the button number on the panel.
- Call single user: If enabled, the call is sent to a single user when the button is pressed. If disabled, the call is sent to a ring group.
- Ring Group PBX: Ring group associated to this button.
Integration example: 2N Helios IP
The Helios IP Verso SIP Door Station is an SIP Door Station solution with an integrated video camera for monitoring door activity. Here follows settings to apply to the 2N Helios door station to work properly with Thinknx PBX. It applies to 2N firmware version 2.10.0 (2015). The following features are supported:
- Paging: When the call button is pressed on the door station, it will call all appropriate clients based on the settings of the ring group called.
- 2Way audio call: the user at the client station can converse with the person outside the door
- Video monitoring: the camera in the door station can be accessed by the client to view the caller and the outside area
- Relay/Door strike actuation from the server: the internal relays can be actuated from Thinknx client/server provided that the needed license inside the 2N (http API) is enabled
Preliminary Requirements
The 2N Helio IP door station has to be connected to the ethernet using a CAT5 cable and it has to be in the same network to which Thinknx server is attached. Also the clients have to be connected to the same network. Special network configuration is possible using the needed routing/firewalling devices.
Voip PBX setup
Add the Voip PBX object and configure as follow:
- Add several users into the “Accounts PBX” tab
- Add an intercom into the “Intercom devices” and set it as generic intercom. A number will be shown. That is the ID of the intercom (extension number). The password for the registration to the PBX is identical to that number (user 901/pass 901)
- Add a ring group and select the users you want to call with that ring group. A number will be shown. That number is the extension associated to that ring group (9001). Calling that number will canuse all the associated users to ring.
2N Helios IP setup
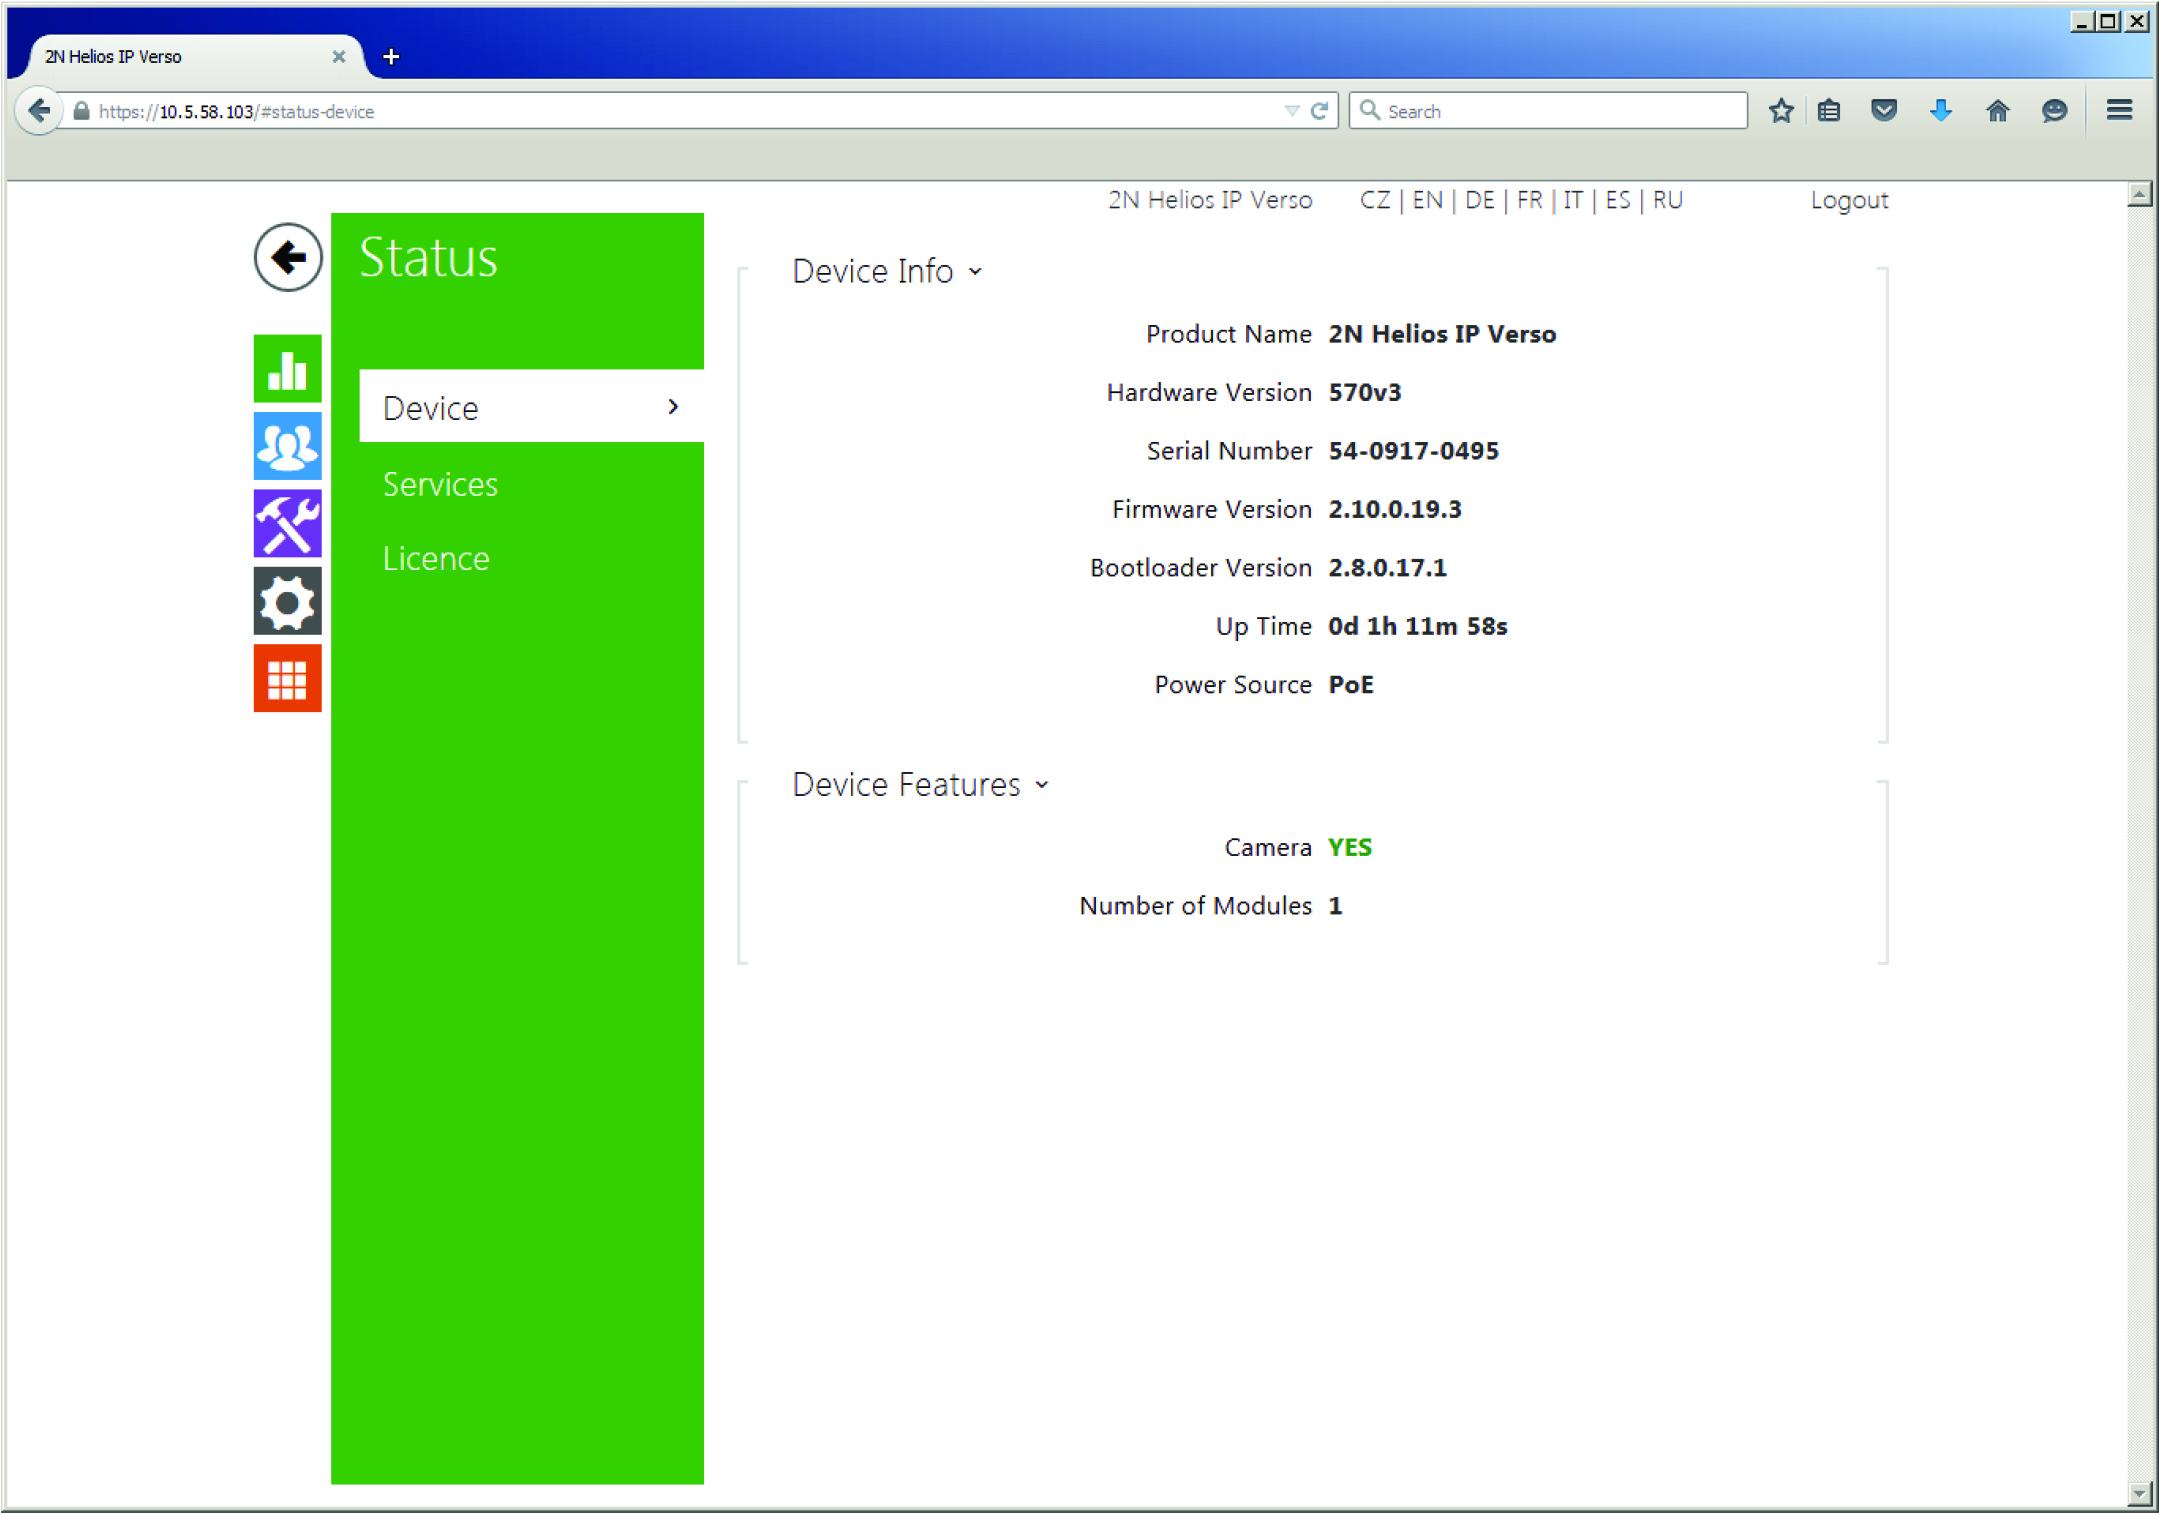
Enter the IP Address of the door station into a Web Browser. You will be taken to the login page for the Door Station. Log in to the Door Station. By default, the user name is Admin and the password is 2n. You will be taken to the Configuration Utility:

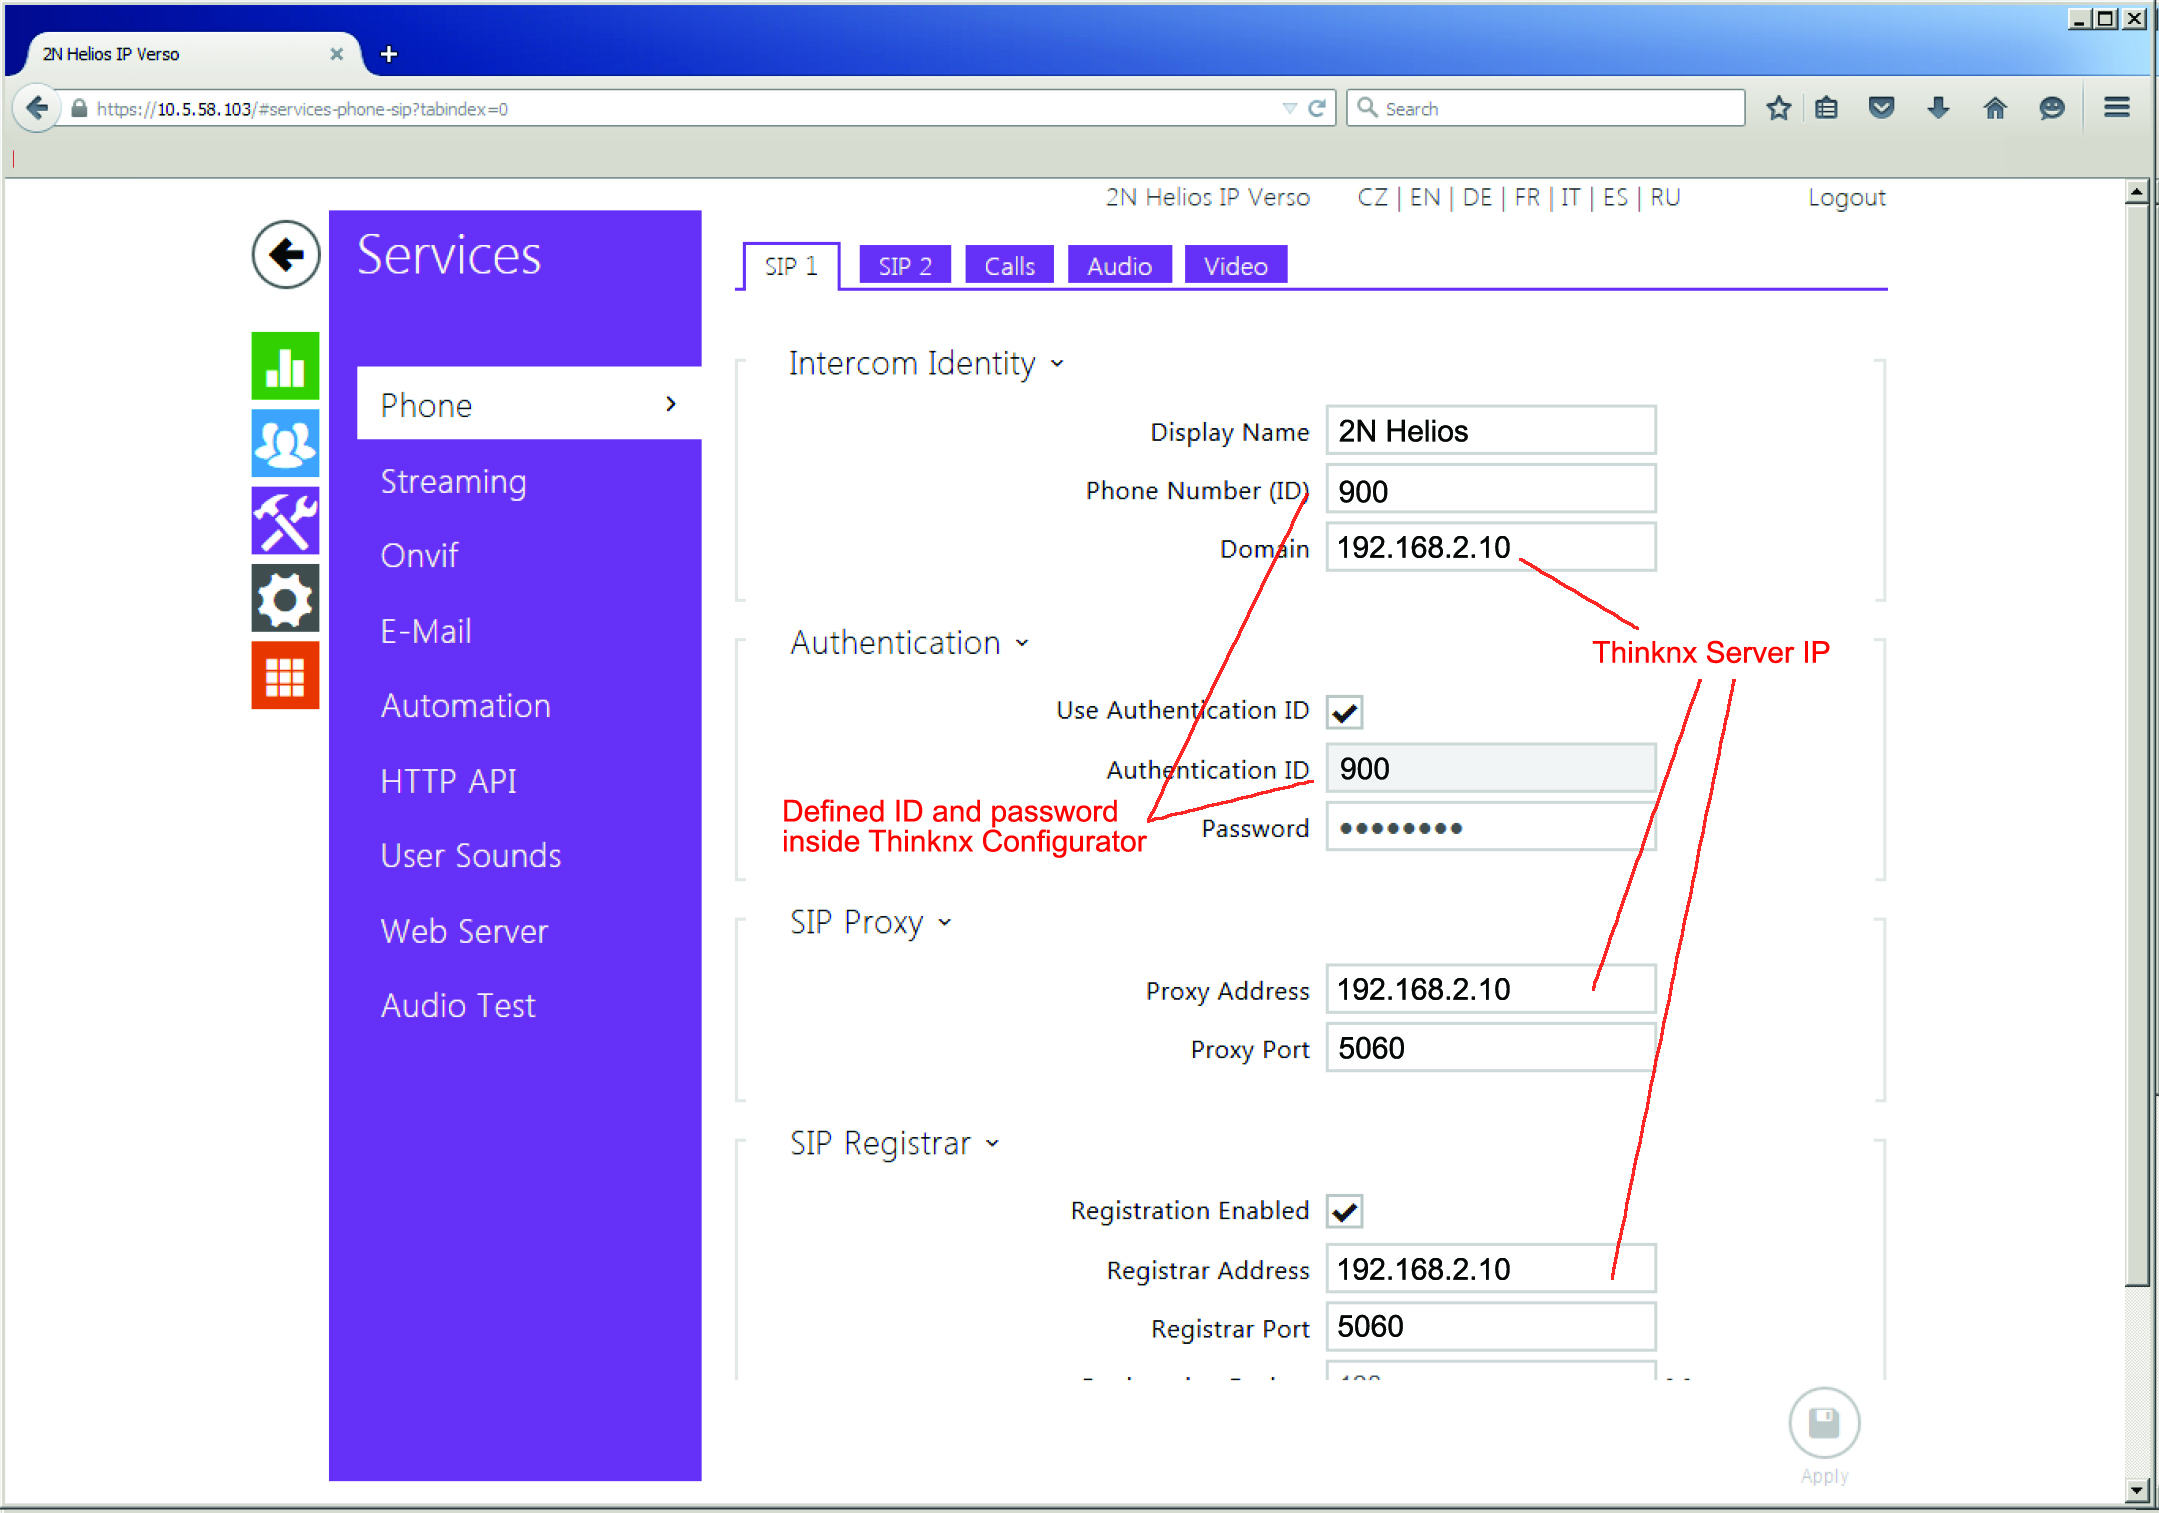
Select the “Services” Icon on the left to access the Services screen. Then select the Phone option:

On the SIP 1 Tab→ Intercom Identity
- Set the Phone Number. This is actually the “ID” with which the device will populate in the Thinknx SIP server (901)
- Set the Domain to the IP Address of Thinknx server
On the SIP 1 Tab→ Authentication
- Check the Use Authentication ID box
- Set the Authentication ID to the ID of the device inside the Thinknx SIP server (901)
- Set the Password with the same number of the ID (901)
On the SIP 1 Tab→ SIP Proxy
- Set the Proxy Address to the IP Address of Thinknx server
- Ensure the Proxy Port is set to 5060
On the SIP 1 Tab→ SIP Registrar
- Check the Registration Enabled box
- Set the Registrar Address to the IP Address of Thinknx server
- Ensure the Registrar Port is set to 5060
- Leave the Registration Expires time set to default
On the Audio Tab
- Uncheck G.722
- Make G.711 (PCMU) the first choice
On the HTTP API option:
- Select “No authentication” for the camera image service
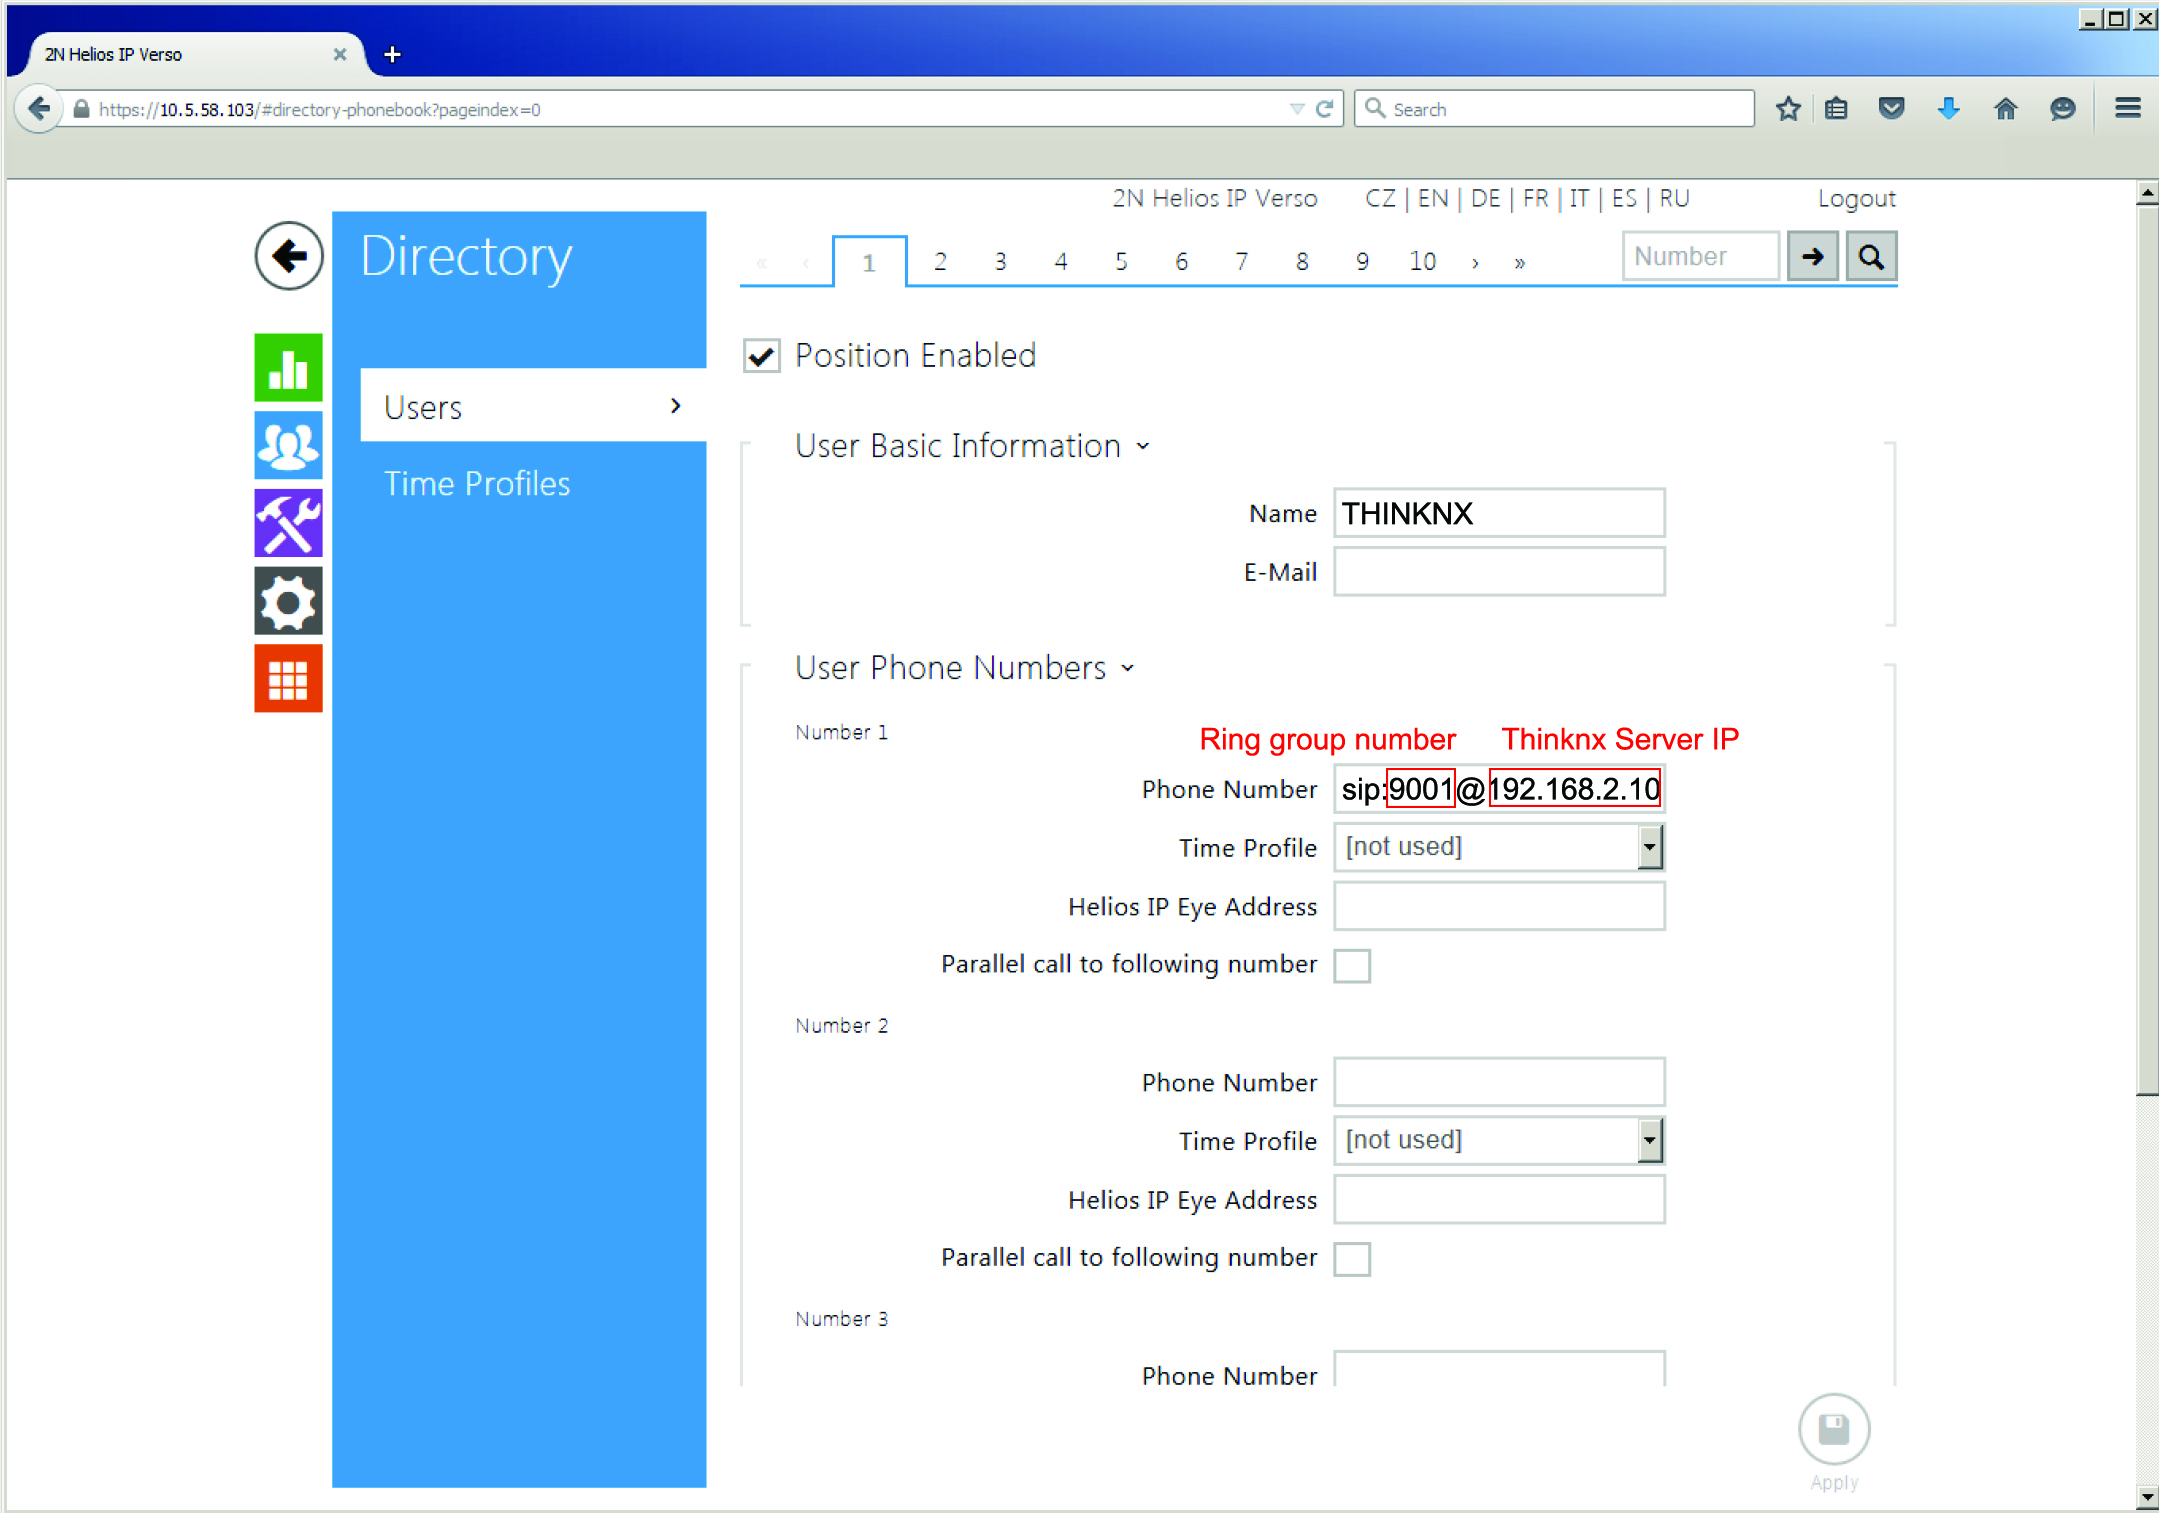
Select the “Directory” Icon on the left to access the Users screen

On the User 1 (button 1) tab:
- Check the “Position Enabled” box
- Under User Basic Information→ Name, type any name you like. The E-Mail field may be left blank
- Under User Phone Numbers→ Number 1→ Phone Number type sip:9001@x.x.x.x, where “x.x.x.x” is the IP Address of the Thinknx Server and 9001 is the extension number to call (ring group in this case).
- All other fields on this screen may be left blank
To be able to see the images coming from the device you need to add a Camera inside Thinknx UI and configure to grab images using the following parameters:
- Type: Generic Camera
- Use RTSP : Disabled
- Image Path : api/camera/snapshot?width=640&height=480
- Fill the other fields like IP addresses and credentials as for any other normal camera.
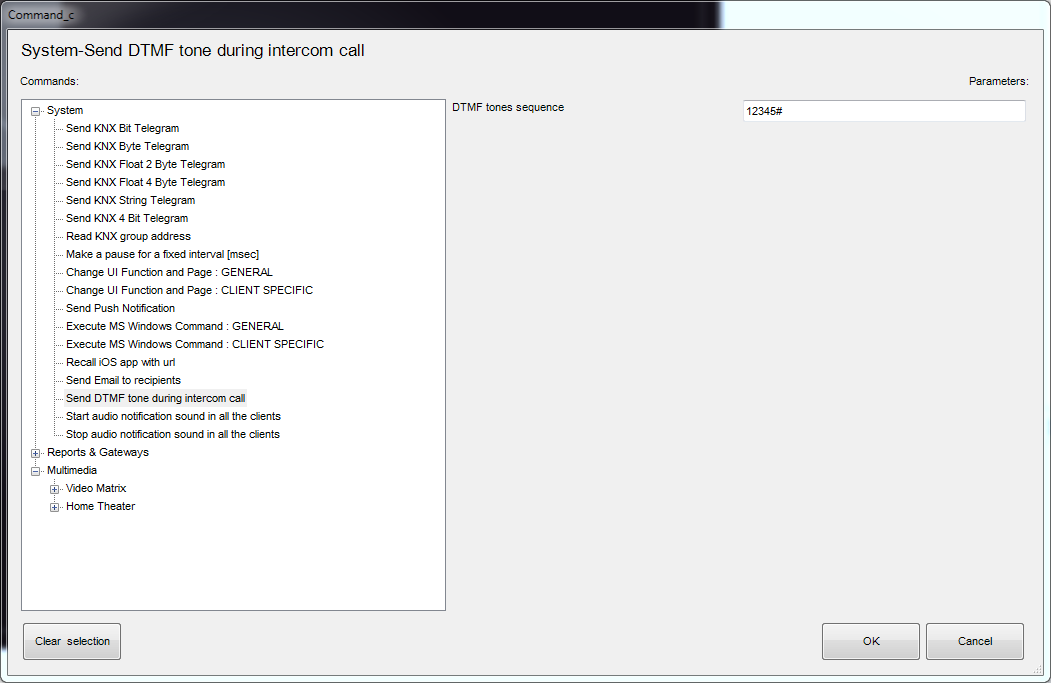
To be able to open the Lock connected to the 2N device you have two options: to send DTMF tones during conversation or to send html GET messages to the device. If you want to use DTMF tones, it will be enough to create a Generic Buttom into the UI and select as action the generation of DTMF tone as in the following picture. DTMF code must be the same inserted into the 2N configuration page followed by # (in the example 1234#).
If you prefer to use html GET solution, you need to use the Thinknx Ethernet Gateway plugin and configure a Generic Button to perform an action with the following parameters:
- Command: Make http GET call to a specified url with username and password
- URL : http://IP_of_2N_DEVICE/api/switch/ctrl?switch=1&action=on
- Username : username used to authenticate with 2N station
- Password : password used to authenticate with 2N station
This method require additional licenses from 2N to enable the Switch API. The API should be available on HTTP also (Not HTTPS only).
Integration example: Doorbird D10x, D20x
The DoorBird D10x and D20x Door Stations are SIP Door Station solution with an integrated video camera for monitoring door activity.
For proper connection of Doorbird door stations to Thinknx server, refer to the step-by-step user guide created by Doorbird wich can be found on their website, or follow the instructions below.The following features are supported:
- Paging: When the call button is pressed on the door station, it will call all appropriate clients based on the settings of the ring group called.
- 2Way audio call: the user at the client station can converse with the person outside the door
- Video monitoring: the camera in the door station can be accessed by the client to view the caller and the outside area
- Relay/Door strike actuation from the server: the internal relays can be actuated from Thinknx client/server or from KNX
Preliminary Requirements
The DoorBird door station has to be connected in the same network to which Thinknx server is attached. Also the clients have to be connected to the same network. Special network configuration is possible using the needed routing/firewalling devices.
Voip PBX setup
Add the Voip PBX object and configure as follow:
- Add several users into the “Accounts PBX” tab
- Add an intercom into the “Intercom devices” and set it as generic intercom. A number will be shown. That is the ID of the intercom (extension number). The password for the registration to the PBX is identical to that number (user 901/pass 901)
- Add a ring group and select the users you want to call with that ring group. A number will be shown. That number is the extension associated to that ring group (9001). Calling that number will canuse all the associated users to ring.
Doorbird setup
Enter the following url into a web browser to configure the SIP part of the doorbird device:
http://x.x.x.x/bha-api/sip.html
where x.x.x.x is the local ip of the Doorbird doorstation. To get the ip address, in case you don't know it, you can use the utility reachable from the following address: http://www.doorbird.com/checkonline and inserting the required data.
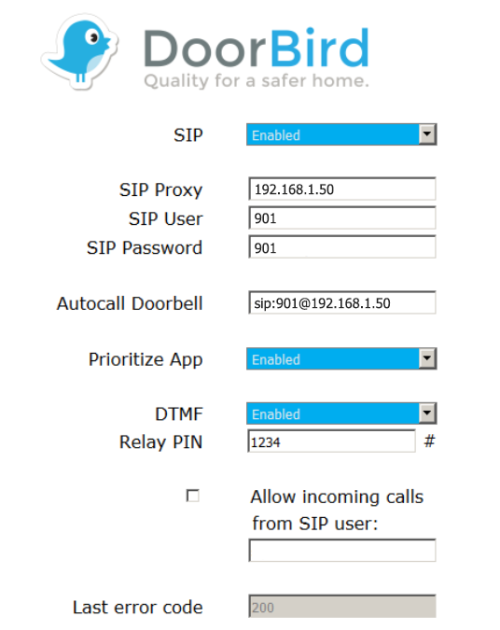
Referring to the image:
- Set SIP to enabled
- Set SIP Proxe to the IP Address of Thinknx server
- Set the SIP User to the ID of the device inside the Thinknx SIP server (901)
- Set the SIP Password with the same number of the ID (901)
- Set the Autocall doorbell as sip:9001@x.x.x.x, where “x.x.x.x” is the IP Address of the Thinknx Server and 9001 is the extension number to call (ring group in this case).
- Set DTMF to enabled to be able to open the lock using DTMF codes
The same procedure can be done using the DoorBird app into the dedicated SIP configuration section.
To be able to see the images coming from the device you need to add a Camera inside Thinknx UI and configure to grab images using the following parameters:
- Type: Generic Camera
- Use RTSP : Disabled
- Image Path : bha-api/image.cgi
- Fill the other fields like IP addresses and credentials as for any other normal camera.
To be able to open the Lock connected to the Doorbird device you have two options: to send DTMF tones during conversation or to send html GET messages to the device. If you wnat to use DTMF tones, it will be enough to create a Generic Buttom into the UI and select as action the generation of DTMF tone as in the following picture. DTMF code must be the same inserted into the Doorbird configuration page followed by # (in the example 1234#).

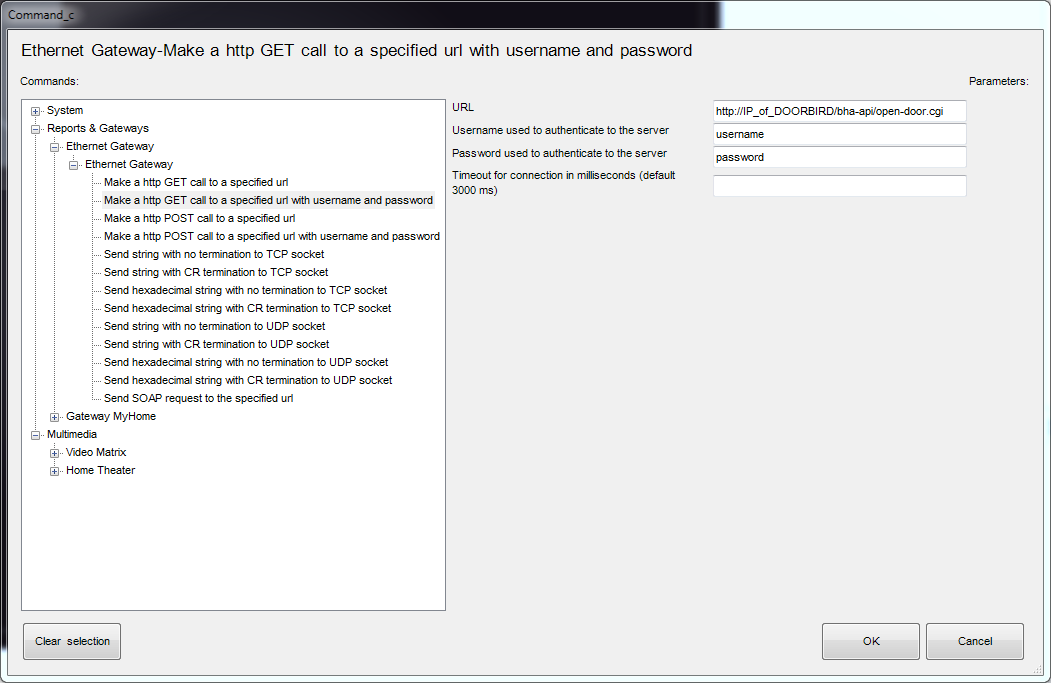
If you prefer to use html GET solution, you need to use the Thinknx Ethernet Gateway plugin and configure a Generic Button to perform an action with the following parameters:
- Command: Make http GET call to a specified url with username and password
- URL : http://IP_of_DOORBIRD/bha-api/open-door.cgi
- Username : username used to authenticate with Doorbird station
- Password : password used to authenticate with Doorbird station


- pbx_doorcom.1552304700.txt.gz
- Last modified: 2019/03/20 17:03
- (external edit)