Table of Contents
ViaVai Access Control
-
Solution Overview
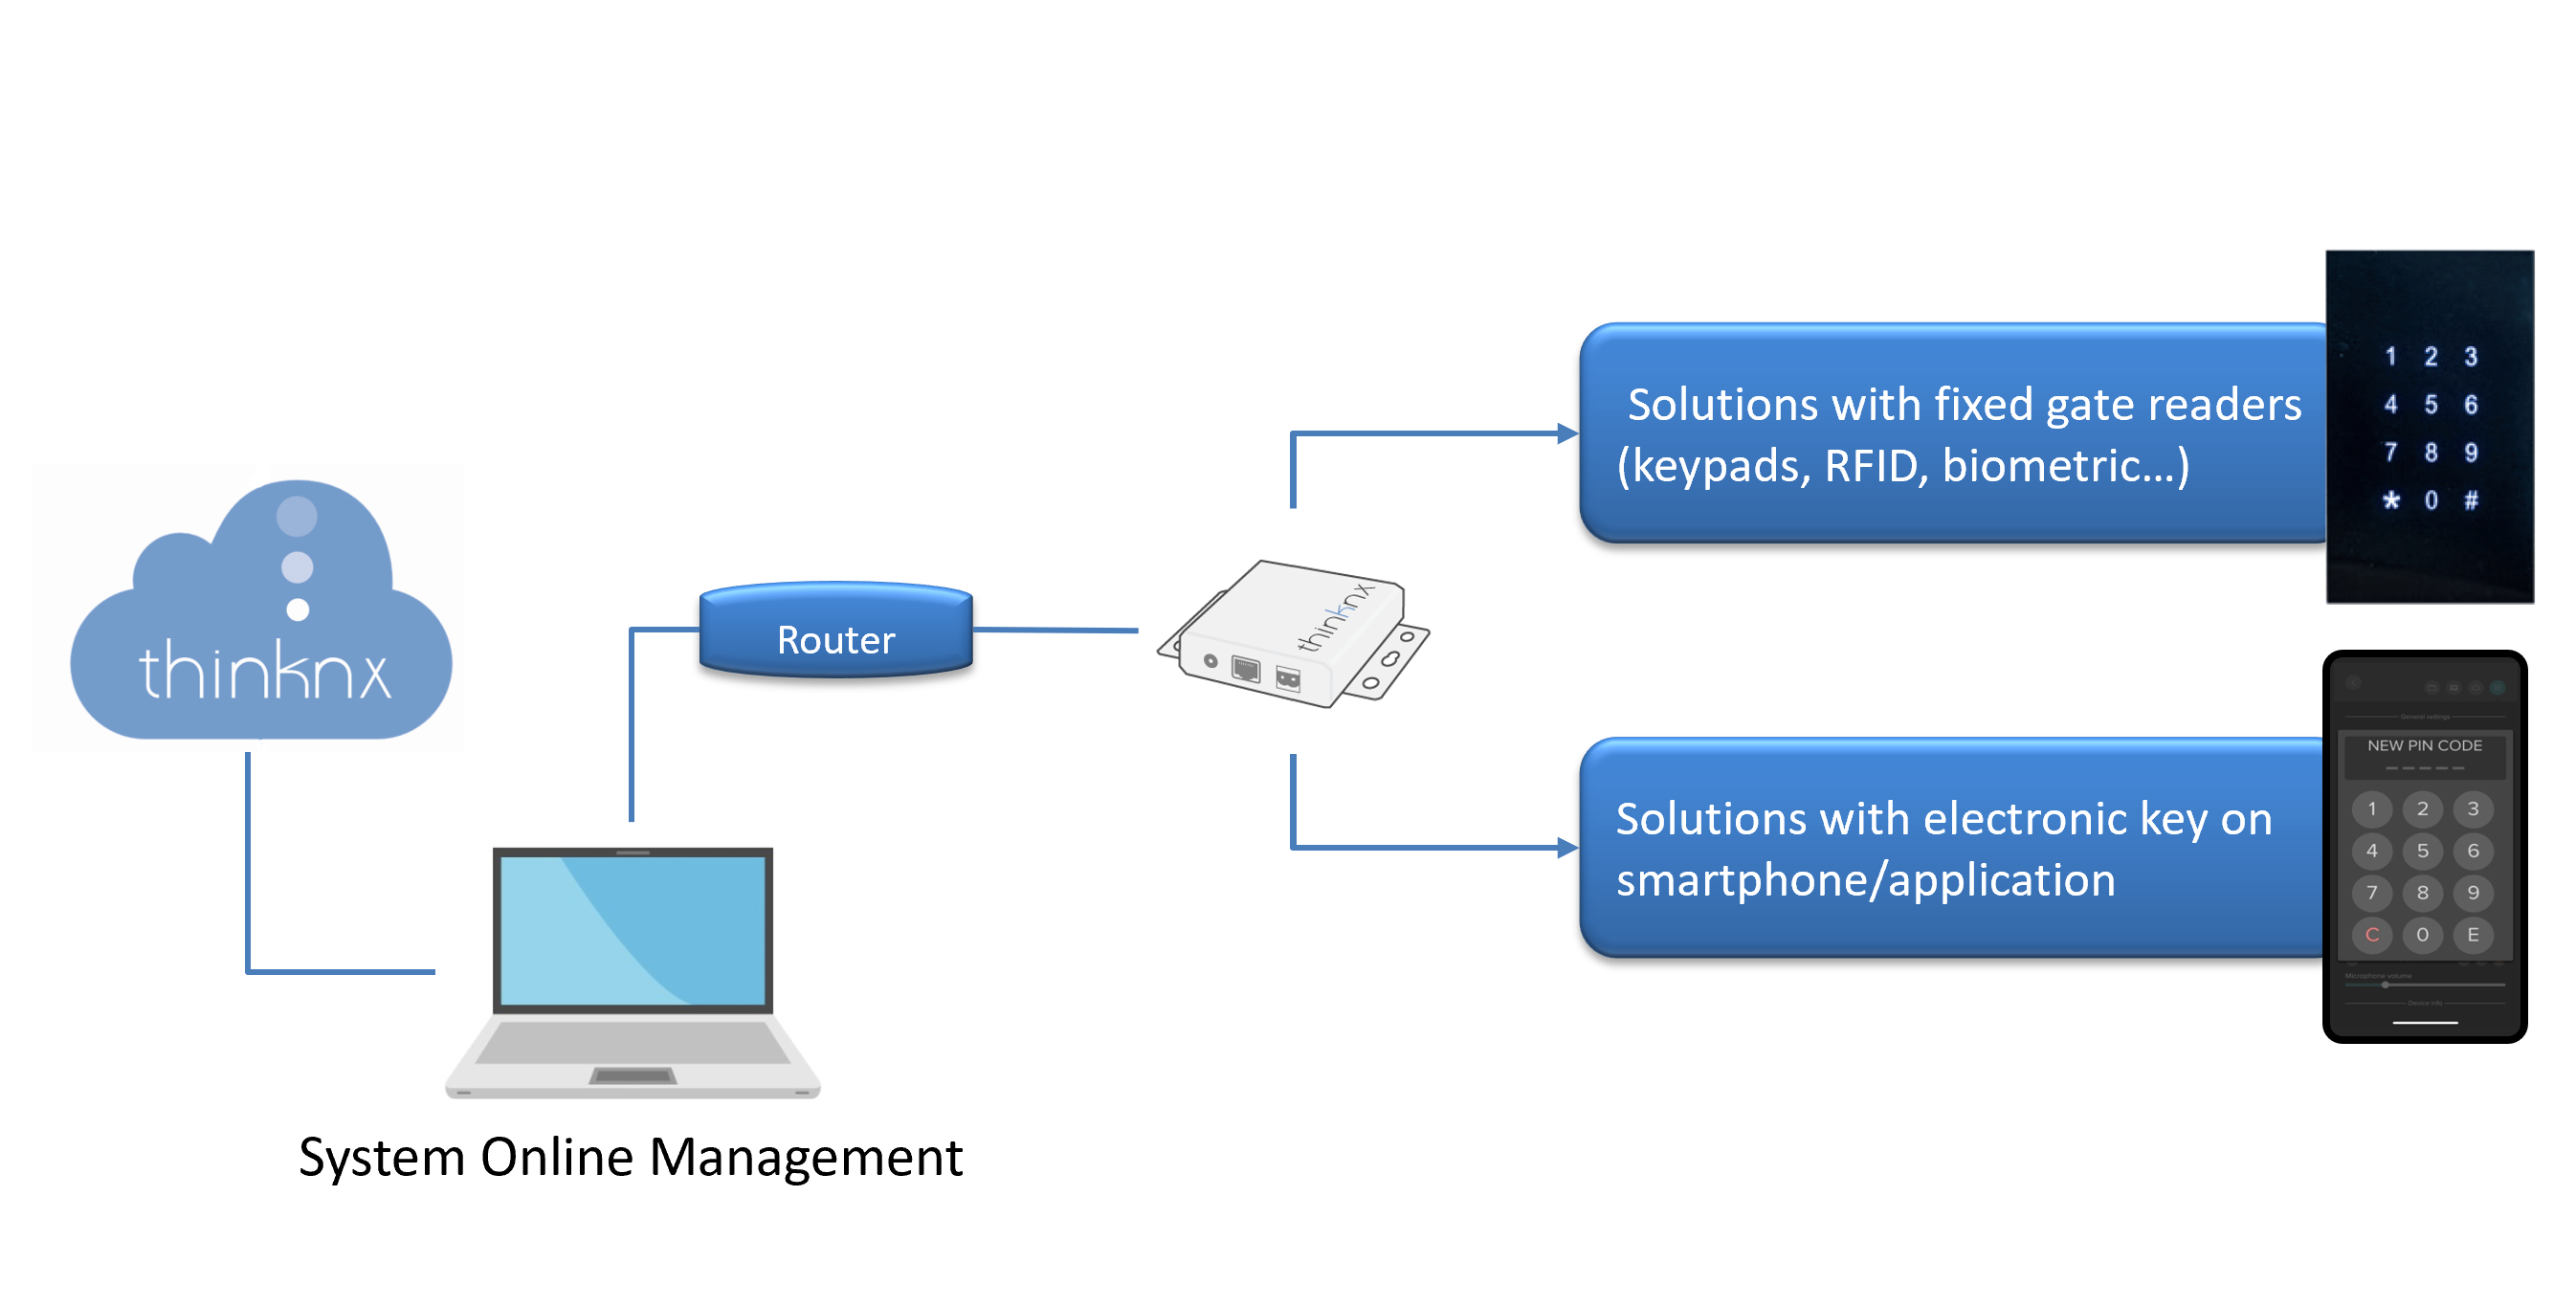
The Thinknx Access Control object permits to enhance the level of automation and security of the home/building where it is applied. It can be adapted to sectors where long term expirations are required such as service and industry sectors, but also applies to the hospitality sector where credentials are usually short term, and remote management is required.

Figure 1: Access Control Usability
The Access Control object can communicate directly with the KNX system through Thinknx server, making the integration very easy and flexible. Any standard KNX keypad can be used as an access keypad, and its buttons as code entries. Once the code is inserted, it is possible to operate a lock or switch on a KNX actuator. In addition, communication with Wiegand technology is possible through the Thinknx-Wiegand adapter, making it possible to install a suitable RFID or biometric reader.
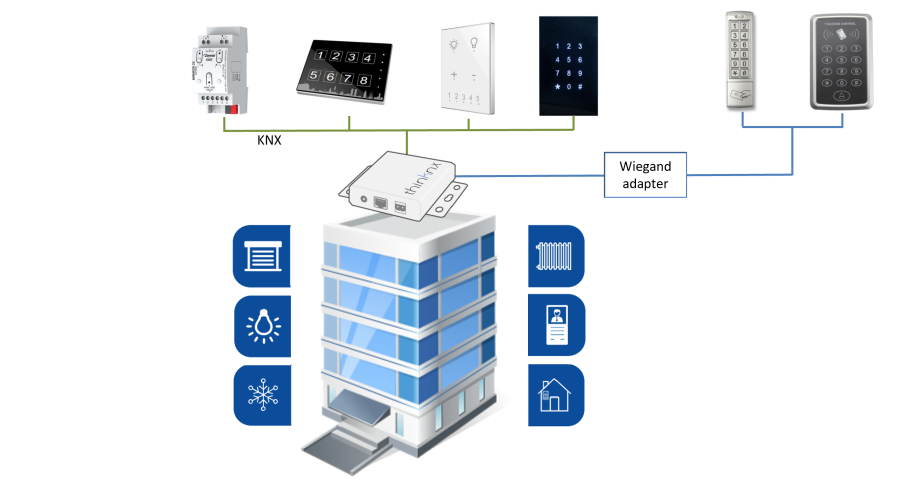
Figure 2: Access Control Diagram
Configuration & Features
To facilitate the work of end users and adminitrators and still be able to cover complex situations, Thinknx Access Control is configured in two different phases and with two different tools:
- Phase 1: Thinknx Configurator The installer and system integrator will use Thinknx Configurator to completely define the topology of the system, creating and configuring readers, areas and roles, and creating interactions between KNX and other integrated systems. More details in section Phase 1: Thinknx Configurator.
- Phase 2: Management The manager, who is most likely available on site, will focus on the everyday management tasks such as creating users and associating them with predefined roles, create calendars and time-based restrictions, add or delete access codes, view logs and movements, control area occupancy and much more. The manager will not have access to the Thinknx Configurator project, but will use a dedicated web page or Thinknx application. More details in section Phase 2: Management.
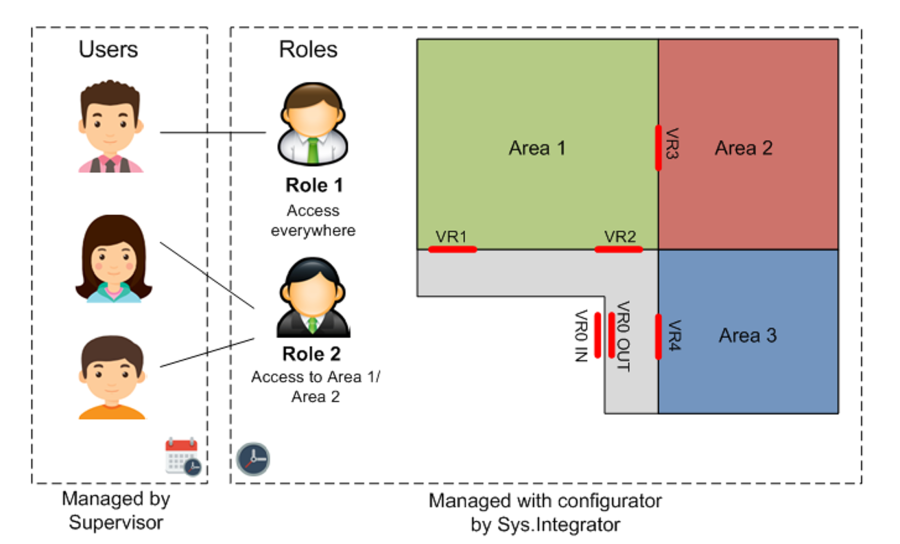
Figure 3: Access Control Structure
Some of the most important features available within the Access Control:
- Possibility to create Areas as parts of the building, limited by one or more gates with readers. Rights will be granted per area.
- Possibility to define for each area Entry Gates and Exit Gates, which can lead to fully count the number of persons inside the area, or for timekeeping operations.
- Possibility to create different Roles, with predefined privileges to access specific building areas. Any new user shall be assigned to a preconfigured role and will receive the same access rules as this role.
- Possibility to define multiple levels of time-based authorizations (per area, per single gate, or per single user).
- Possibility to generate electronic codes to operate the gates and transfer them using QR codes.
- Possibility to define automatic expirations for user authorizations.
- Automatic update of all gates when settings are modified.
- Possibility to log all movements and save them inside the database or send them automatically as reports.
Phase 1: Thinknx Configurator
In the Thinknx Configurator software, open the project and add the Access Control object in the System tab. The below parameters are available for this object:
- Label Text to identify the object
- Code length Number of digits inside the access codes. All codes should have the same number of digits. If length of codes is 6, a valid code will be 123456.
- Code numbers Numbers contained inside the code, starting from 0. This depends on the number of buttons in keypads. If code numbers is 5, codes can contain the numbers 0,1,2,3,4.
- Zero included Permits to choose if zero (0) should be part of the code or not. If code number is 3, and zero is included, the numbers used inside the code are 0,1,2. If zero is not included, the numbers are 1,2,3.
- Confirm time (ms) Maximum time between two consecutive keypress. Once the confirm time has been exceeded, the start of a new code will considered on keypress. This time is useful to start a new sequence if a mistake has been made when entering the code.
- Guard wrong codes if enabled, it is possible to monitor wrong codes attempts, and generate events once a threshold has been reached.
- Number of attempts Maximum number of attempts with wrong codes allowed before triggering an event if tried within a certain guard time.
- attempts interval (s) duration in seconds used to count the number of wrong code attempts before triggering the event. If the number of wrong attempts exceeds the number of attempts set previously during the attempt interval, then the event for wrong codes will be fired.
Keypad prototypes
Collection of prototypes used for the installed keypads. To add and configure a prototype, click on the small button to the right to access the prototype creator window. For each added prototype, the following properties are available:
- Name label of the prototype used.
- Technology technology used for the created protoype. The available options are:
- Doory (Blumotix)
- Generic KNX
- Generic Wiegand coming soon
- Wiegand over network coming soon
If “Generic KNX” was selected as Technology, the below parameters are available:
- KNX Data Type Data type used on the KNX buttons to send the access code digits. Each button can be configured to send a 1bit object to a different KNX group, or send a certain value on a 1byte object corresponding to the digit on the same KNX group.
- Delete Key if enabled, this option will delete the inserted sequence and start a new one before the “confirm time” expiration.
- Confirm tone if enabled, the system will generate an event “confirm tone” in case of successful attempt.
- Keys only visible if KNX Data Type is DPT 1 (bit). This parameter holds the keys collection used to enter a code. Clicking on the small right button will open the Keys Manager. From there, it is possible to configure every single key. Each key has a name, key type and a group address.
- KNX group for keys only visible if KNX Data Type is DPT 5 (Unsigned byte). It holds the group address used on the keypad to sen the different code digits. A telegram with value 4 means that button 4 has been pressed on the keypad.
Keypads
This parameter holds the collection of keypads used and installed on the plant. At least one keypad protocol must be created prior adding the keypads. Clicking on the small button to the right will open the Keypads Manager. Each added keypad will have the following parameters:
- Name device label
- Prototype communication prototype used for this device. A prototype must be created in Keypads Prototype in order to view it in the list here.
- KNX physical address physical address of the device.
- KNX group for code enabled only visible if keypad has Doory (Blumotix) as prototype KNX group used by keypad to signal that the code is enabled (1 bit data type).
- KNX group for storing/deleting codes only visible if keypad has Doory (Blumotix) as prototype KNX group to store and delete codes from the keypad (10 bytes data type).
- KNX group for erase request only visible if keypad has Doory (Blumotix) as prototype KNX group to erase codes from the keypad (1 bit data type).
- Command if fail command to execute in case of failed entry attempt.
- Command if success command to execute in case of successful entry.
- command for tone only visible if keypad has Doory (Blumotix) as prototype command to execute to play tone.
Areas
This parameter holds the collection of all the areas (rooms or part of the building) limited by one or more access control keypads. By clicking on the small button to the right, the Area Manager is accessible. Each added area will have the following parameters:
- Name label of the area.
- Entrance doors allows you to select the checkers that are used on site to enter this specific area. The checkers should be created first in the Keypads collection.
- Dual flow id disabled, the entrance checkers will be considered for both entrance and exit. If enabled, it means the area has different doors/checkers for entrance and exit. It permits to distinguish entrance and exit events and eventually count the people inside the area.
- Exit doors only visible if Dual flow is enabled. allows you to select the checkers that are used on site to exit this specific area. The checkers should be created first in the Keypads collection.
- Count persons only visible if Dual flow is enabled. If enabled, the system will count the number of persons inside the area based on the entrance and exit events.
- Success enter command Command to execute in case of successful entrance event.
- Success exit command Command to execute in case of successful exit event.
- Nobody command only visit if Count persons is enabled. Command to execute in case nobody is in the area.
- Somebody command only visible if Count persons is enabled. Command to execute in case somebody enters the area first.
- KNX group force closed KNX group (1 bit DPT1) to force all doors/checkers to refuse any code.
- KNX group force open KNX group (1 bit DPT1) to force all doors/checkers to accept any code.
- KNX group valid enter KNX gorup (1bit DPT1) to signal a valid entrance into the area.
- KNX group valide exit KNX group (1bit DPT1) to signal a valid exit from the area.
- KNX group someone inside only visit if Count persons is enabled. KNX group (1bit DPT1) to signal somebody is inside the area.
- KNX group nobody inside only visit if Count persons is enabled. KNX group (1bit DPT1) to signal that nobody is inside the area.
- KNX group n.persons KNX group (2byte unsigned integer - DPT7) to signal the number of persons in the area.
Roles
This parameter holds the collection of roles created inside the project. Users on site can be assigned a role with predefined privileges to access specific building areas. Clicking on the small button to the right will open the Roles Manager. Each added role will have the following parameters:
- Name Role name
- Permitted areas permits to select the allowed areas for the role created. The list will show areas created in the “Areas” parameter.
Phase 2: Management
Once the Thinknx project has been uploaded to the server, codes shall be generated by the Manager when needed using the server's web page.
- After logging in, go to Server–> Access Control.
- Under “Codes generation”, add a description for the new code.
- Click on “Generate new code” to view the new code.
- Assign a role to this code. The list will show all the roles added inside the project.
- Configure a time range for this code's validity.
- Save the code. A new entry will show in the table above with the added information. The admin will be able to edit this entry or delete it altogether.
To allow direct access to the Access Control page, the Manager can use the link below, making sure to fill the proper IP address and password for the server: http://localhost:5051/login.html?login=login&direct_login&username=service&password=password&redirect=access_control_s.html
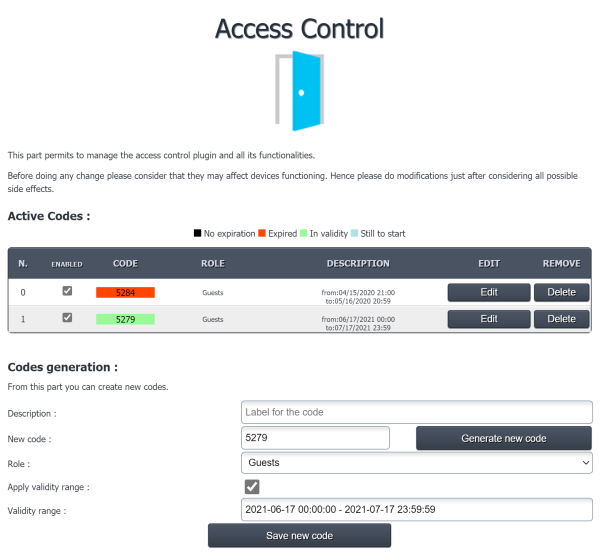
Figure 4: Access Control Webpage
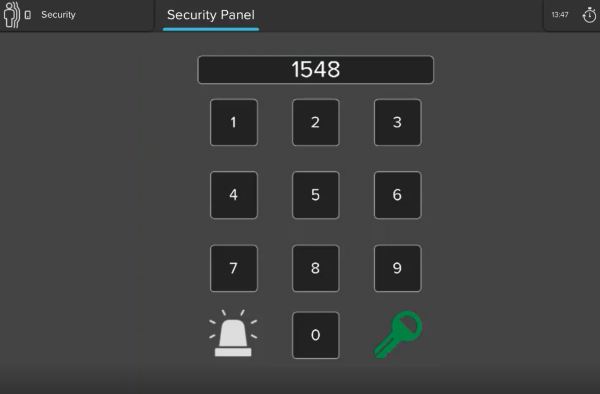
Application 1: Virtual Keypad
This application does not require any additional hardware to be installed on site. With the Access Control module configured inside the Configurator, the integrator will be able to provide the user with an extra level of security for certain scenarios or logic functions.
Click on the button below to get a sample of the project that contains the virtual keypad:
- Provides the user with a virtual keypad inside the project (no need to have a KNX keypad installed on site).
- Allows the user to launch specific events only when the correct code has been entered within the allowed time schedule.
- Monitors the number of wrong code attempts, and triggers an event in case the code failed.
- Can be used to launch critical logic functions or scenarios.
Application 2: Offices
- KNX keypads with multiple buttons should be installed on each secured area.
- Door locks of all secured areas should be connected to KNX.
- Codes are generated by the server for the employees with a certain role in order to restrict access to certain areas.
- Possibility to assign a time schedule for each code generated.
- Possibility to count the number of persons inside an area.
- Possibility to force open/close an area.
- Possibility to monitor the number of wrong code attempts, and triggering an event in case the code failed.