Table of Contents
Project Management
A project can be defined as a folder containing all the configuration files related to a specific plant and all the settings needed to reconstruct user interface and system logics. New projects can be easily created directly using the Configurator software. Previously existing projects can be imported and edited (they can be renamed, optimised, deleted, etc).
Creating a project
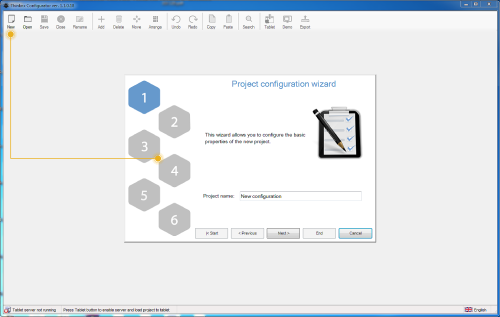
Projects can be created using a dedicated wizard tool, which will be automatically launched by clicking on the ”New” button in the toolbar above.
- Step 1 Enter the project name without spaces or diacritic signs (mandatory).
| Figure 3.1: New project button and wizard first step |
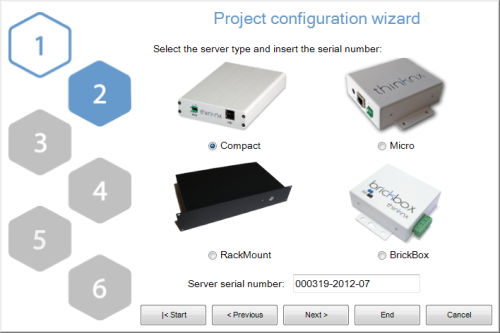
- Step 2 Select the server type (mandatory) and enter the device serial number (optional); go to the next phase by clicking on ”Next” or conclude the wizard by clicking on ”End”; all the following steps are optional .
| Figure 3.2: Step 2: server selection |
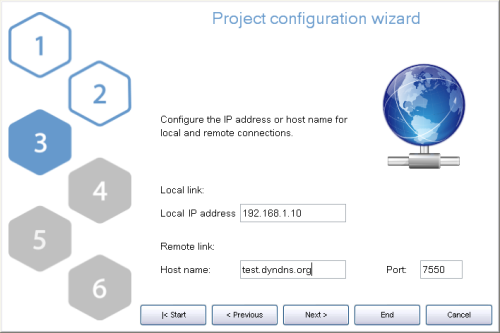
- Step 3 Enter IP address to connect to the server using the local network or host name and port (if different from the predefined one) to use remote connection.
| Figure 3.3: Step 3: connection settings |
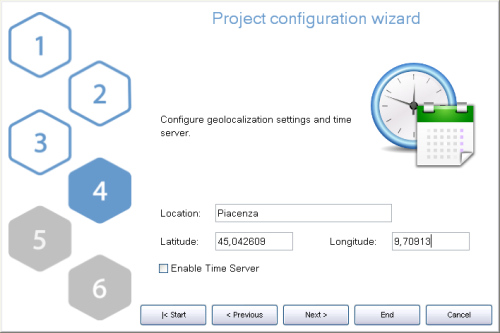
- Step 4 The name and even the geographic coordinates of the location where the server is installed should be typed in this section. These data will be used on clients when the geolocalization feature is active. These settings are mandatory if the sun calculator object is added to system. Check the box ”Enable Time Server” to use the server as time and date source for KNX devices. Server will synchronize with NTP time server if an internet connection is available.
| Figure 3.4: Step 4: server location settings |
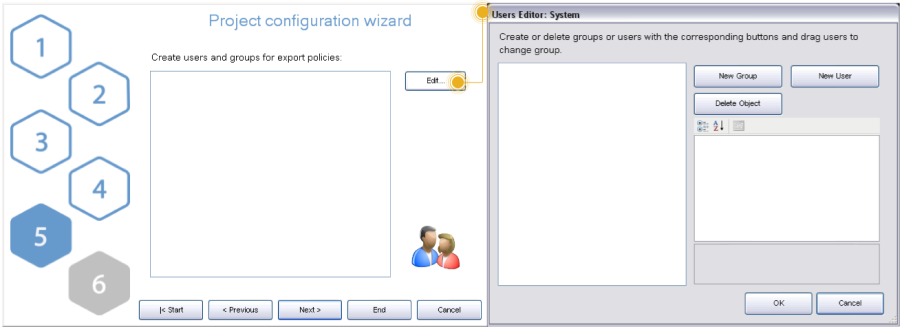
- Step 5 If the plant will be managed by different users and different user interfaces for each user has to be created than it is necessary to create users and groups to be used for export policies. It is possible clicking on the ”Edit” button to access the users editor window. For more details about users creation refer to section 3.1.4 .
| Figure 3.5: Step 5: users creation for restrictions |
Once all users and groups are set, a summary is displayed in the empty window. Click on “Next” to move to the next step.
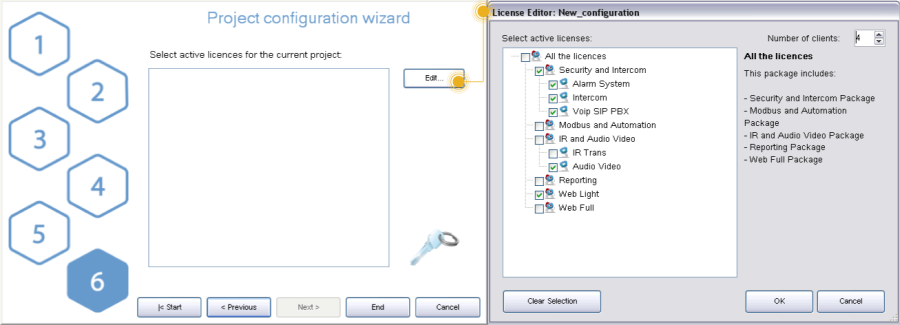
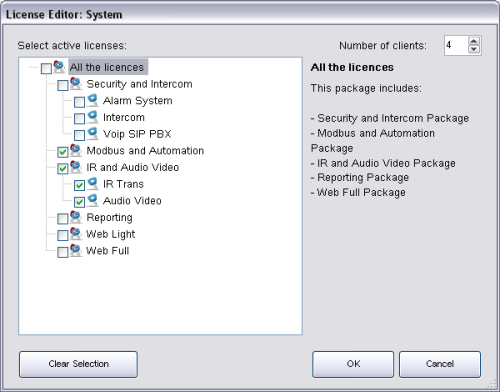
- Step 6 Selecting the active licences for the project permits that configurator checks while exporting whether objects and functions configured into the project will properly work once the project will be exported and uploaded on the server. In fact, if the project contains objects that are not included in licences purchased by the customer, they will not be working in the real installation.
| Figure 3.6: Step 6: project active licenses editor |
Click on “Edit” button to access the licences editor. Single licences, and packages can be selected in the licences editor window. For more details refer to section 2.1.3.
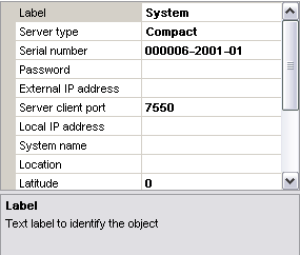
To adjust the information set included into the wizard at a later stage, select the “System” object in the Configurator system tree and all the object properties will be displayed in the property grid below.
Managing a project
After a project has been successfully created, it can be managed using various buttons displayed in the configurator upper toolbar.
| Figure 3.7: Project related buttons on configurator toolbar |
- Save Changes applied to the project will be saved.
- Close Current project will be closed, while the Configurator homepage stays open.
- Rename Current project name can be edited.
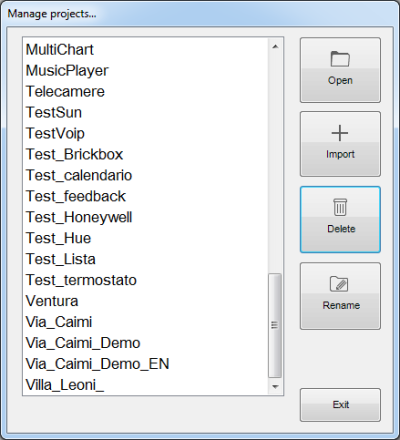
- Open By clicking on this button, the following window will be displayed:
| Figure 3.8 |
| Figure 4.9: Project management form |
Existing projects can be renamed, opened or deleted. Previously created files can be imported in the Configurator.
Cloud
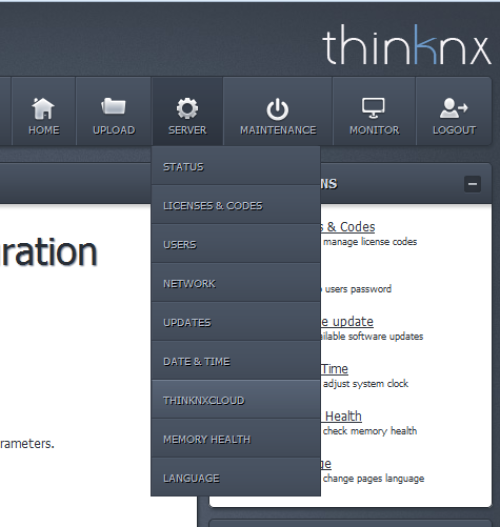
To enable the use of ThinKnxCloud, open the server web page, select Server menu item and then select ThinKnxCloud. In the cloud page, click “Enable ThinKnxCloud” button. A popup will appear to set the maintainer password for the cloud. After the user fills these fields and clicks on the Enable button, the server enables the Cloud features which means project upload and data storage. After the enabling procedure is completed, the status of the cloud must change to Enabled and the user can see how much storage space is using on the cloud.
System object properties to set
- Serial number: serial number of the ThinKnx server, it is mandatory to use all the cloud features
- ThinknxCloud: it must be enabled
- Password for ThinknxCloud: it must contain the maintainer password previously set in the server web page
- User’s ThinKnxCloud password: if the project requires the use of groups and users, each user configured must have a password associated to it. All the users passwords for the cloud must be different. To create the password, open the Authorizations property, select a user and fill the ThinKnxCloud password property with the password assigned to the user.
Uploading the project on ThinKnx Cloud
Once the cloud properties are set, to upload the project on the cloud, save the project, click on the Export button in the toolbar menu and select “Upload to the Cloud” menu item. All the clients versions of the project (one for each user) are uploaded to the ThinknxCloud server. If the project doesn’t contain any users, only the main version is uploaded. A popup indicating the progress of the upload will appear.
Downloading the project from ThinKnx Cloud
To download the project, open ThinKnx or ThinKnx Pocket app and open the Settings page. Select the Cloud tab and fill the two fields below with the server serial number and the cloud password. If the projects contains multiple user, to download a specific version of the project insert the password associated to the user otherwise use the maintainer password (the one created in the server web page). When the user taps the Download button, the download starts. Different icons indicates whether the project has been downloaded from the Configurator or from the ThinKnx Cloud. To simplify the download procedure from Cloud, the serial number will be displayed for each project under the project name.
Dynamic DNS configuration
In case a fixed public ip address is not available this service grants to access your server even out from the local network. To configure the server open the server webpage from local address:
http://<server_ip_address>:5051.
| Figure 3.10 |
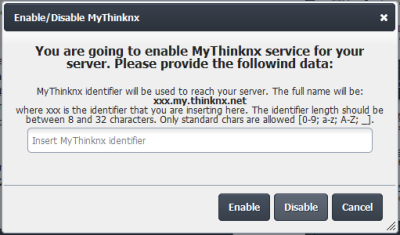
From the main menu, select “Server” and click on “ThinKnxCloud”. To add a “ThinKnx ID”, click on the button “Change MyThinKnx settings”. It will appear a windows where to add the name of the device.
| Figure 3.11 |
Clicking on the “Enable” button will set the new ThinKnx ID.
Exporting a project
When the project is complete it has to be deployed on the various devices like the server and the clients. The configurator has a special part dedicated to project exporting with several file formats depending on the addressee device. Project can also be exported simply to back it up or to transfer to another PC.
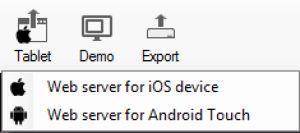
By right clicking on the ”Tablet” button, the following menu will be displayed:
- Web server for iOS device Select this option if the project has to be exported on iOS devices.
- Web server for Android Touch Select this option if the project has to be uploaded on Android touch screen devices.
After selecting one of the option, click on the ”Tablet” button and a web server, which allows to directly upload the project on the desired client, is automatically launched in the Configurator:
| Figure 3.12 |
The displayed address has to be specified in the client application and the project will be automatically downloaded.
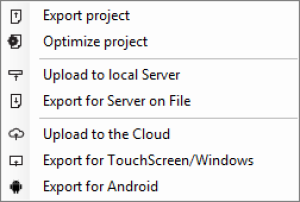
By clicking on ”Export” button, the following options will be displayed:
| Figure 3.13 |
- Export project Export procedure allows to save the project created with the Configurator as a .erg file; it is particularly useful to store back up copies in a folder and to send projects from a Configurator to another.
- Optimise project Whenever an image or any kind of file is imported in the Configurator, it is automatically copied in a dedicated project folder so that the software does not operate on the original item, risking to affect the project if it is moved or deleted. Doing so, several unused files roll by the project folder; by clicking on this button they will be automatically removed, remarkably improving and simplifying clients performances.
- Upload to local server [local_up]The project is uploaded to the server so that configurations can be saved and memory can be allocated for objects that require to be configured by the user.
- Export for server on file If the PC which the Configurator is running on is not in the same LAN as the server one, the software automatically creates a .srv file that can be manually uploaded to the web page.
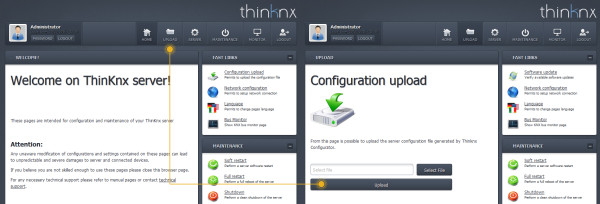
Uploading procedure
- After launching the browser and typing http://’external IP’:5051 the login page is displayed.
- Login as service user (default password: ”pass”).
- In the homepage, click on ”Upload” button.
- Click on ”Select file” and then ”Upload”.
| Figure 3.14 |
- The server restarts automatically.
- Upload to the Cloud All the clients versions of the project (one for each user) are uploaded to the ThinknxCloud server. If the project doesn’t contain any users, only the main version is uploaded. A popup indicating the progress of the upload will appear.
- Export for touch screen Generates a file with .tou extension, meant to be used with the Player for Windows software.
- export for android Generates a config.android file, meant to be used on Android devices and Mac OS computers.
Uploading procedure for Android devices
- Connect the device to the PC via USB
- Create a folder named ”Thinknx” in the root folder of the device
- Copy the config.android file in the folder just created
Uploading procedure for Mac computers
- Create a folder named ”Thinknx” in the user’s ”Documents” folder
- Copy the config.android file inside the folder just created
Export for user
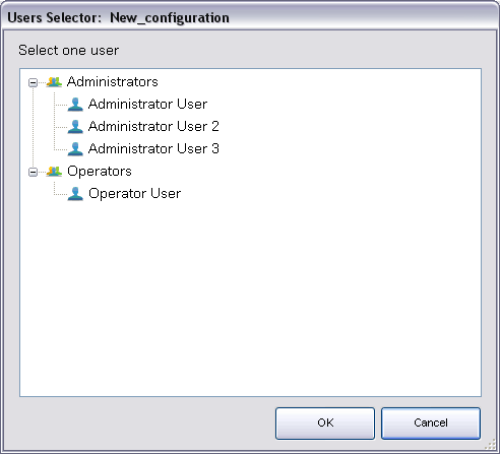
Export for user allows to configure different versions of the project to be uploaded to clients; the peculiar characteristics of each version can be defined by setting restrictions for users (for more details refer to section 2.1.6 ). The Configurator, if users have been configured in the project (for more details refer to section 2.1.4 ), requires to select which user will be the project exportation final addressee. Select the desired user and click on ”OK”.
Export procedure
After selecting one export modality, the Configurator automatically checks system properties to confirm that an IP address valid for the server has been set; otherwise the export cannot be finished. If components not corresponding to the selected licences have been configured in the project, the Configurator displays a warning message. The export can still be finished but the commands related to unlicensed objects will not be working. If the file has to be exported for touch-screen and Android, is required to specify where the file has to be saved. If the file has to be exported on iPad, the Configurator directly exports the project and launches the web server so that the user can immediately connect.
Client Authentication
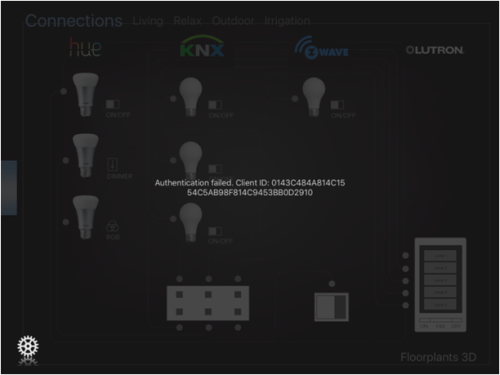
Once the project is loaded on the server and on clients, the client software opens a connection with the ThinKnx server. The first time the project is loaded on the client, it requires to be authenticated on the server.
| Figure 3.15 |
The client authentication is done on the server web page, browse in the “Server→Licenses & Codes” and copy the “Last connected client code” and check the “Enabled” box, as shown in the following figure:
| Figure 3.16 |
Example
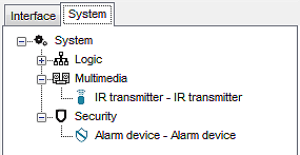
Four clients have to be used for four different functions: three of them shares the same needs, the fourth has fewer enabled functions. First of all, two groups have to be created: the first one contains the three users with similar needs, the other one will contain the user with limited functions; once users have been configured, restrictions have to be manually set on objects. Suppose that the example project has no external server address and contains the following elements:
| Figure 3.17 |
| Figure 3.18 |
In the project have been only selected ”Modbus and Automation” and ”IR Audio and Video ” licenses.
| Figure 3.19 |
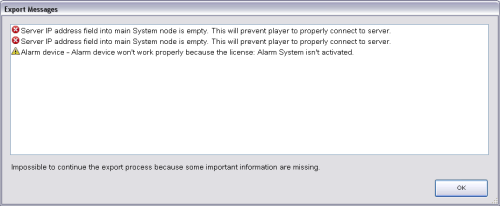
Launching the exportation, the Configuration displays the error window containing messages that warns about the empty IP address slot and the missing licences.
| Figure 3.20 |
Since the IP address has not been set, the export cannot be continued. To set the IP address, select the ”System” node from the system tree and type the external server address in the empty slot near the property name.
Once the missing information have been added, launching the export again, the error window is still displayed but it contains only the messages related to missing licences. In this case, click on ”Yes” to proceed with the export anyway.
The Configurator, if users have been configured in the project, requires to select which user will be the project exportation final addressee. Select the desired user, for example ”Operator User”, and click on ”OK”.
| Figure 3.21 |
Once the project has been downloaded to client, for example to an iPad, that specific client will be allowed to display only a ”reduced” project version, which has been exported for Operator User.
Of all configured functions, Operator User cannot visualise Rollers, Heating and Cameras since they contain a restriction.
