Migration to Thinknx UP
- What's new?
Introduction
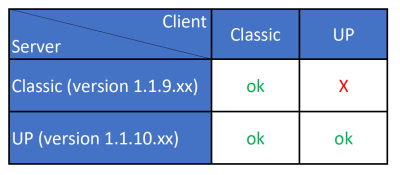
Thinknx UP is a completely redesigned version of the Classic Thinknx software. It includes additional features for the system integrator and the end user. In order to use Thinknx UP, it is important to update both Thinknx Server and Thinknx Client as seen in the table below:
Figure 1: Thinknx Compatibility
The table above is applicable to all features except for Push Notifications. They only work when both server and clients are using the same Thinknx version.
What's New?
General updates
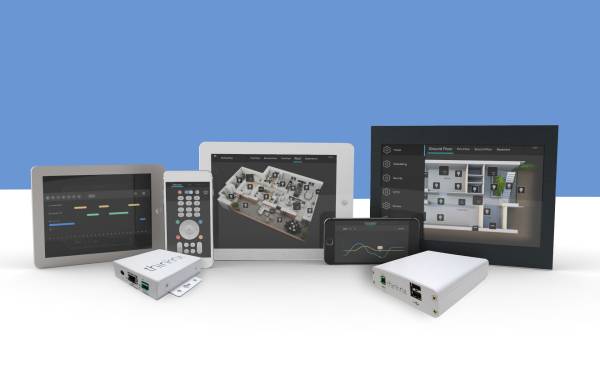
Improved performance of the application (in terms of speed and startup) and unified platform for a more consistent experience on all devices
Figure 2: Thinknx Platform
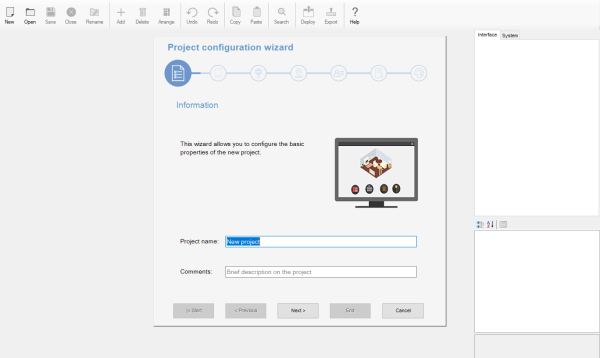
Re-designed interface of the “Project Configuration Wizard”
Figure 3: Project Configuration Wizard
High customization of the icons
A large set of SVG icons is now integrated inside the Configurator, allowing the user to:- Scale without losing quality
- Choose the background's opacity
- Change the background's color and shape
- Modify the background's border color and thickness
Figure 4: Graphic customization
Possibility to change the below for each project:
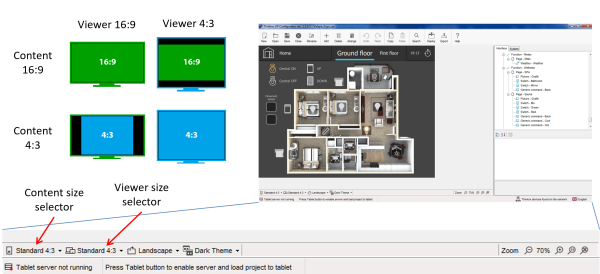
- Aspect ratio (4:3 - 16:9 - Envision - Balanced)
- Orientation (landscape - portrait)
- Theme (dark - White)
It is important to note that phones, tablets, and Envisions have different screen sizes and resolutions, therefore the project will not be displayed exactly the same on all these devices. For example, if an aspect ratio of 4:3 has been used while creating the project, and if viewed on a 16:9 device, additional spaces shall be inserted to the left and right of the project to accustom for the bigger screen.
Therefore, it is better that the integrator chooses the most favorable aspect ratio depending on the devices used in each project. If multiple types are used, then the best option would be to select the Balanced option.
Figure 5: Aspect Ratio
Ability to edit multiple selections at once
By selecting multiple objects, it is now possible to edit their color, background or other common parameters in just one attempt.Figure 6: Edit multiple selections
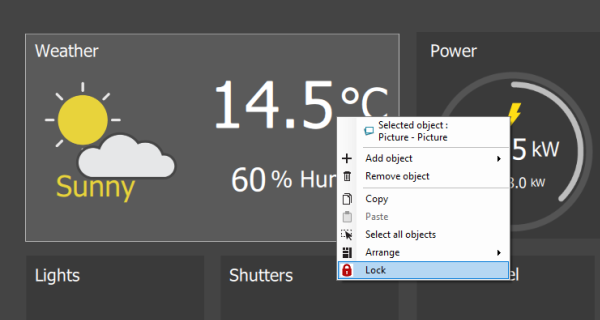
Ability to lock objects on the interface
Figure 7: Lock objects
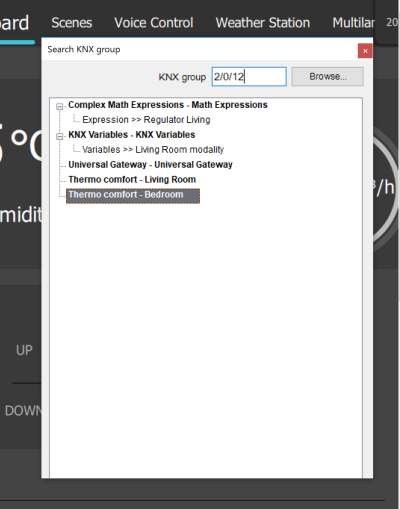
Improved KNX group search utility
Figure 8: KNX search utility
Objects Upgrades
- Switch object:
- New redesigned popup window
- For Dimmer type, possibility to have a side bar to view the dimmer's feedback when popup is closed
- Shutter object:
- New redesigned popup window
- Possibility to rotate the blind from the same icon
- Scene object:
- New redesigned popup window
- Possibility to view/arrange/delete recorded actions
- Possibility add “pause” time between actions
- RGB object:
- New redesigned popup window
- Possibility to control “White” channel
- Possibility to store unlimited number of favorite colors
- Possibility to manage color sequences with changeable time interval between colors
- Thermo Comfort object:
- New redesigned popup window
- Possibility to change the valve type between 1 bit and 1 byte
- Possibility to control the fan speed
- Possibility to parameterize the setpoint between “Absolute” and “Relative”
- Analog Value object:
- Possibility to change the level colors when displayed as “bar”
- Possibility to display the values as a “circle” and change its color, border thickness, and start/end angle
- Camera object:
- Possibility to test the camera inside the Configurator either in “Local” or “Remote” mode
- New decoder with better performance for H.264 and H.265
- Intercom object:
- Possibility to make internal SIP calls between registered users
- Advanced Integration:
- Public API for integration with third party systems
- Additional system object for integration with IFTTT (see details here)
How to Migrate?
- Step 1. Download Thinknx UP Configurator here.
- Step 2. Click on Open –> Import and select your project file (.erg)
Exported projects from the Classic Configurator have the extension “.erg”, while Thinknx UP projects are defined by the “.tup” extension.
- Step 3. Once the project is open, arrange and modify the interface as needed.
After importing an “.erg” project, always double check that all objects inside the project have been imported correctly.
- Step 4. Click on the bottom right of the Configurator to search for your Thinknx server.
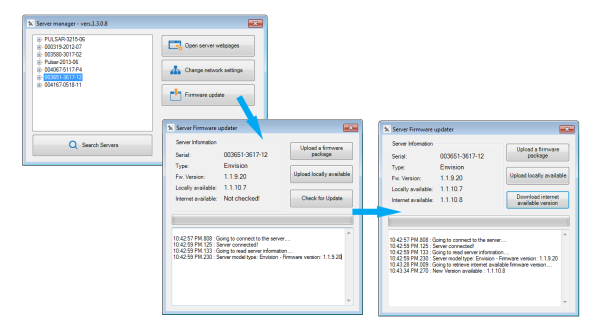
- Step 5. Once server is located, click on “Firmware update” to open the update window.
A simple update of the server from its web interface is not enough to migrate to Thinknx UP. It will only search for the updated version of the Classic Thinknx (1.1.9.xx).
- Step 6. Click on “Check for Update” to search for an available update online, or locate a file locally on the PC.
- Step 7. Once Thinknx UP version is located (1.1.10.xx) on the internet, click on “Download internet available version”. The version will now be available locally on the computer.
Figure 9: Download update
- Step 8. Close the firmware updater and open it again.
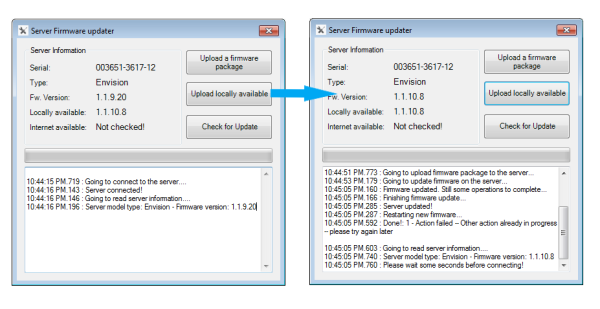
- Step 9. Make sure that you read “1.1.10.xx” next to the “Locally available” status.
- Step 10. Click on “Update locally available” to migrate the server to Thinknx UP. Once finished, the logs will indicate that server is now updated to version 1.1.10.xx.
Figure 10: Install update
- Step 11. Upload project to the updated server
- Step 12. Download Thinknx UP client:
- Apple - Download App
- Android - Download App
- Windows - Download Player
- Mac - Download Player
Step 13. If Envision screen is used, go to “Settings”, select the “Options” tab and click on the button “Load Thinknx UP”.Step 14. Make sure Envision is updated to the latest firmware.Migration from Classic to UP might require a reboot of the Envision
- Step 15. Enjoy Thinknx UP!
- migration_to_thinknxup.txt
- Last modified: 2020/01/15 13:58
- by ingrid
