THINKNX NEWS
2015, 23 March
Summary:
ThinKnx Cloud: a new way to deliver project updates
Get a new feeling from your home through charts
New Sonos integration to enhance user experience
New System Object to read feedbacks
ThinKnx Cloud: a new way to deliver project updates
Deploying ThinKnx projects on all the clients was a long procedure, even more when there are a lot of users configured. With the new version of the ThinKnx Configurator it is now possible to choose to upload the project on the ThinKnxCloud and automatically it generates all the different versions of the project (one for each user) and uploads them on the cloud server. In this way, to download the project on the client application the user just needs to insert the serial number of the server and its password.
Enabling the ThinKnx Cloud service is really easy
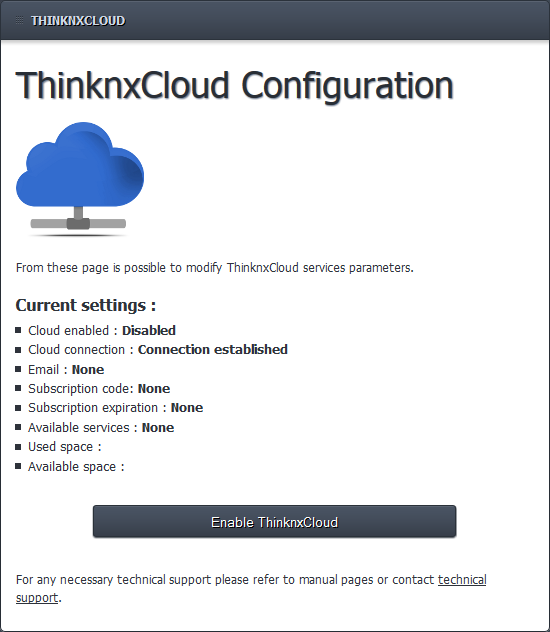

To enable the use of ThinKnxCloud the user has to open the server web page, select Server menu item and then select ThinKnxCloud. In the cloud page, click Enable ThinKnxCloud button. A popup will appear to set the maintainer password for the cloud. After the user fills these field and clicks on the Enable button, the server enables the Cloud features which means project upload and data storage.
After the enabling procedure is completed, the status of the cloud must change to Enabled and the user can see how much storage space is using on the cloud.
Uploading the project on ThinKnx Cloud
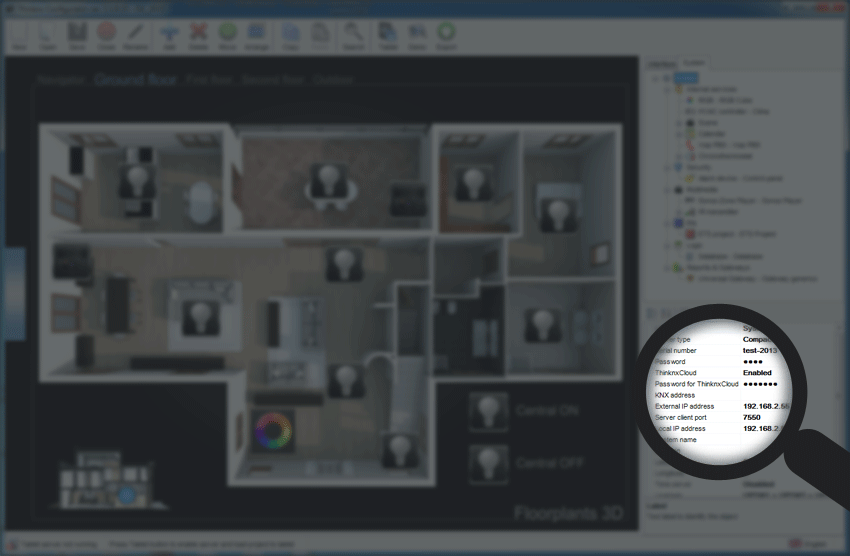
To upload the project on cloud, the system integrator simply needs to open the project in the ThinKnx Configurator, select the System object in the System tree view and edit some of its properties, more specifically:
Serial number property is mandatory to use all the cloud features and must contain the serial number of the ThinKnx server
ThinknxCloud property must be enabled
Password for ThinknxCloud property must contain the maintainer password previously set in the server web page
If the project requires the use of groups and users, each user configured must have a password associated to it. All the users passwords for the cloud must be different, to create the password, select the Authorizations property of the System object, select a user and fill the ThinKnxCloud password property with the password assigned to the user.
To upload the project on the cloud, save the project, click on the Export button in the toolbar menu and select Upload to the Cloud menu item. A popup indicating the progress of the upload will appear.
Downloading the project from ThinKnx Cloud
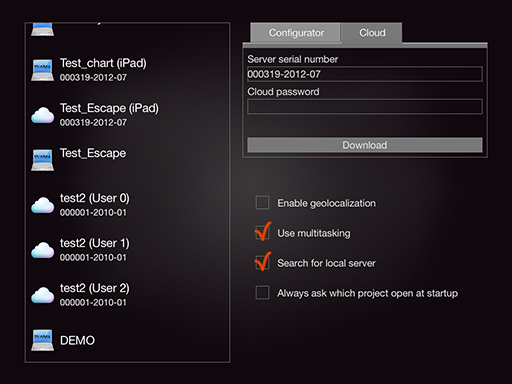
Currently, the projects download procedure from the cloud is available only for iOS devices. To download the project on iPhone or iPad, open the ThinKnx or ThinKnx Pocket app and select the Settings page. In the tab menu on the left, select the Cloud tab and fill the two fields below with the server serial number and the cloud password. If the projects contains users, to download a specific version of the project insert the password associated to the user otherwise use the maintainer password (the one created in the server web page). When the user taps the Download button, the download starts and the procedure is analogue to the one from Configurator.
Different icons indicates whether the project has been downloaded from the Configurator or from the ThinKnxCloud. To simplify the download procedure from Cloud, the serial number will be displayed for each project under the project name.
Broadcasting push notification to iOS clients

To communicate project updates or other important information to final users, ThinKnx server has implemented a new feature on its web pages. In the Licenses and Codes page a new form has been added at the end of the page. The system integrator has to fill the Text that will be displayed in the push notification and by clicking on the Send push notification button the notification will be instantly sent to all the iOS clients.
Get a new feeling from your home through charts
ThinKnx until now provided charts via email, storing data from KNX directly inside the server. It was not possible to charts data in real time. For more, after the email has been sent, the data on the server was deleted to make space for the new ones and in this way there wouldn't be a complete view of the data for example all over the year.
To overcome this and other limitations ThinKnx now integrates the cloud service which allows to store the data read from KNX or other buses on the cloud and to display them with charts inside all the clients applications.
For each values the user can apply little elaborations like values mean before storing the data on the cloud. All the charts can be highly customized choosing between two graphical themes, renaming chart axis and series.
Storing data on the cloud

First of all, to store data on the cloud the ThinKnxCloud service must be enabled. To enable it follow the instructions in the previous paragraph.
Once the cloud is enabled, open the desired project in the ThinKnx Configurator, select the System tree view and add the Database object. To specify to the server which values it must send to the cloud, open the Values Collection property. Add a new value with the Add button and edit its properties to configure the saving modalities.
After filling the basic information like name, measure unit, datatype and KNX group address, the user can set a multiplying factor to apply to the value read from KNX before it is elaborated by the server.
There are several policies the server can use to pick the values from KNX and store them on the cloud, they can be chosen setting the StoreTrigger property:
On new value reception: the server will send the value to the cloud every time it receives a telegram from KNX. This option is useful when the user wants a precise representation of the data during the day, for example, for power consumption. ?This option is although space consuming so we recommend to use it carefully.?
After a fixed time interval: the server will read the value from KNX after a determined time interval and store it on the cloud. The time interval can be set by the user through the property Store time interval. This option can be used, for example, to read temperatures and all that values that doesn't change that much during the day.
On over-threshold change: the server will store locally the last value received from KNX and it will compare it with the latest incoming telegram, if the difference between the two values crosses a predefined threshold it will store the new value on the cloud. The threshold represents the ratio between the gap of the two values and the previously stored value and can be set by the user through the Change percentage property. This option is useful because allows the user to keep trace of only the significant changes of the value during the day.
On over-threshold change and after time: this option combines the advantages of both previously explained techniques. Data will be stored when over-threshold change occurs and, in any case, after a fixed time interval.
ThinKnx server can also perform elaborations on the data picked with the Store Trigger policy. To set the elaboration set the Value to store property:
Last received value: the value will be sent to the cloud without additional elaborations.
Math derivative of values: the server will compute the derivative of the values coming from KNX telegrams in the interval after the last value sent. If the Store Trigger is set to On new value reception, the derivative will be computed between the last value stored and the new one while if the Store Trigger is set to After a fixed time interval, the derivative will consider all the telegrams received during the time interval. This elaboration can be useful, for example, when the server reads the value of energy from KNX and the user wants to store the power.
Math integral of values: the server will compute the integral of the values as explained in the previous option. This elaboration can be useful when the server reads the value of power from KNX and the user wants to store the energy.
Simple mean of values: the server will compute a simple mean of the values as explained above.
Weighted mean of values: the server will compute a weighted mean of the values as explained above.
After setting these properties for each value to store on the cloud, as soon as the project is loaded on the server, the server will start read data and store them on the cloud.
Adding charts to a project
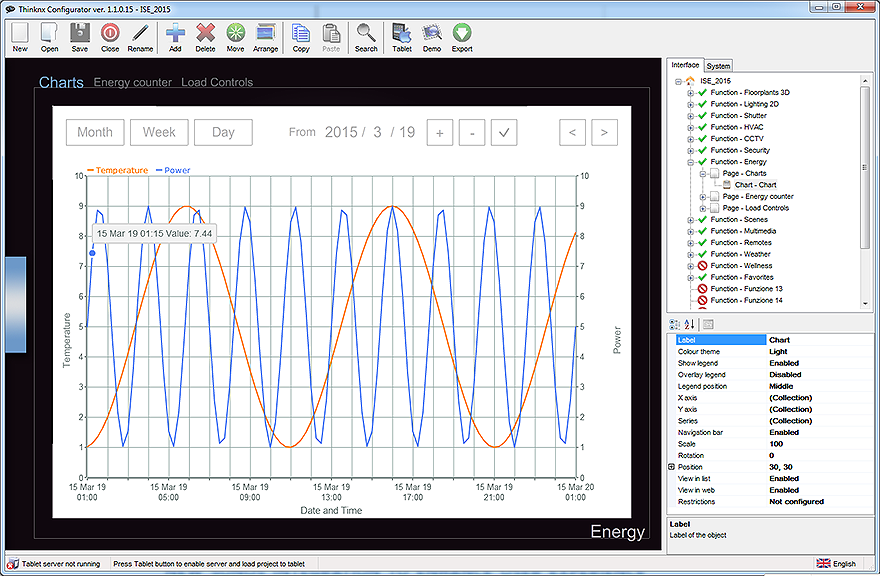
To display a chart with the values stored on the cloud inside the client application, the system integrator must add a Chart object to the project through the Configurator. By editing the Chart object properties, it is possible to choose a theme for the charts (which means background color, axis and labels colors, etc.), whether to show a legend and where to position it in the plot area and which labels assign to axis.
To simplify data representation on the chart it is possible to add a second Y axis by editing the Y axis property. For each axis in the chart, it is possible to specify whether grids should be drawn in the plot area and whether to display the axis title.
The data to represents in the chart must be set in the Series property. For each series the system integrator must fill the following properties:
Label: name that will be displayed in the legend
Reference axis: Y axis to which the series will be associated
Serie type: graphical representation of the values in chart, the system integrator can choose between Line and Columns. Please note that selecting Column the data displayed will be summarized
Database: the system object that contains the value the system integrator wants to represent
Variable: the value the system integrator wants to represent contained in the Database object
If the final user wants to browse through the data in the chart without time limitations, the property Navigation bar must be enabled. In this way a bar appears over the plot area and it will allow the final user to select a precise date and define a time interval to filter the data to download from the cloud (day, week, month). If the chart has the only purpose to display a history of the last stored values, the system integrator must disable the Navigation bar property and select the time interval to display through the Timespan property.
New Sonos integration to enhance user experience
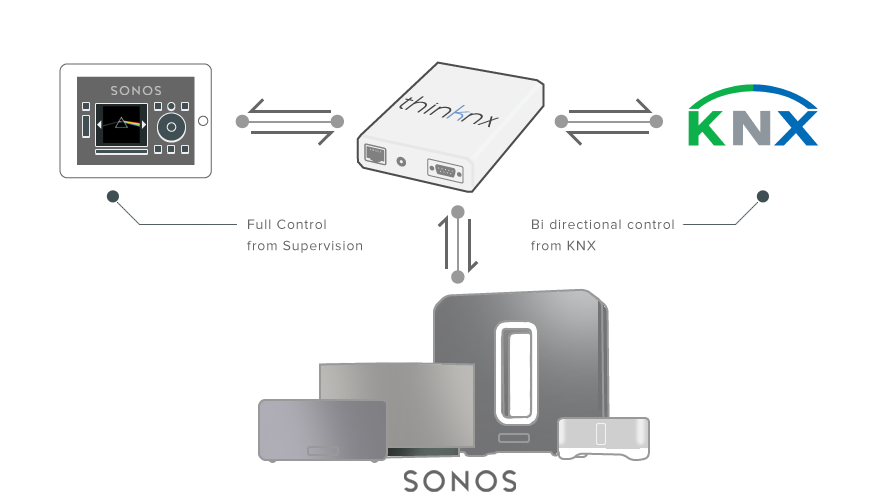
ThinKnx Compact server added new features to its Sonos integration! First of all it is now possible control and receive feedbacks from Sonos players directly through network without creating more traffic on KNX. In this way, all the commands and feedbacks can be available on KNX thanks to ThinKnx server only if the installer really need them!
ThinKnx clients can play, pause, shuffle or repeat tracks, launch playlists or favorites and control volume and they can receive also feedbacks regarding the track being played (track title, album title and artist name). Everything optionally on KNX!
Configuring Sonos for KNX
To control Sonos from KNX the system integrator must add the Sonos Manager object to the system tree view in ThinKnx Configurator. The Players property represents the list of players configured by the system integrator. To add a player, open the Sonos Players editor by selecting this property. By clicking on the Add button the ThinKnx Configurator starts searching for Players connected to its network and displays a list of them in a new window. If the player to add is connected to the network, the system integrator just selects it and clicks on the Add Player button and the Configurator will add it to the list with some properties already filled (like IP address, etc.), otherwise the user clicks on the Create Player button and the player object added to the list will be completely empty. This last option is useful when the configuration occurs in a different network in respect of the deployment one and the Sonos Players are not reachable.
With the Player object it is possible to configure:
Playback control: the user can set one KNX group for the Play/Stop command and one KNX group for the Play/Stop status of the player. This association can be done also for Mute, Shuffle and Repeat features (both command and state). ThinKnx server will make available on KNX three 14 bytes strings representing the track title, track album and track artist. It also possible to control the source of the Sonos, Queue or Line-in, and get a feedback with other two 1 bit groups.
Volume control: The volume value can be sent on KNX bus through a KNX group (1 byte) (Volume status group). Different modalities to change the volume are available:
Sending directly the value of the volume through a 1 byte KNX group - Volume value group
Stepping up and down through a 1 bit KNX group - Volume step group
Dimming the volume value through a 4 bit KNX group - Volume move group
Playlists and favorites control: Playlists and favorites can be selected directly from KNX. To do so, the user must set a 1 byte KNX group to command playlists (Playlist select group) and another one to command favorites (Favorite select group). The value sent to select the playlist or favorite is just a number, for this reason, to recall a playlist its name must start with the number used to recall the playlist from KNX (chosen by the user) and it must follow the syntax [user number][space]-[space][playlist name], for example 1 - [Playlist name].
Regarding playlists, a feedback of the selection can be obtained by configuring a 1 byte group (Playlist status group) to get the number of the selection and a 14 bytes string group to get the current playlist title.
Another important feature consists of creating grouping among players directly from KNX. The groups must be predefined in the Configurator editing the Topologies property in the Sonos Manager object. For each topology the user must select the players that will be part of that group and assign two 1 bit KNX groups, one to recall the topology and one to determine if the topology is active. To select the players the user has to click on the Players Groups property, a popup containing the list of configured players will appear. Using drag & drop the user can move players among groups and by right clicking on a player it is possible to select it as the coordinator of the group, remove a player from a group, separate all players or group all of them together.
The Sonos Manager object provides also additional properties to control all the players from KNX. It is possible to stop or mute all the players configured by sending a bit on KNX. In addition, one of the Sonos players can be configured as a public announcer, in other words a player can be used as a source to spread public announcements to all the other players from KNX with a bit.
Sonos on ThinKnx server
Sonos integration works even without KNX interface, saving traffic on the bus when it is not needed. All the commands and feedbacks listed before are available inside the Thinknx client and in addition it is also possible to display the cover image of the track currently performed.
For example, to skip track on the Sonos Player directly from ThinKnx client application the user can add a Generic Button, open the Command property and select the Skip track command for the desired Player. When the user will tap the Generic Command object in the client interface, the command will be sent through the network not overloading the KNX bus.
Also the feedbacks can be read without using the KNX bus, for example, track title can be displayed in the client application using an Extended Command object. If the user selects System Object as the Data Source of the value to read, in the System status property can choose the Get the current track title command for the desired player. (For additional information read the paragraph below)
New System Object to read feedbacks
Reading Sonos feedback values without passing from KNX is now possible! For example, if the user wants to read the Sonos Player volume value and display it in the client application, he just has to add a Analog Value object in the interface (after configuring the Sonos Manager). In the Data Source property he selects System Object and the property System Status will appear. In this property the user must select the Get the current volume command for the desired player. If the user wants also to change the value of the volume from the Analog Value object, he must enable the Send value property and select in the Command property the Set value for volume command filling the Desired volume field with %val.
To display the image cover of the current track, the user has to use an Extended Command object and select the type Graphic and System object as Data Source. In the System status property select the Get the current track cover URL for the desired player. In the Feedback States collection, in the state automatically created by Configurator, enable the Use source string property. To stretch the image coming from Sonos to the user desired size, enable the Resize always property and set the Max. width and Max. height properties. If otherwise the image must keep the original size disable the Resize always property and it will be stretched only if width or height crosses the maximum dimensions specified.
This new feature of the Extended Command can be used also to read URLs from KNX and display the corresponding image. Since 14 byte strings are really short, it is possible to fill the URL prefix property with the initial part of the URL of the source and then attach the value coming from KNX.