Show pagesource Backlinks Add to book Export to PDF Fold/unfold all Table of Contents Internal Commands & Status System Reports and Gateways Hue Gateway Gateway Modbus Lutron Project Serial Gateway Ethernet Gateway Gateway MyHome Voice Control Gateway IFTTT Account SMS Gateway Internal Services Scene Presence Simulator Chronothermostat Email Account Thinknx Sensors Irrigation RGB Multimedia Video Matrix Audio Matrix Display Home Theater Sonos Manager Media Player IR Transmitter Security Alarm Device Centrale Internal Commands & Status When an object is added to the System, a list of all the commands related to this object will be accessible, if applicable. These commands can be used on a generic button, inside the logic module, with the universal gateway, etc. Some objects, like Sonos Manager, will also allow you to read statuses from the devices by using an Analog Value interface object or an Extended Command The commands/Statuses are grouped into 5 categories: System Reports and Gateways Internal Services Multimedia Security The category will only be visible if the related objects have been added inside the System tab. Figure 1: Thinknx Objects Commands System The available commands when selecting the System category are the following: Send KNX Bit telegram This command is used to send a 1 bit value to the KNX bus. KNX Group Group address to sen the value. KNX value Can be either 1 or 0. Send KNX Byte Telegram This command is used to send a 1 byte value to the KNX bus. KNX Group Group address to send the value. KNX value Can be a value between 0-255. A generic button can be configured to send a fixed dimming value to a dimming circuit, for example sending the value 128 to make the light go to 50%. Send KNX Float 2 Byte Telegram This command is used to send a 2 byte float value to the KNX bus. KNX Group Group address to send the value. KNX value Can be a value between -671088,64 and 670760,96. A generic button can be configured to send a fixed temperature value to a thermostat, for example sending the value 21.5 as a setpoint. Send KNX Float 4 Byte Telegram This command is used to send a 4 byte float value to the KNX bus. KNX Group Group address to send the value. KNX value Send KNX String Telegram This command is used to send a string of 14 bytes to the KNX bus. KNX Group Group address to send the value. KNX value string text to be entered. Send KNX 4 Bit Telegram This command is used to send a 4 bit value to the KNX bus. KNX Group Group address to send the value. KNX value Can be a value between 0 and 15. A generic button can be configured to decrease (value 0-7) or increase ( value 8-15) a light dimming value. It can also be used to change a shutter position (use values 0-7 for UP, and 8-15 for DOWN). For example, sending the value 5 to a dimmer will decrease the brightness by 6%, while sending the value 10 to a shutter will lower its position by 50%. Read KNX group address This command is used to read a value from the KNX bus. KNX Group Group address to read the value from. Make a pause for a fixed interval This command pauses the system for a specified time interval configurable in milliseconds. Interval Time interval in milliseconds. When saving a scene, sometimes a pause between two commands is necessary, for example, when saving the TV channel number. Another use of the Pause application would be before turning off the final light in a Goodbye scene, making sure that the client has left the house. Change UI Function and Page: GENERAL This command allows to redirect all clients to a specific function and page. Function insert the Index number of the destination function. Page insert the Index number of the destination page. Using the Universal Gateway, a scenario can be configured to redirect the users to the Main Entrance camera page whenever the doorbell rings. Change UI Function and Page: SPECIFIC CLIENT This command allows the specific client who has sent it to access a certain function and page. Function insert the Index number of the destination function. Page insert the Index number of the destination page. Invisible generic buttons can be placed on the house plan for each room, allowing every single client to navigate through the rooms by clicking on each area. Send Push Notification This command allows to send push notifications to the clients. By accessing the web page of the server and clicking on Server –> Licenses and Codes, it is possible to enable/disable the receipt of push notifications for each client. Message insert the message to be displayed on the clients. Maximum number of push notifications with the same identifier allowed in 10 min This parameter is not mandatory. However, if a value has been entered, the system will make sure to limit the number of push notifications sent to this number in 10 min. It is quite useful when the trigger for sending the push notifications is being sent frequently on the bus. Push Notification Identifier A small descriptive text to allow the system to differentiate a push notification from another one when calculating the rate limit. Mandatory only if the previous parameter has been used. Using the Universal Gateway, a push notification can be sent to the client when a 1-bit value is received from the bus to indicate that the Water Tank Level is low. The message in that case can be “Low Water Level!”. If the 1-bit is being sent periodically to the bus with a small interval, then a maximum number of push notifications can be inserted in the related parameter. Push notifications only work with internet connectivity. In addition, the server and client should both have the same version of Thinknx software (both Classic or Thinknx UP). Execute MS Windows Command: GENERAL This command allows to launch an .exe file directly from the ThinKnx application on all Players for Windows. Command Parameter Example: to open a specific file or folder on Windows, fill the Command field with “explorer.exe”, and put the entire path leading to the folder or file in the Parameter field. Execute MS Windows Command: SPECIFIC CLIENT This command allows to launch an .exe file directly from the ThinKnx application on all Players for Windows. Command Parameter Example: to open a specific file or folder on Windows, fill the Command field with “explorer.exe”, and put the entire path leading to the folder or file in the Parameter field. Recall iOS app with url This property allows to launch a specific application on iOS devices directly from the ThinKnx app by typing the related URL. URL used to recall iOS app Type in the correct URL to open the desired installed application, for example http://www.google.com will automatically browse the google safari page. Another example is typing sonos:// to open the SONOS app. A generic button can be configured for the client to open another application on the iOS device. Send Email to recipients This command allows to send an email message using a default ThinKnx account. Email Subject Enter the email title here. Email Recipients Enter destination email accounts. Email Content Enter the email content here. If the client's house is empty and a presence has been detected inside (1-bit KNX telegram), a scenario can be programmed on the Universal Gateway to send an email to the owner of the house. This command might not work properly. Instead, add an Email Account under System tab, and select the command “send email to recipient” that can be found in the Internal Services. See this section for more information. Send DTMF tone during intercom call This command allows to send a DTMF tone used in telephony while an intercom call is running on the client. DTMF tones sequence enter the sequence of numbers to send during the intercom call. Sometimes it is necessary to end the sequence with the symbol “#”, depending on the application. A generic button can be configured in the Intercom page to send a DTMF tone to open the main gate whenever a call is established. Make SIP call When using the Thinknx server as PBX, it is possible to make internal calls between all the devices. Extension to call Enter the extension of the destination device. A house owner can have a generic button on his application to call the extension of the touch screen installed in Kitchen to communication with the help. Start audio notification sound in all the clients This command allows to play an audio sound in all the clients. Sound to play Choose between different beeps to play: 0=Beep_1, 1=Beep_2, 2=Alarm_1, 3==Alarm_2, 4=Siren_1, 5=Siren_2. Duration of the sound to play Specify the duration of the sound to play in seconds. If 0 is entered, the sound will play endlessly until a Stop command has been sent. An emergency push button can be installed in bathrooms to send a KNX 1-bit value. Using the Universal Gateway, this value received can launch the command to start audio notification on all clients. Stop audio notification sound in all clients This command allows to stop the audio sound previously launched in all clients. See above command for example. Reports and Gateways The list below contains all the possible objects that could be added to the Reports and Gateways category: Hue Gateway Gateway Modbus Lutron Project Serial Gateway Ethernet Gateway Gateway MyHome Voice Control Gateway IFTTT Account SMS Gateway Figure 2: Reports and Gateways Hue Gateway The available commands when selecting the Hue Gateway category under Reports and Gateways are the following: Turn on/off element This command allows to start turn on or off the Hue element. Value Write 1 to turn on, and 0 to turn off. Dimm the element to a value This command allows to set the desired value for the dimmer through a single parameter which can assume a value between 0 and 255. Value can be between 0 and 255. Set the element color temperature (white) This command allows to set the element color temperature. Value Can be between 0 and 255, where 0 corresponds to Cold White (6500 K) and 255 correspond to Warm White (2000 K). Set the element color (RGB) Set the element RGB color through the definition of three parameters for Red, Green and Blue. Each color can assume a value between 0 and 255. Red Value value between 0 and 255. Green Value value between 0 and 255. Blue Value value between 0 and 255. Gateway Modbus The available commands when selecting the Gateway Modbus category under Reports and Gateways are the following: Send Modbus value with function 5 This function is used to send a value to a Modbus device supporting function 5, known as “write single coil”. Modbus address Modbus address. Coil Address Discrete output address (coils are 1-bit registers). Value could be 1 or 0. Send Modbus value with function 6 This function is used to send a value to a Modbus device supporting function 6, known as “Write Single Holding Register”. Modbus Address Modbus address. Register Address Slave register. Value value to write. N.Byte Number of bytes. Send Modbus value with function 16 This function is used to send a value to a Modbus device supporting function 16, known as “Write Multiple Holding Registers”. Modbus Address Modbus address. First Register Address Slave register. Value value to write. N.Byte Number of bytes. Send Modbus value with function 22 This function is used to send a value to a Modbus device supporting function 22. The function can be used to set or clear individual bits in the register. Modbus Address Modbus address. Register Address Slave register. Value value to write. Selected bits mask mask value of the selected bits to be changed. Lutron Project The available commands when selecting the Lutron Project category under Reports and Gateways are the following: Simulate keypad button press This command is used to simulate a keypad button press on one of the Lutron devices installed. System address of the keypad Address of the keypad with the desired button to simulate. Communication is done by connecting to the Lutron processor. Address shall be written using the following template “processor:link:address”. Button number to operate Number of the button to press on the Lutron keypad. Simulate keypad button release This command is used to simulate a keypad button release on one of the Lutron devices installed. System address of the keypad Address of the keypad with the desired button to simulate. Communication is done by connecting to the Lutron processor. Address shall be written using the following template “processor:link:address”. Button number to operate Number of the button to release on the Lutron keypad. Simulate keypad button hold This command is used to simulate a keypad button hold on one of the Lutron devices installed. System address of the keypad Address of the keypad with the desired button to simulate. Communication is done by connecting to the Lutron processor. Address shall be written using the following template “processor:link:address”. Button number to operate Number of the button to hold on the Lutron keypad. Simulate keypad button double tap This command is used to simulate a keypad button double tap on one of the Lutron devices installed. System address of the keypad Address of the keypad with the desired button to simulate. Communication is done by connecting to the Lutron processor. Address shall be written using the following template “processor:link:address”. Button number to operate Number of the button to double tap on the Lutron keypad. Select Sivoia state This command is used to control Lutron shutters/blinds through a Sivoia control device. System address of Sivoia Control Address of the Sivoia Control device. Communication is done by connecting to the Lutron processor. Address shall be written using the following template “processor:link:address”. Sivoia state to select O=open, C=close, S=stop. Select Grafik Eye scene This command is used to play a scene configured with Lutron Grafik Eye system. System address of Grafik Eye to control Address of the Grafik Eye device. Communication is done by connecting to the Lutron processor. Address shall be written using the following template “processor:link:address”. Scene number to select Input the scene number (0=OFF). Select Level Lights This command is used to send the lights to a certain level. Output integration ID ID of the output to control. Level Input a number between 0 and 255 to send the lighting level. Select Raising Lights This command is used to start raising the lighting level of the desired output. Output integration ID ID of the output to control. Select Lowering Lights This command is used to start lowering the lighting level of the desired output. Output integration ID ID of the output to control. Stop Raising or Lowering Lights This command is used to stop raising/lowering the lighting level of the desired output. Output integration ID ID of the output to control. Serial Gateway The available commands when selecting the Serial Gateway category under Reports and Gateways are the following: Send string with no termination This command is used to send a text without termination. String to send input the string that will be sent to the serial gateway. Send string with CR termination This command is used when sending a text with CR termination, marking the end of the line. String to send input the string that will be sent to the serial gateway. Send hexadecimal string with no termination This command is used to send an hexadecimal string without termination. String to send input the string that will be sent to the serial gateway. Send hexadecimal string with CR termination This command is used when sending an hexadecimal string with CR termination, marking the end of the line. String to send input the string that will be sent to the serial gateway. Ethernet Gateway The available commands when selecting the Ethernet Gateway category under Reports and Gateways are the following: Make an HTTP GET call to a specified url This command allows the sending of an HTTP GET request to execute a command. URL Timeout for connection in milliseconds, default 3000 ms. Make an HTTP GET call to a specified url with username and password This command allows the sending of an HTTP GET request execute a command. URL Username used to authenticate to the server Password used to authenticate to the server Timeout for connection in milliseconds, default 3000 ms. Make an HTTP POST call to a specified url This command allows the sending of an HTTP POST request to send data to a certain sever in order to execute a command. URL Content to send into call multiple form fields and values can be sent via the same URL. The encoding used by default is based on an early version of the general URI percent-encoding rules, with a number of modifications such as newline normalization and replacing spaces with + instead of %20. The media type of data encoded this way is application/x-www-form-urlencoded. Timeout for connection in milliseconds, default 3000 ms. Make an HTTP POST call to a specified url with username and password This command allows the sending of an HTTP POST request to send data to a certain sever in order to execute a command. The server in this case requires a username and password. URL Content to send into call multiple form fields and values can be sent via the same URL. The encoding used by default is based on an early version of the general URI percent-encoding rules, with a number of modifications such as newline normalization and replacing spaces with + instead of %20. The media type of data encoded this way is application/x-www-form-urlencoded. Username used the authenticate to the server. Password used to authenticate to the server. Timeout for connection in milliseconds, default 3000 ms. Make an HTTP PUT call to a specified url This command allows the sending of an HTTP PUT request to send data to a certain sever in order to execute a command. URL Content to send into call multiple form fields and values can be sent via the same URL. The encoding used by default is based on an early version of the general URI percent-encoding rules, with a number of modifications such as newline normalization and replacing spaces with + instead of %20. The media type of data encoded this way is application/x-www-form-urlencoded. Timeout for connection in milliseconds, default 3000 ms. Make an HTTP PUT call to a specified url with username and password This command allows the sending of an HTTP PUT request to send data to a certain sever in order to execute a command. The server in this case requires a username and password. URL Content to send into call multiple form fields and values can be sent via the same URL. The encoding used by default is based on an early version of the general URI percent-encoding rules, with a number of modifications such as newline normalization and replacing spaces with + instead of %20. The media type of data encoded this way is application/x-www-form-urlencoded. Username used the authenticate to the server. Password used to authenticate to the server. Timeout for connection in milliseconds, default 3000 ms. Make an HTTP DELETE call to a specified url This command allows the sending of an HTTP DELETE request to send data to an external server. URL Content to send into call multiple form fields and values can be sent via the same URL. The encoding used by default is based on an early version of the general URI percent-encoding rules, with a number of modifications such as newline normalization and replacing spaces with + instead of %20. The media type of data encoded this way is application/x-www-form-urlencoded. Timeout for connection in milliseconds, default 3000 ms. Make an HTTP DELETE call to a specified url with username and password This command allows the sending of an HTTP DELETE to an external server. The server in this case requires a username and password. URL Content to send into call multiple form fields and values can be sent via the same URL. The encoding used by default is based on an early version of the general URI percent-encoding rules, with a number of modifications such as newline normalization and replacing spaces with + instead of %20. The media type of data encoded this way is application/x-www-form-urlencoded. Username used the authenticate to the server. Password used to authenticate to the server. Timeout for connection in milliseconds, default 3000 ms. Send string with no termination to TCP socket This command allows the sending of a string to a TCP host on a defined port. String to send Host:port Timeout for connection in milliseconds, default 3000 ms. Time to wait before closing connection after data sending in milliseconds, default 100 ms. Send string with CR termination to TCP socket This command allows the sending of a string with CR termination, marking the end of the line, to a TCP host on a defined port. String to send Host:port Timeout for connection in milliseconds, default 3000 ms. Time to wait before closing connection after data sending in milliseconds, default 100 ms. Send hexadecimal string with no termination to TCP socket This command allows the sending of an hexadecimal string to a TCP host on a defined port. String to send Host:port Timeout for connection in milliseconds, default 3000 ms. Time to wait before closing connection after data sending in milliseconds, default 100 ms. To send “hello world”, it is enough to convert this ASCII text to HEX using a simple tool such as https://www.rapidtables.com/convert/number/ascii-to-hex.html, and the HEX string to send would be “68 65 6c 6c 6f 20 77 6f 72 6c 64”. Send hexadecimal string with CR termination to TCP socket This command allows the sending of a string with CR termination, marking the end of the line, to a TCP host on a defined port. String to send Host:port Timeout for connection in milliseconds, default 3000 ms. Time to wait before closing connection after data sending in milliseconds, default 100 ms. To send “hello world”, it is enough to convert this ASCII text to HEX using a simple tool such as https://www.rapidtables.com/convert/number/ascii-to-hex.html, and the HEX string to send would be “68 65 6c 6c 6f 20 77 6f 72 6c 64”. Send string with no termination to UDP socket This command allows the sending of an hexadecimal string to a UDP host on a defined port. String to send Host:port Timeout for connection in milliseconds, default 3000 ms. Time to wait before closing connection after data sending in milliseconds, default 100 ms. Send string with CR termination to UDP socket This command allows the sending of a string with CR termination, marking the end of the line, to a UDP host on a defined port. String to send Host:port Timeout for connection in milliseconds, default 3000 ms. Time to wait before closing connection after data sending in milliseconds, default 100 ms. Send hexadecimal string with no termination to UDP socket This command allows the sending of an hexadecimal string to a UDP host on a defined port. String to send Host:port Timeout for connection in milliseconds, default 3000 ms. Time to wait before closing connection after data sending in milliseconds, default 100 ms. To send “hello world”, it is enough to convert this ASCII text to HEX using a simple tool such as https://www.rapidtables.com/convert/number/ascii-to-hex.html, and the HEX string to send would be “68 65 6c 6c 6f 20 77 6f 72 6c 64”. Send hexadecimal string with CR termination to UDP socket This command allows the sending of a string with CR termination, marking the end of the line, to a UDP host on a defined port. String to send Host:port Timeout for connection in milliseconds, default 3000 ms. Time to wait before closing connection after data sending in milliseconds, default 100 ms. To send “hello world”, it is enough to convert this ASCII text to HEX using a simple tool such as https://www.rapidtables.com/convert/number/ascii-to-hex.html, and the HEX string to send would be “68 65 6c 6c 6f 20 77 6f 72 6c 64”. Send hexadecimal string with no termination to UDP socket in multicast This command allows the sending of an hexadecimal string to a UDP host supporting multicast on a defined port. The characters should be separated by a space. String to send Host:port Timeout for connection in milliseconds, default 3000 ms. Time to wait before closing connection after data sending in milliseconds, default 100 ms. To send “hello world”, it is enough to convert this ASCII text to HEX using a simple tool such as https://www.rapidtables.com/convert/number/ascii-to-hex.html, and the HEX string to send would be “68 65 6c 6c 6f 20 77 6f 72 6c 64”. Send hexadecimal string with CR termination to UDP socket in multicast This command allows the sending of a string with CR termination, marking the end of the line, to a UDP host supporting multicast on a defined port. String to send Host:port Timeout for connection in milliseconds, default 3000 ms. Time to wait before closing connection after data sending in milliseconds, default 100 ms. To send “hello world”, it is enough to convert this ASCII text to HEX using a simple tool such as https://www.rapidtables.com/convert/number/ascii-to-hex.html, and the HEX string to send would be “68 65 6c 6c 6f 20 77 6f 72 6c 64”. Send SOAP request to the specified url This command allows the sending of a SOAP (Simple Object Access Protocol) request to a URL. SOAP is an XML-based messaging protocol for exchanging information among computers. URL SOAP Envelope Defines the start and the end of the message. It is a mandatory element. SOAP Action indicates the intent of the SOAP HTTP request. Establish SSH session and send commands This command allows to establish an SSH session with a server to execute certain commands. Secure Socket Shell or SSH, is a network protocol that gives users, particularly system administrators, a secure way to access a computer over an unsecured network. SSH server hostname SSH server port Username Password Commands to send Commands must be enclosed in double quotes and separeted by a space, example: “cmd one” “cmd two” “etc” Application: This session can be used to connect to the home router/access point through Thinknx. Gateway MyHome The available commands when selecting the Gateway MyHome category under Reports and Gateways are the following: Launch a scenario This command allows launching of a scenario configured on the MyHome system. Scenario Number as configured in MyHome. Control Panel Interface (I) Lights: point to point control ON/OFF This command allows to send an ON or OFF command to one lighting point. Room (A) as configured in MyHome. Light Point (PL) Interface (I) ON/OFF type 0 to turn off and 1 to turn on. Lights: point to point control DIMMER This command allows to send a dimming value to one dimmer. Room (A) as configured in MyHome. Light Point (PL) Interface (I) Dimmer Level type a value between 0 and 255 for dimmer's level. Lights: point to point control TIMED This command allows to send an ON value duration for one light point. Room (A) as configured in MyHome. Light Point (PL) Interface (I) ON timed for (min) the values can be 0.5, 1, 2, 3, 4,5, or 15 min. Lights: control for room ON/OFF This command allows to send an ON or OFF command to an entire room. Room (A) as configured in MyHome. Interface (I) ON/OFF type 0 to turn off and 1 to turn on. Lights: control for room TIMED This command allows to send an ON value duration for an entire room. Room (A) as configured in MyHome. Interface (I) ON timed for (min) the values can be 0.5, 1, 2, 3, 4,5, or 15 min. Lights: control for group ON/OFF This command allows to send an ON or OFF command to a group of lighting points. Group as configured in MyHome. Interface (I) ON/OFF type 0 to turn off and 1 to turn on. Lights: control for group DIMMER This command allows to send a dimming value to a group of lighting points. Group as configured in MyHome. Interface (I) Dimmer Level type a value between 0 and 255 for dimmer's level. Lights: control for group TIMED This command allows to send an ON value duration for a group of lighting points. Group as configured in MyHome. Interface (I) ON timed for (min) the values can be 0.5, 1, 2, 3, 4,5, or 15 min. Lights: general control ON/OFF This command allows to send an ON or OFF command to all lighting points. ON/OFF type 0 to turn off and 1 to turn on. Lights: general control DIMMER This command allows to send a dimming value to all lighting points. Dimmer Level type a value between 0 and 255 for dimmer's level. Lights: general control TIMED This command allows to send an ON value duration for all lighting points. ON timed for (min) the values can be 0.5, 1, 2, 3, 4,5, or 15 min. Automation: point to point control This command allows to control a single shutter by sending Up, Down or Stop. Room (A) as configured in MyHome. Automation Point (PL) Interface (I) Stop/Up/Down Stop=0, Up=1, Down=2. Automation: control for group This command allows to control a group of shutters by sending Up, Down or Stop. Group as configured in MyHome. Interface (I) Stop/Up/Down Stop=0, Up=1, Down=2. Automation: control for room This command allows to control all shutters in a single room. Room as configured in MyHome. Interface (I) Stop/Up/Down Stop=0, Up=1, Down=2. Automation: general control This command allows to control all shutters. Stop/Up/Down Stop=0, Up=1, Down=2. Temperature Control: Setpoint This command allows to change the setpoint in a zone. Zone (ZA, ZB) as configured in MyHome. Temperature type the value of the temperature in °C. Temperature Control: enable or disable This command allows to enable/disable the thermostat. Zone (ZA, ZB) as configured in MyHome. Enable or disable type 1 to enable and 0 to disable. Sound: Control the volume This command allows to control the volume of a speaker. Room (A) as configured in MyHome. Loudspeaker (PF) Volume the number must be between 0 and 255. Sound: control a speaker ON/OFF This command allows to turn a speaker on or off. Room (A) as configured in MyHome. Loudspeaker (PF) ON/OFF insert 1 to turn on and 0 to turn off. Voice Control Gateway The available commands when selecting the Voice Control Gateway category under Reports and Gateways are the following: Restart Homekit gateway This function is used to restart the Homekit gateway enabled from the server's web page. IFTTT Account The available commands when selecting the IFTTT Account category under Reports and Gateways are the following: Trigger an event with parameters This function is used to send a command from Thinknx to trigger an event configured on an IFTTT service. The service configured in this case requires certain values before execution. Event identification this identification should match the one entered on the IFTTT website. Value to pass as ingredient 1 value 1 required by the service on IFTTT. Value to pass as ingredient 2 value 2 required by the service on IFTTT. Value to pass as ingredient 3 value 3 required by the service on IFTTT. Trigger an event This function is used to send a command from Thinknx to trigger an event configured on an IFTTT service. Event identification this identification should match the one entered on the IFTTT website. SMS Gateway The available commands when selecting the SMS Gateway category under Reports and Gateways are the following: Send SMS to numbers with text This function allows the sending of an SMS to multiple phone numbers. SMS text content message body. Receivers phone numbers use “ ; ” to indicate more receivers. Number should be international without leading + or 00. Internal Services The list below contains all the possible objects that could be added to the Internal Services category: Scene Presence Simulator Chronothermostat Email Account Thinknx Sensors Irrigation RGB Figure 3: Internal Services Scene After selecting Scene, a list of all the added scenes in System will be shown. The available commands when selecting one of the scenes are the following: Launch scenery This command will allow to play the selected scene. Sop scenery execution This command will allow to stop a scene during execution. Presence Simulator The available commands after selecting Presence Simulator and opening the Simulator tree are the following: Start the presence simulation This command allows to start playing the presence simulation configured in the Presence Simulation object in System. Stop the presence simulation This command allows to stop playing the presence simulation configured in the Presence Simulation object in System. Chronothermostat After selecting Chronothermostat, a list of all the added chronothermostats in System will be shown. The available command when selecting one of the chronothermostats is the following: Enable/Disable the Chrono modality This command allows to activate/deactivate the control of the setpoint from the schedule configured by the client. Enable/Disable send 1 to enable and 0 to disable. Email Account After selecting Email Account, a list of all the email accounts created in System will be shown. The available command when selecting one of the accounts is the following: Send Email to recipients This command allows to send an email to a group of recipients. Email subject Email recipients separate the emails using “ ; ”. Email content body of the email. Thinknx Sensors After selecting Thinknx Sensors, a list of all the Thinknx Sensors created in System will be shown. The available statuses when selecting one of the sensors are the following: Get the actual humidity This command allows read the humidity value from the selected sensor Get the actual luminosity This command allows read the luminosity value from the selected sensor Get the actual temperature This command allows read the temperature value from the selected sensor Irrigation The available command after selecting Irrigation and opening the “Chrono-Irrigation” is the following: Enable/Disable the Chrono modality This command allows to activate/deactivate the functioning of the irrigation zones from the schedule configured by the client. RGB After selecting RGB, a list of all the RGB objects added in System will be shown. The available commands when selecting one of the RGB objects are the following: Start RGB sequence shuffle with time in seconds This command allows to play a sequence of all the favorite colors in a shuffle mode, while defining the time to switch from one color to another. Time interval before switching to a new color, in seconds Start RGB sequence repeat with time in seconds This command allows to play a sequence of all the favorite colors in order and repeat them once done, while defining the time to switch from one color to another. Time interval before switching to a new color, in seconds Stop RGB sequence and turn OFF This command allows to stop an already launched sequence and turn off the RGB light. Save the current color to the selected preset position This command allows to save the current color to one of the available slots in Favorites. Preset position number of the slot where the color should be saved (value between 0-9). Recall the color previously saved to the selected preset position This command allows to switch the color of the RGB lights into the color saved in the requested slot below. Preset position number of the slot corresponding to the desired color (value between 0-9). Multimedia The list below contains all the possible objects that could be added to the Internal Services category: Video Matrix Audio Matrix Display Home Theater Media Player Sonos Manager IR Transmitter Figure 4: Multimedia Video Matrix After selecting Video Matrix, a list of all the video matrixes added in System will be shown. The available commands when selecting one of the matrixes are the following: Disconnect input for every output This command will disconnect all the inputs connected to the outputs. Disconnect input for selected output This command will disconnect the input connected to the desired output. Output Number Set the selected input to the selected output This command will allow to set the desired input to a selected output. Input Number Output Number Audio Matrix After selecting Audio Matrix, a list of all the audio matrixes added in System will be shown. The available commands when selecting one of the matrixes are the following: Set the selected input ot the selected output This command will allow to set the desired input to one or more multiple outputs. Input Number Output Number use comma “,” to send to multiple outputs. Disconnect input for every output This command will allow to disconnect the inputs on all outputs. Mute or unmute selected output This command will allow to mute or unmute one or more outputs. Output Number use comma “,” to send to multiple outputs. Mute Value 1=muted, 0=unmuted. Volume up selected output This command will allow to raise the volume on the selected output. The volume is raised by 1. Output Number use comma “,” to send to multiple outputs. Volume down selected output This command will allow to lower the volume on the selected output. The volume is lowered by 1. Output Number use comma “,” to send to multiple outputs. Set volume for selected output This command will allow to set the a desired value to the volume on the selected output. Output Number use comma “,” to send to multiple outputs. Volume value between 0-100. Display After selecting Display, a list of all the displays added in System will be shown. The available commands when selecting one of the displays are the following: Set the TV channel number This command will allow to change the TV channel to the desired channel entered inside the parameter. Channel Number Set the video source This command will allow to set the video source on the TV. Source Number On or standby the device This command will allow to turn ON the TV or put it to Standby mode. Power Value 1=Power ON, 0=Standby. Set the audio volume This command will allow to send a value to the TV volume. Volume Level value between 0-100. Set the audio volume up This command will allow to raise the volume on the TV. Set the audio volume down This command will allow to lower the volume on the TV. Home Theater After selecting Home Theater, a list of all the home theater devices added in System will be shown. The available commands when selecting one of the devices are the following: Depending on the brand of the Home Theater device selected in System, some commands may not be applicable. The values entered inside the commands vary depending on the protocol specification for each brand. Power On or Standby device This command will allow to turn the device On or put it to Standby mode. The command is sent to each zone individually. Subzone power value this value varies depending on the Brand of the Home Theater device. For more information, contact support@thinknx.com. Mute or unmute main output This command will allow to mute or unmute the output on the selected subzone. Subzone mute value this value varies depending on the Brand of the Home Theater device. For more information, contact support@thinknx.com. Volume up main output This command will allow to raise the volume on the selected subzone. Subzone Volume down main output This command will allow to lower the volume on the selected subzone. Subzone Set volume for main output This command will allow to send a desired value to the output's volume. Subzone Volume value between 0-100. Bass up main output This command will allow to raise the bass on the output. Bass down main output This command will allow to lower the bass on the output. Treble up main output This command will allow to raise the treble on the output. Treble down main output This command will allow to lower the treble on the output. Enable or disable Subwoofer This command will allow to enable or disable the subwoofer. Sub enable Select source for main output This command will allow to set the desired source to the main output of the selected zone. Subzone Main source Select audio source for selected main source This command will allow to set the main audio source. Subzone Main source audio Select video source for selected main source This command will allow to set the main video source. Subzone Main source video Read tuner frequency This command will allow to get a feedback on the current tuner frequency. Read tuner station This command will allow to get a feedback on the current tuner station. Tuner frequency up This command will allow to raise the tuner frequency. Tuner frequency down This command will allow to lower the tuner frequency. Tuner up This command will allow to scan for the next tuner station. Tuner down This command will allow to scan for the previous tuner station. Tuner auto search This command will allow to launch the tuner auto search. Tuner stop search This command will allow to stop the tuner auto search. Select digital mode for main output This command will allow to select the digital mode on the device. Digital Mode Select surround mode for main output This command will allow to select the surround mode on the device. Digital Mode Remote setup menu show/hide This command will allow show/hide the on screen display menu for the remote. OSD Setup 1=show OSD menu, 0=hide OSD menu. Remote press cursor up This command will simulate the remote control command “Cursor Up”. Remote press cursor down This command will simulate the remote control command “Cursor Down”. Remote press cursor right This command will simulate the remote control command “Cursor Right”. Remote press cursor left This command will simulate the remote control command “Cursor Left”. Remote press Enter button This command will simulate the remote control button “Enter”. Remote press Back/Return button This command will simulate the remote control button “Back/Return”. Remote press Option button This command will simulate the remote control button “Option”. Remote press Info button This command will simulate the remote control button “Info”. Send a custom command This command will allow to send a customized command to the device. Command to send to the device refer to the Denon/Marantz protocol specification. The available statuses to read from the Home Theater when it is configured as Denon are the following: Get the active input This feedback will read the active input on the AVR. Get the power status of the device This feedback will read the power status of the device. Get the present volume This feedback will read the current volume set on the device. Get the selected audio type This feedback will read the selected audio type. Get the selected video type This feedback will read the selected video type. Get the text displayed by device This feedback will read the text displayed on the device. Sonos Manager After selecting Sonos Manager, a list of all the players created in the System tab will be shown. The available commands when selecting one of the players are the following: Put the device in PLAY state This command will allow to play music on the selected player. Put the device in STOP state This command will allow to stop the music from playing on the selected player. Volume up the device This command will allow to raise the volume on the selected player. Volume down the device This command will allow to lower the volume on the selected player. Skip track forward This command will allow to play the next track. Skip track backward This command will allow to play the previous track. Set value for volume This command will allow to set the volume to a desired level. Desired Volume value between 0 and 100. Put the device in MUTE state This command will allow to mute/unmute the player. Mute value 1=unmuted, 0=muted. Play the audio from Audio IN plug This command will allow to play the music coming from the analog input of the player. Play the audio from another player Audio IN plug This command will allow to play the music coming from the analog input of another player player. Zone player unique identifier this identifier can be found when accessing the Sonos Manager in System and going to the Players collection. Play the audio from a network file This command will allow to play a shared file on the network using its URL. File URL should follow the form ://192.168.2.5/Music/abc.mp3 Play the audio from a streaming This command will allow to play from a streaming URL. Streaming URL should follow the form ://myradiostream.com:800 Enable/Disable Repeat PlayMode This command will enable/disable the repeat mode. Repeat value 1=enabled, 0-disabled. Enable/Disable Shuffle PlayMode This command will enable/disable the Shuffle mode. Shuffle value 1=enabled, 0-disabled. Start a Playlist from its number This command will start playing a desired playlist from its number. Playlist number Start a Playlist from its name This command will start playing a desired playlist from its name. Playlist name Play a favorite item from its number This command will start playing a desired item from the Favorite list. Favorite number The available statuses to read from the Sonos players are the following: Get mute status This feedback will read the mute status. Get the current track album This feedback will read the current track album. Get the current track artist This feedback will read the current track artist. Get the current track cover URL This feedback will read the current track artist URL. Get the current track title This feedback will read the current track title. Get the current volume This feedback will read the current volume level. Get the last invoked playlist This feedback will give the last invoked playlist. Get the play status This feedback will read the play status of the player. Get the repeat status This feedback will read if the repeat function is enabled or disabled. Get the shuffle status This feedback will read if the shuffle function is enabled or disabled. Media Player After selecting Media Player, a list of all the players added in System will be shown. The available commands when selecting one of the media players are the following: Navigate up in the user interface Simulates the $\uparrow$ command. Navigate down in the user interface Simulates the $\downarrow$ command. Navigate right in the user interface Simulates the $\rightarrow$ command. Navigate left in the user interface Simulates the $\leftarrow$ command. Select current item in the user interface Select the current object in the user interface. (It simulates the ”OK” or ”Enter” command) Goes back in the user interface Return to the previous page; it simulates the ”Return” or ”Back” command. Shows the context menu in the user interface Visualise the current object menu; it simulates the ”Menu” button. Shows the information dialogue Displays a pop-up with the information related to the current program; it simulates the ”Info” button. Goes to GUI homepage Redirects to the GUI homepage; it simulates the ”Home” button. Shows the on-screen display for the current player Visualise a pop-up with the on-screen display for the current player. Starts playback of a single file or an item from the database Launches a specified file; the file path can be specified by adjusting the ”File path” parameter on the right. Play/Pause the player Play or pause the current player. Stop the player Stops the player. Skip the current track and play the next one Skips the current track and directly play the next one. Skip the current track and play the previous one Skips the current track and directly play the next one. Make a step forward on the current playing element Fast forward the current playing element. Make a step backward on the current playing element
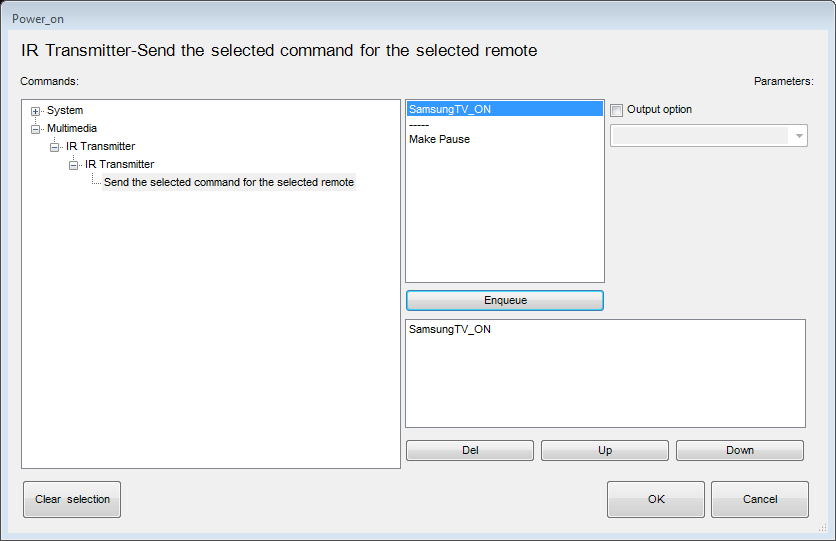
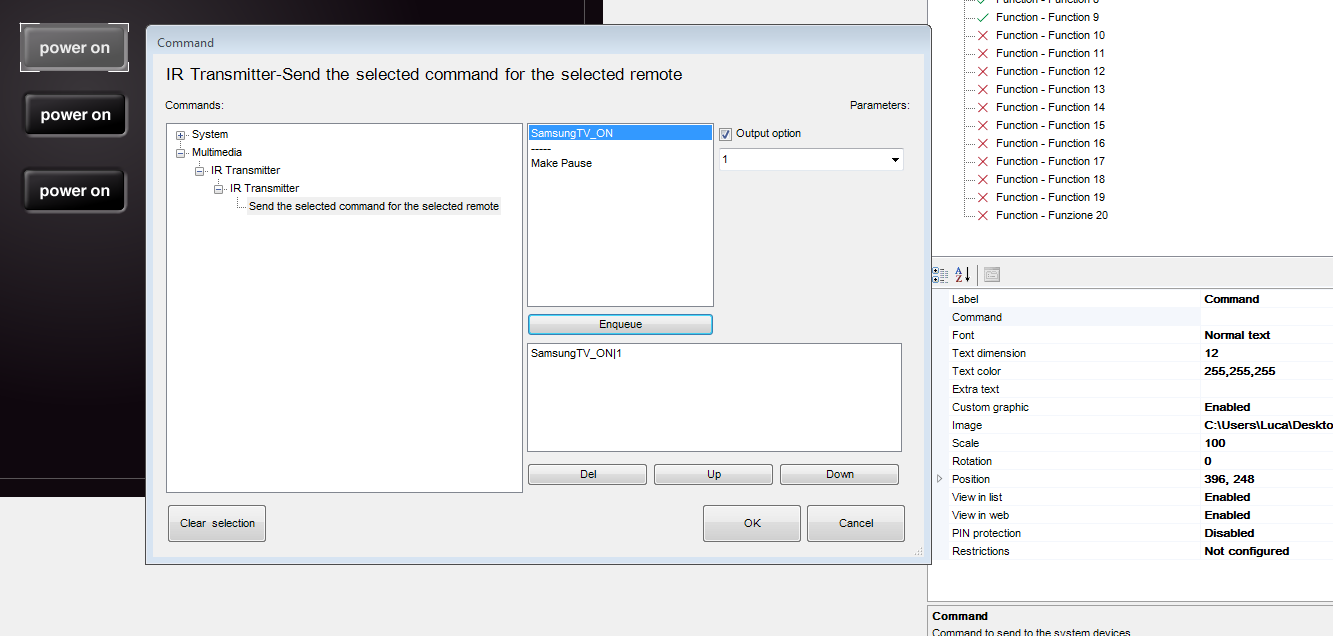
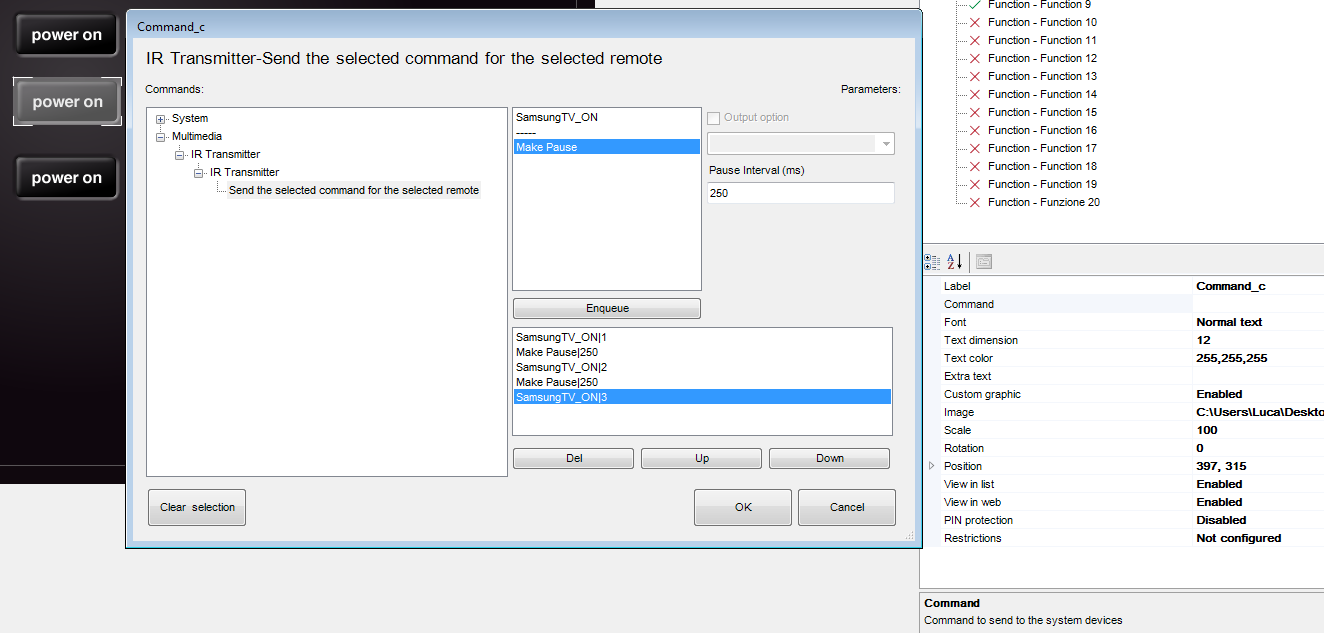
 Fast backward the current playing element. Raise the volume of the player Turns the volume up. Lower the volume of the player Turns the volume down. IR Transmitter After selecting IR Transmitter, a list of all the transmitters created in the System tab will be shown. The available commands when selecting one of the transmitters are the following: Send the selected command for the selected remote This command will allow to send an IR command by selecting it from the list to the right. If you want to select a defined output different from the default one, before enqueuing the command, it is possible to enable the “Output option” and select the desired output from the list. The enqueued command will appear on the list of the commands to execute with an appended index corresponding to the selected output. It is possible to create complex macro of IR operations simply enqueuing more commands. Commands can be separated by pause adding the ”Make pause” item in order to grant a better reception. The sequence displayed in the box on the bottom of the page can be edited by deleting single items or moving them by clicking on ”Up” and ”Down” buttons. Security The list below contains all the possible objects that could be added to the Security category: Alarm Device Centrale Figure 5: Security Alarm Device After selecting Security, a list of all the alarm devices and centrale added in System will be shown. The available commands when selecting one of the devices are the following: Arm a particular partition with a specified code This command will allow to arm one partition using its related pin code. Partition Number Pin Code Disarm a particular partition with a specified code This command will allow to disarm one partition using its related pin code. Partition Number Pin Code Arm all partitions with a specified code This command will allow to arm all partition using a common pin code. Pin Code Disarm all partitions with a specified code This command will allow to disarm all partition using a common pin code. Pin Code Switch ON or OFF the specified output This command will allow to control a particular output on the alarm system. Number of the output to switch New /state of the output ON=1, OFF=0. Centrale After selecting Security, a list of all the alarm devices and centrale added in System will be shown. The available commands when selecting one of the devices are the following: Arm a particular partition with a specified code This command will allow to arm one partition using its related pin code. Partition Number Pin Code Disarm a particular partition with a specified code This command will allow to disarm one partition using its related pin code. Partition Number Pin Code Arm all partitions with a specified code This command will allow to arm all partition using a common pin code. Pin Code Disarm all partitions with a specified code This command will allow to disarm all partition using a common pin code. Pin Code Switch ON or OFF the specified output This command will allow to control a particular output on the alarm system. Number of the output to switch New /state of the output ON=1, OFF=0.