Thinknx Server with KNXnet/IP Interface
-
Introduction
Enabling KNXnet/IP on the server allows you to program and connect to the KNX bus over IP. In addition to the normal operation of the server as a visualization tool, and depending on the configuration, it can be used as a:
- KNX/IP interface without routing, allowing KNX programming over IP.
- KNX IP router, allowing KNX programing as well as connecting different parts of a KNX system together over IP, much like a line coupler.
Figure 1: Thinknx server with KNXNet/IP interface
The Thinknx server can also communicate with other KNXNet/IP interfaces instead of using its own embedded bus connection to communicate with the KNX bus.
The KNXnet/IP service is only available on servers using firmware 1.1.10.13 or up.
Enabling KNXNet/IP interface
This service can be enabled from Thinknx UP Configurator (version 1.3.0.11 or up) or by accessing the server's web page and overriding the project's configuration.
Using UP Configurator
Go to the System tab, and click on System. The below parameters are available to edit in the Properties window:
- KNXNet/IP interface if enabled, the Thinknx server can be used as a KNXNet/IP interface, allowing KNX programming from the ETS software for example.
- KNXNet/IP different IP if enabled, permits to choose a different KNXNet/IP interface to connect and access the KNX bus.
- Clients Ph. Address Base base physical address for the clients connections.
- Client number number of supported client tunnel connections.
When using the server as a KNXnet/IP interface, it is important to define the “client physical address base” and “clients number”, and reserve these KNX physical addresses in the ETS project instead of assigning them to other devices.
The “Clients Physical Address base” and “Client number” are only available to be used with Thinknx Envision. On the other servers the KNX tunnel connections will share same primary physical address
- KNXNet/IP router If enabled, the server will also route traffic from TP to multicast IP and vice versa, allowing to connect different parts of a KNX system together over IP.
Be careful to avoid loops that may result from connecting 2 Thinknx servers with KNXNet/IP router enabled on the same network and same TP line.
Figure 2: Enabling KNXNet/IP Interface from Configurator
Using the webpage
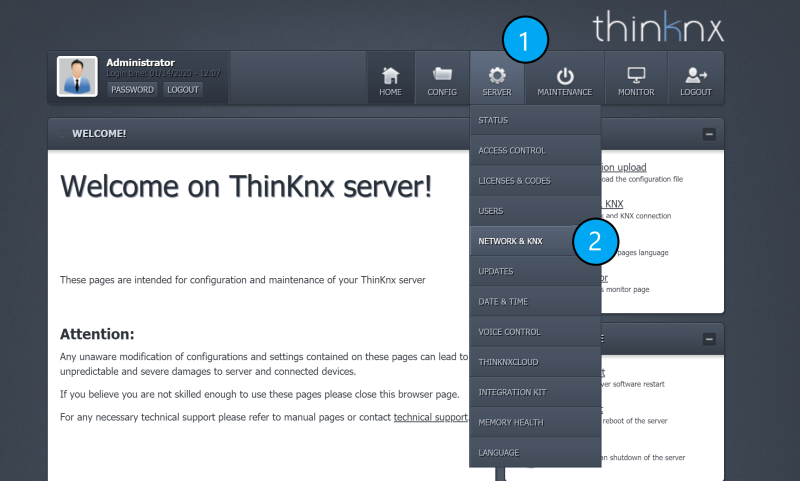
Click on Server, and select Network and KNX. This page will allow you to modify the network and KNX settings of the server.
Figure 3: Accessing Network and KNX
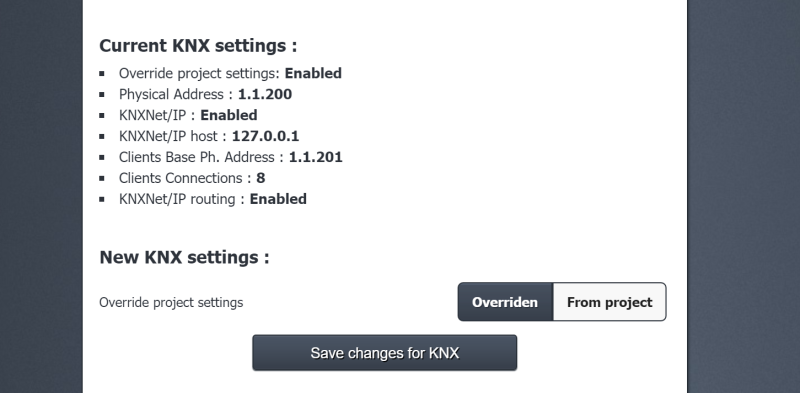
Scroll down to reach the “KNX Settings”. By default, the web page will show the KNX configuration uploaded with the Thinknx project.
Figure 4: Viewing the KNX settings
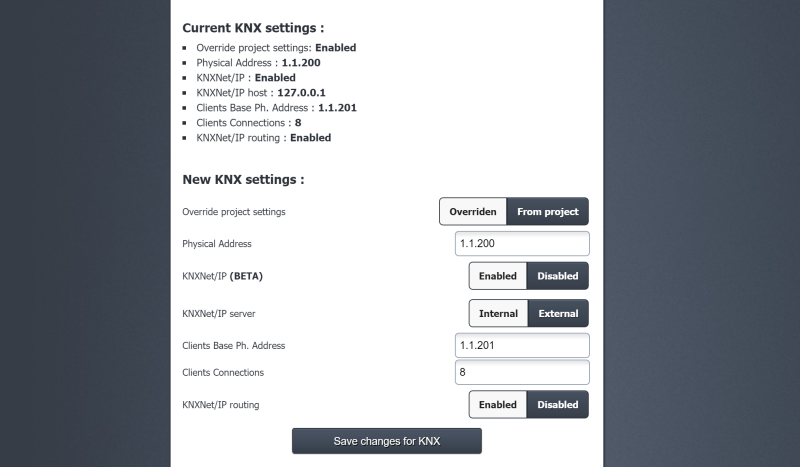
If you wish to override these settings, click on “Overridden”.
Figure 5: Editing the KNX settings
The below parameters are available to configure:
- Physical Address KNX physical address assigned to the Thinknx server.
- KNXNet/IP if enabled, the Thinknx server can be used as a KNXNet/IP interface, allowing KNX programming from the ETS software, for example.
- KNXNet/IP server if External is selected, it permits to connect to choose a different KNXNet/IP interface to connect and access the KNX bus. If Internal is selected, the Thinknx server will be used as KNXNet/IP interface.
- KNXNet/IP server IP only visible if KNXNet/IP server is “External”. IP address of the third party KNX IP interface to connect to.
- Clients Ph. Address Base base physical address for the clients connections.
- Client number number of supported client tunnel connections.
When using the server as a KNX/IP interface, it is important to define the “client physical address base” and “clients number”, and reserve these KNX physical addresses in the ETS project instead of assigning them to other devices.
The “Clients Physical Address base” and “Client number” are only available to be used with Thinknx Envision
- KNXNet/IP routing If enabled, the server will also route traffic from TP to multicast IP and vice versa, allowing to connect different parts of a KNX system together over IP.
Be careful to avoid loops that may result from connecting 2 Thinknx servers with KNXNet/IP router enabled on the same network and same TP line.
Application 1: Thinknx server as KNXnet/IP Interface
This option permits to use the Thinknx Server as a visualization server as well as a KNXNet/IP interface (without routing).
- Enable KNXNet/IP interface from the Configurator/Webpage.
- You may leave KNXNet/IP server as “internal” or “disabled”.
- Disable KNXNet/IP router.
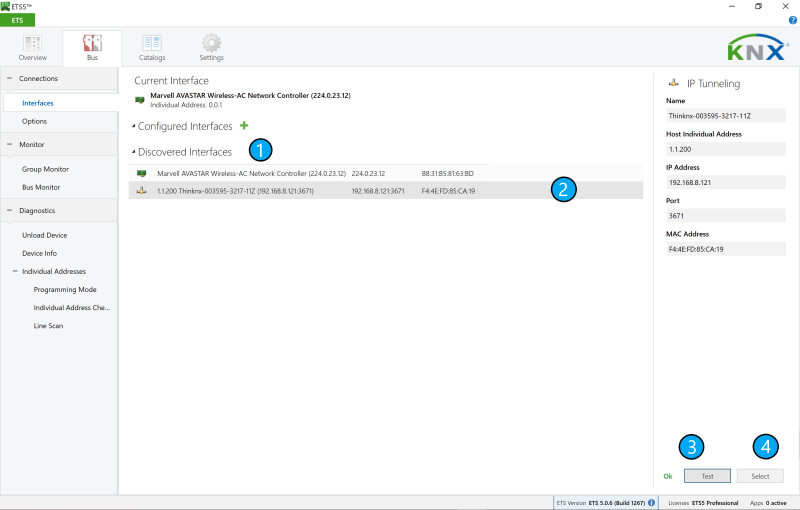
- Connect your PC to the same network as the Thinknx server and go to the ETS “Bus” tab.
- Under “Discovered interfaces”, you will be able to find the Thinknx Server, test the connection, and select it.
Figure 6: Scanning server from ETS
Application 2: Thinknx server as KNXnet/IP Router
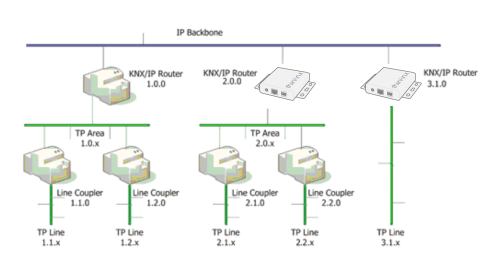
This option permits to use the Thinknx Server as a visualization server as well as a KNXNet/IP router, combining two devices in one, as seen in the diagram below.
To use the server as KNXNet/IP router:
- Enable KNXNet/IP interface from the Configurator/Webpage.
- Enable KNXNet/IP router.
- You may leave KNXNet/IP server as “internal” or “disabled”.
Be aware of the KNX physical address to be given to your Thinknx server. It should follow the topology of your KNX installation.
- knxnet_ip.txt
- Last modified: 2020/01/28 08:40
- by wikiadmin


