Audiofy 2.0 - The Hub of Home and Building Automation
- Product Range
- Audiofy P1 upgradable to Micro Server
- Audiofy P4 upgradable to Micro Server
Technical DataInstallationIntroduction
Audiofy is not only a professional audio multi-room system but your all-in-one solution for the complete control of home and building automation. Just with one device you can stream music contents from internal players or analog stereo inputs and manage in the same time all the functionalities of Thinknx supervision system from lighting and heating & cooling, to audio and music. Moreover, thanks to the integration with voice control devices like Apple Home Kit and Amazon Echo, you’ll directly turn on or off all the commands using your voice. Through the native KNX TP port, Audiofy acts as every Thinknx controller allowing a bidirectional interaction with the plant. The new software update and the graphical restyling make the Audiofy app much more intuitive, faster and easy to use for every iOS and Android mobile devices, maximizing the performance level of the system, for a complete customer user-experience.
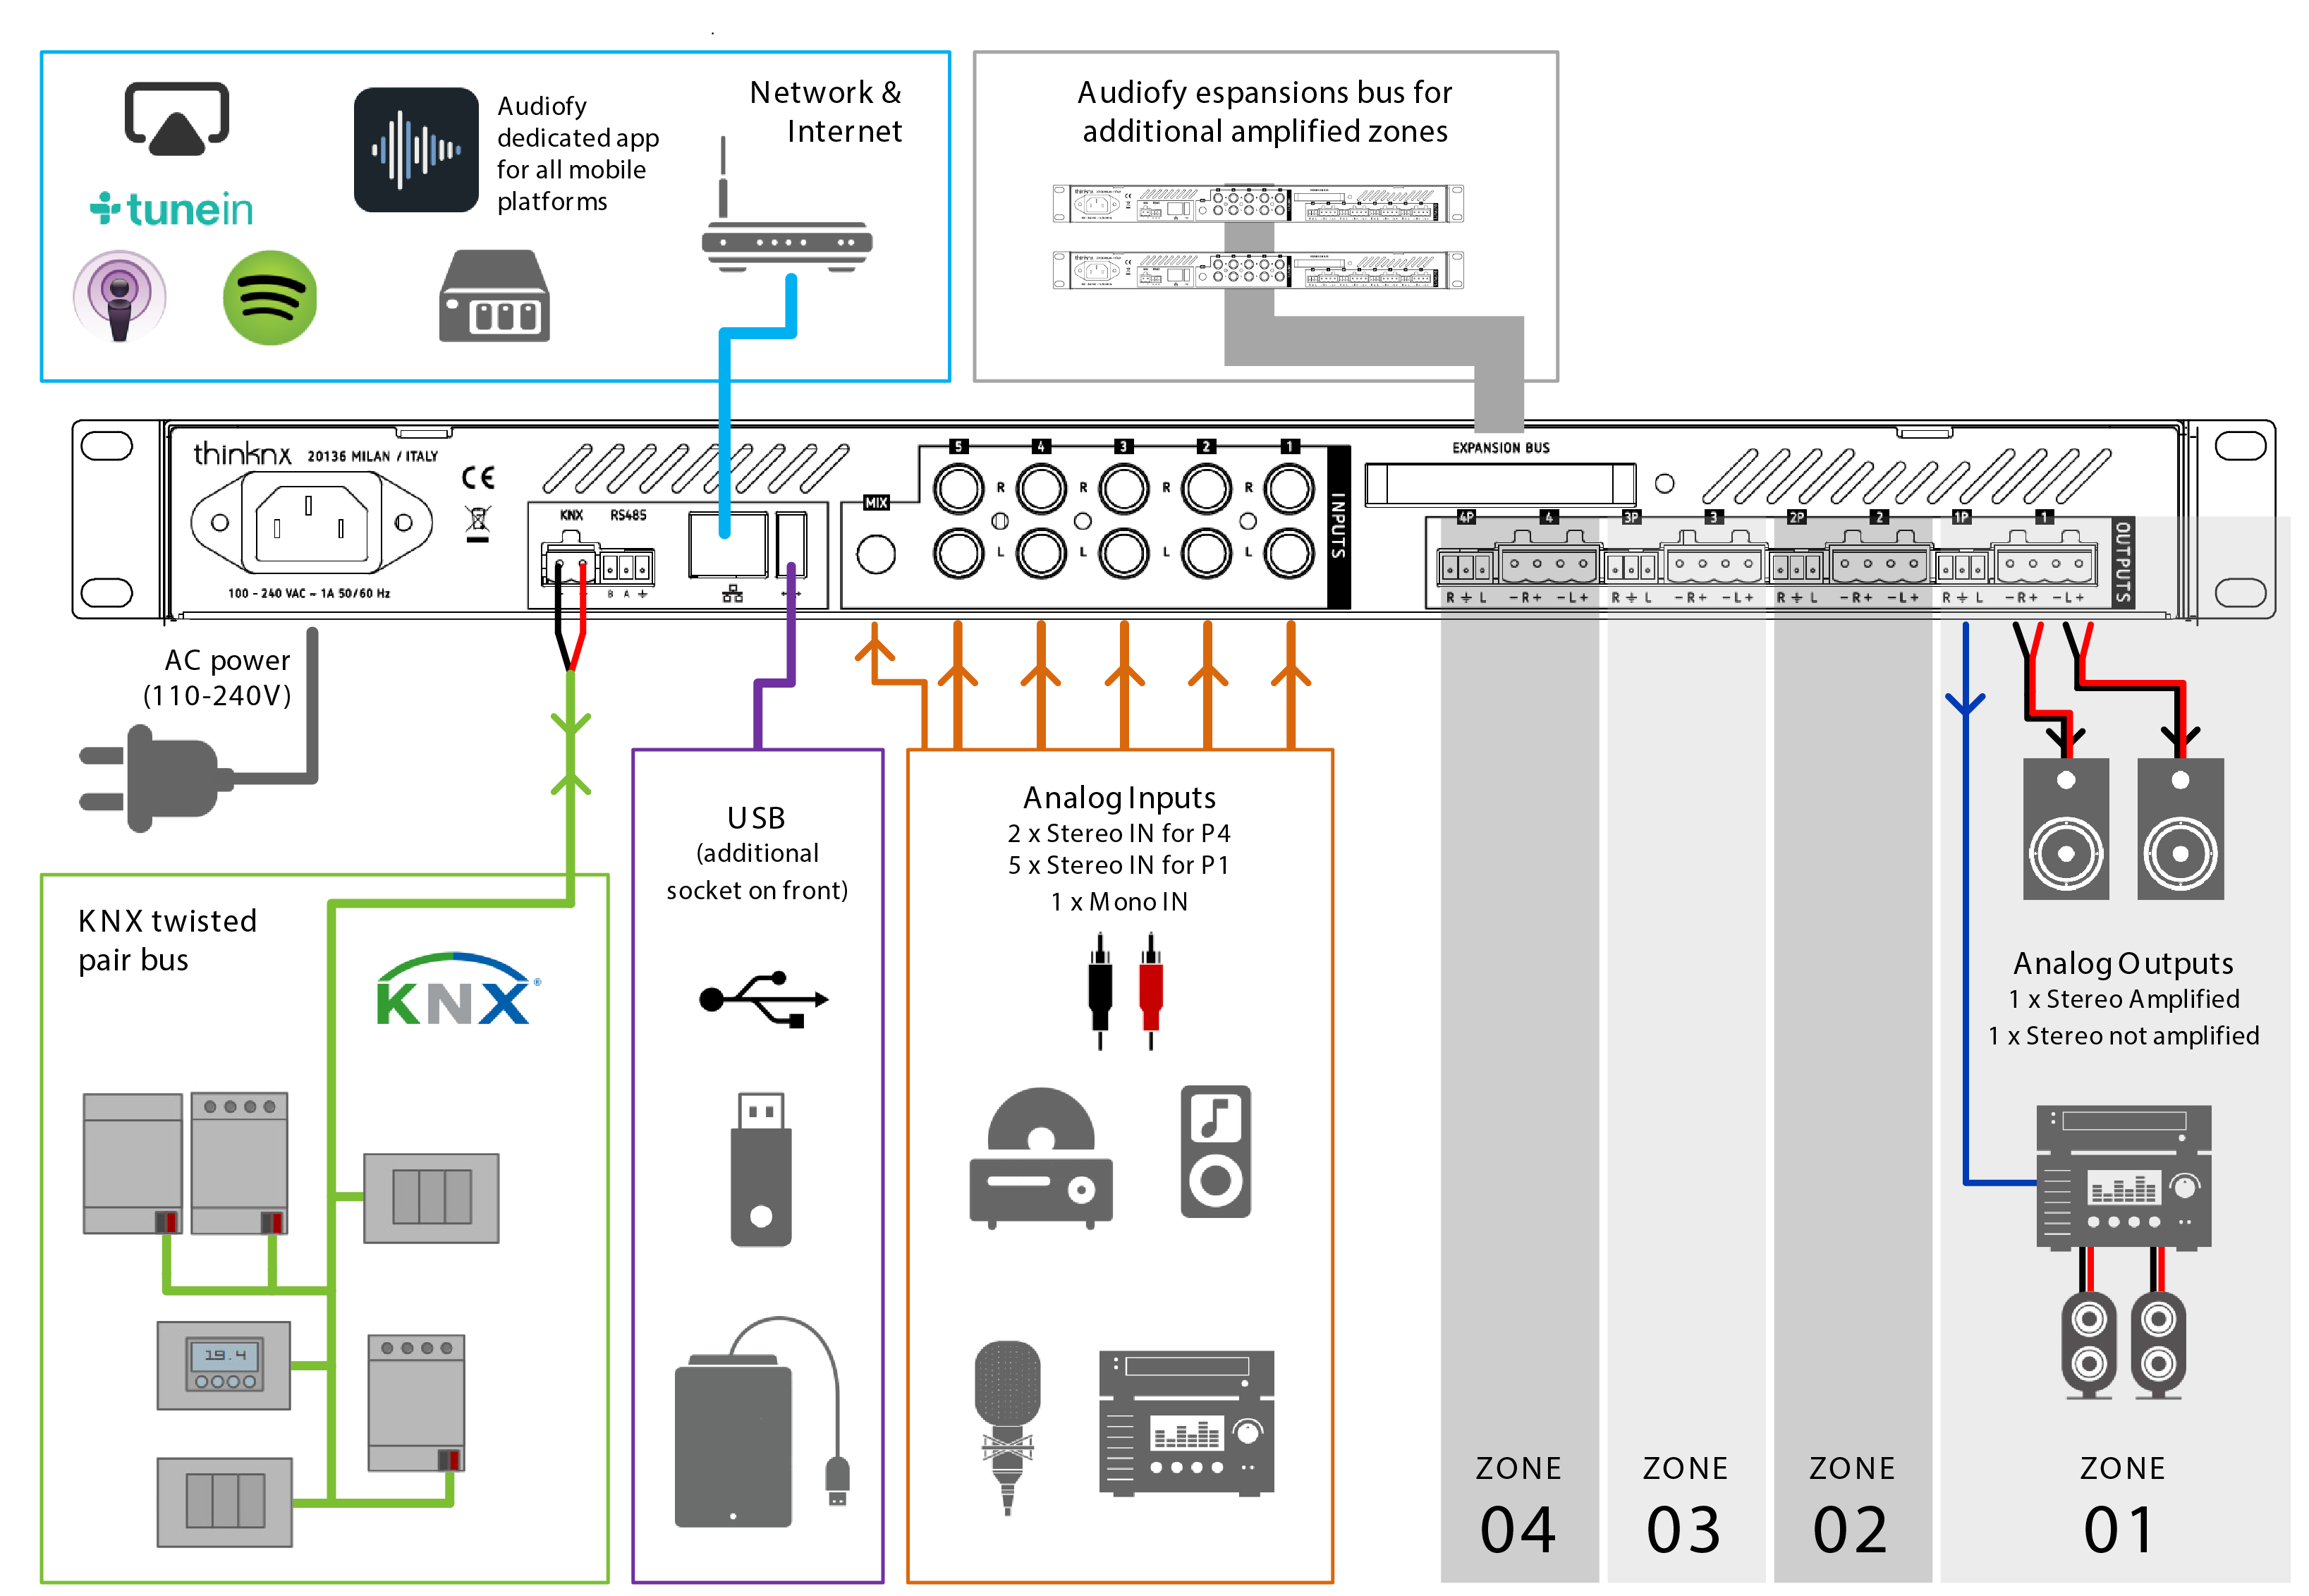
Figure 1: Scheme of a typical integrated installation
Safety Precautions
Before connecting and using this product, please read this instruction carefully and keep it on hand for future reference. The manual is to be considered an integral part of this product and must accompany it when it changes ownership as a reference for correct installation and use as well as for the safety precautions. Pulsar Engineering s.r.l will not assume any responsibility for the incorrect installation and / or use of this product.
WARNING To prevent the risk of fire or electric shock, never expose this product to rain or humidity (indoor use only).
1. All the precautions, in particular the safety ones, must be read with special attention, as they provide important information.
2. Power supply from mains
- The mains voltage is sufficiently high to involve a risk of electrocution: never install or connect this product when its power cord is plugged in.
- Before powering up, make sure that all the connections have been made correctly and the voltage of your mains corresponds to the voltage shown on the rating plate on the unit, if not, please contact your Thinknx dealer.
- The metallic parts of the unit are earthed by means of the power cord.
- Protect the power cord from damage. Make sure it is positioned in a way that it cannot be stepped on or crushed by objects.
- To prevent the risk of electric shock, never open this product: there are no parts inside that the user needs to access.
- The mains plug is used as the disconnect device and it shall remain readily operable.
3. Make sure that no objects or liquids can get into this product, as this may cause a short circuit. This apparatus shall not be exposed to dripping or splashing. No objects filled with liquid (such as vases) and no naked sources (such as lighted candles) shall be placed on this apparatus.
4. Never attempt to carry out any operations, modifications or repairs that are not expressly described in this manual. Contact your authorized service centre or qualified personnel should any of the following occur:
- The product does not function (or functions in an anomalous way).
- The power supply cord has been damaged.
- Objects or liquids have got in the unit.
- The product has been subject to a heavy impact.
5. If this product is not used for a long period, disconnect the power cord.
6. If this product begins emitting any strange odours or smoke, switch it off immediately and disconnect the power cord.
7. Do not connect this product to any equipment or accessories not foreseen. For suspended installation, only use the dedicated anchoring points and do not try to hang this product by using elements that are unsuitable or not specific for this purpose. Also check the suitability of the support surface to which the product is anchored (wall, ceiling, structure, etc.), and the components used for attachment (screw anchors, screws, brackets not supplied by the producer), which must guarantee the security of the system / installation over time, also considering, for example, the mechanical vibrations normally generated by loudspeakers. To prevent the risk of falling equipment, do not stack multiple units of this product unless this possibility is specified in the user manual.
8. Hearing loss Exposure to high sound levels can cause permanent hearing loss. The acoustic pressure level that leads to hearing loss is different from person to person and depends on the duration of exposure. To prevent potentially dangerous exposure to high levels of acoustic pressure, anyone who is exposed to these levels should use adequate protection devices. When loudspeakers capable of producing high sound levels are used, it is necessary to wear ear plugs or protective earphones. See the technical specifications in speaker user manuals to know their maximum sound pressure levels.
9. Install this product far from any heat source.
10. Do not use solvents, alcohol, benzene or other volatile substances for cleaning the external parts of this product. Use a dry cloth.
Product Range
Audiofy is a scalable system which delivers music contents from internal players (up to 4) or analog stereo inputs (up to 5) to stereo power amplified outputs (from 4 to 32).
Thanks to the many protocols supported, it is perfectly integrated inside automation systems. A native KNX TP port allows to send commands to the music system directly from other KNX devices and to receive feedback.
Through a complete set of Apps, the final user decides the routing of the audio sources and has a complete control over his music listening experience. The internal player is directly controlled from the app, the music library provided by a NAS or USB stick can be browsed with a simple menu.
Even the music stored on smartphones or tablets can be reproduced directly using AirPlay, UPnP and the outputs can always be chosen through the app!
If the user wants to listen to radio or web contents, Audiofy provides the integration of several web services so that the he can always access to his favorite music.
Did you know? The internal player inside the Audiofy is used to stream music from any digital source, such as Airplay, NAS, Spotify, USB or playlist.
Audiofy P1
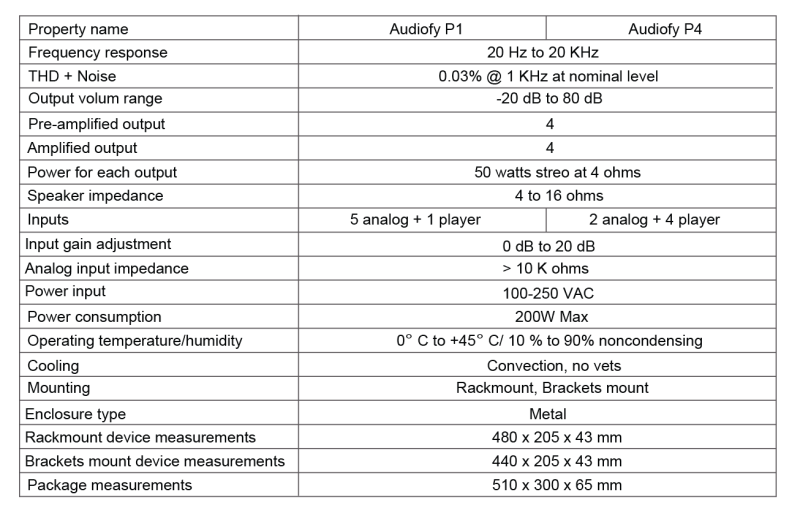
It allows to diffuse the music coming from the 4 analog inputs or from the internal player to 4 amplified outputs (expandable to 12)
- 1x Internal network player
- 5x Unbalanced analog inputs
- 4x Amplified stereo outputs
- 1x Network port
- 1x EIB / KNX TP port
- 1x USB port
- Power supply 24Vdc 200W Max
Audiofy P4
It allows to diffuse the music coming from the 2 analog inputs or from the 4 internal players to 4 amplified outputs (expandable to 12)
- 4x internal network players
- 2x unbalanced analog inputs
- 4x amplified stereo outputs
- 1x network port
- 1x EIB / KNX TP port
- 1x USB port
- Power supply 24Vdc 200W Max
Expansion E4
Expansion module that allows to add 4 additional outputs to P1 or P4 modules.
- 4 amplified stereo outputs (50W per channel on 4Ohm speakers)
- Power supply 24Vdc 200W Max
Did you know? An Audiofy can be upgraded to work as a Thinknx server, combining control of the home automation system as well as the multi-room audio system in one application.
Technical Data
Rear Panel
Figure 4: View of the connections [P1-P4]
- Power Supply (Mains voltage 100 - 250 Vac)
- KNX connection (respect polarity)
- RS485 port
- Ethernet port
- USB port
- MIX input
- Left audio analog input channel P1[1-5] - P4[1-2]
- Right audio analog input P1[1-5] - P4[1-2]
- Pre-amplified output channel [1-4]
- Speakers output channel [1-4]
Audio Outputs
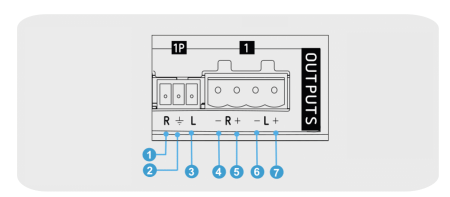
Figure 5: Audiofy audio outputs connections
- Pre-amplified output right
- Pre-amplified output shield
- Pre-amplified output left
- Right speaker output -
- Right speaker output +
- Left speaker otput -
- Left speaker output +
KNX external control
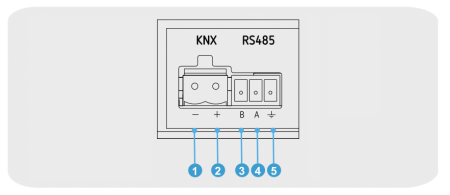
Figure 6: Audiofy KNX connections
- KNX Connection -
- KNX Connection +
- RS485 B (D-)
- RS485 A (D+)
- RS485 Shield
The RS-485 port is not meant to control the Audiofy, but is meant for internal use only through a Thinknx staff member.
Installation
Rack Mounting
This device can be installed into a 19” rack cabinet (1 unit) thanks to its rack ears, or to a wall thanks to its brackets mount. In the following pictures you can see how to mount the proper brackets to the audiofy unit. Please use only the provided M4x8 screws to avoid internal damages to the unit.
Figure 7: Audiofy rack mounting option
Figure 8: Audiofy wall mounting option
Inter-device connection
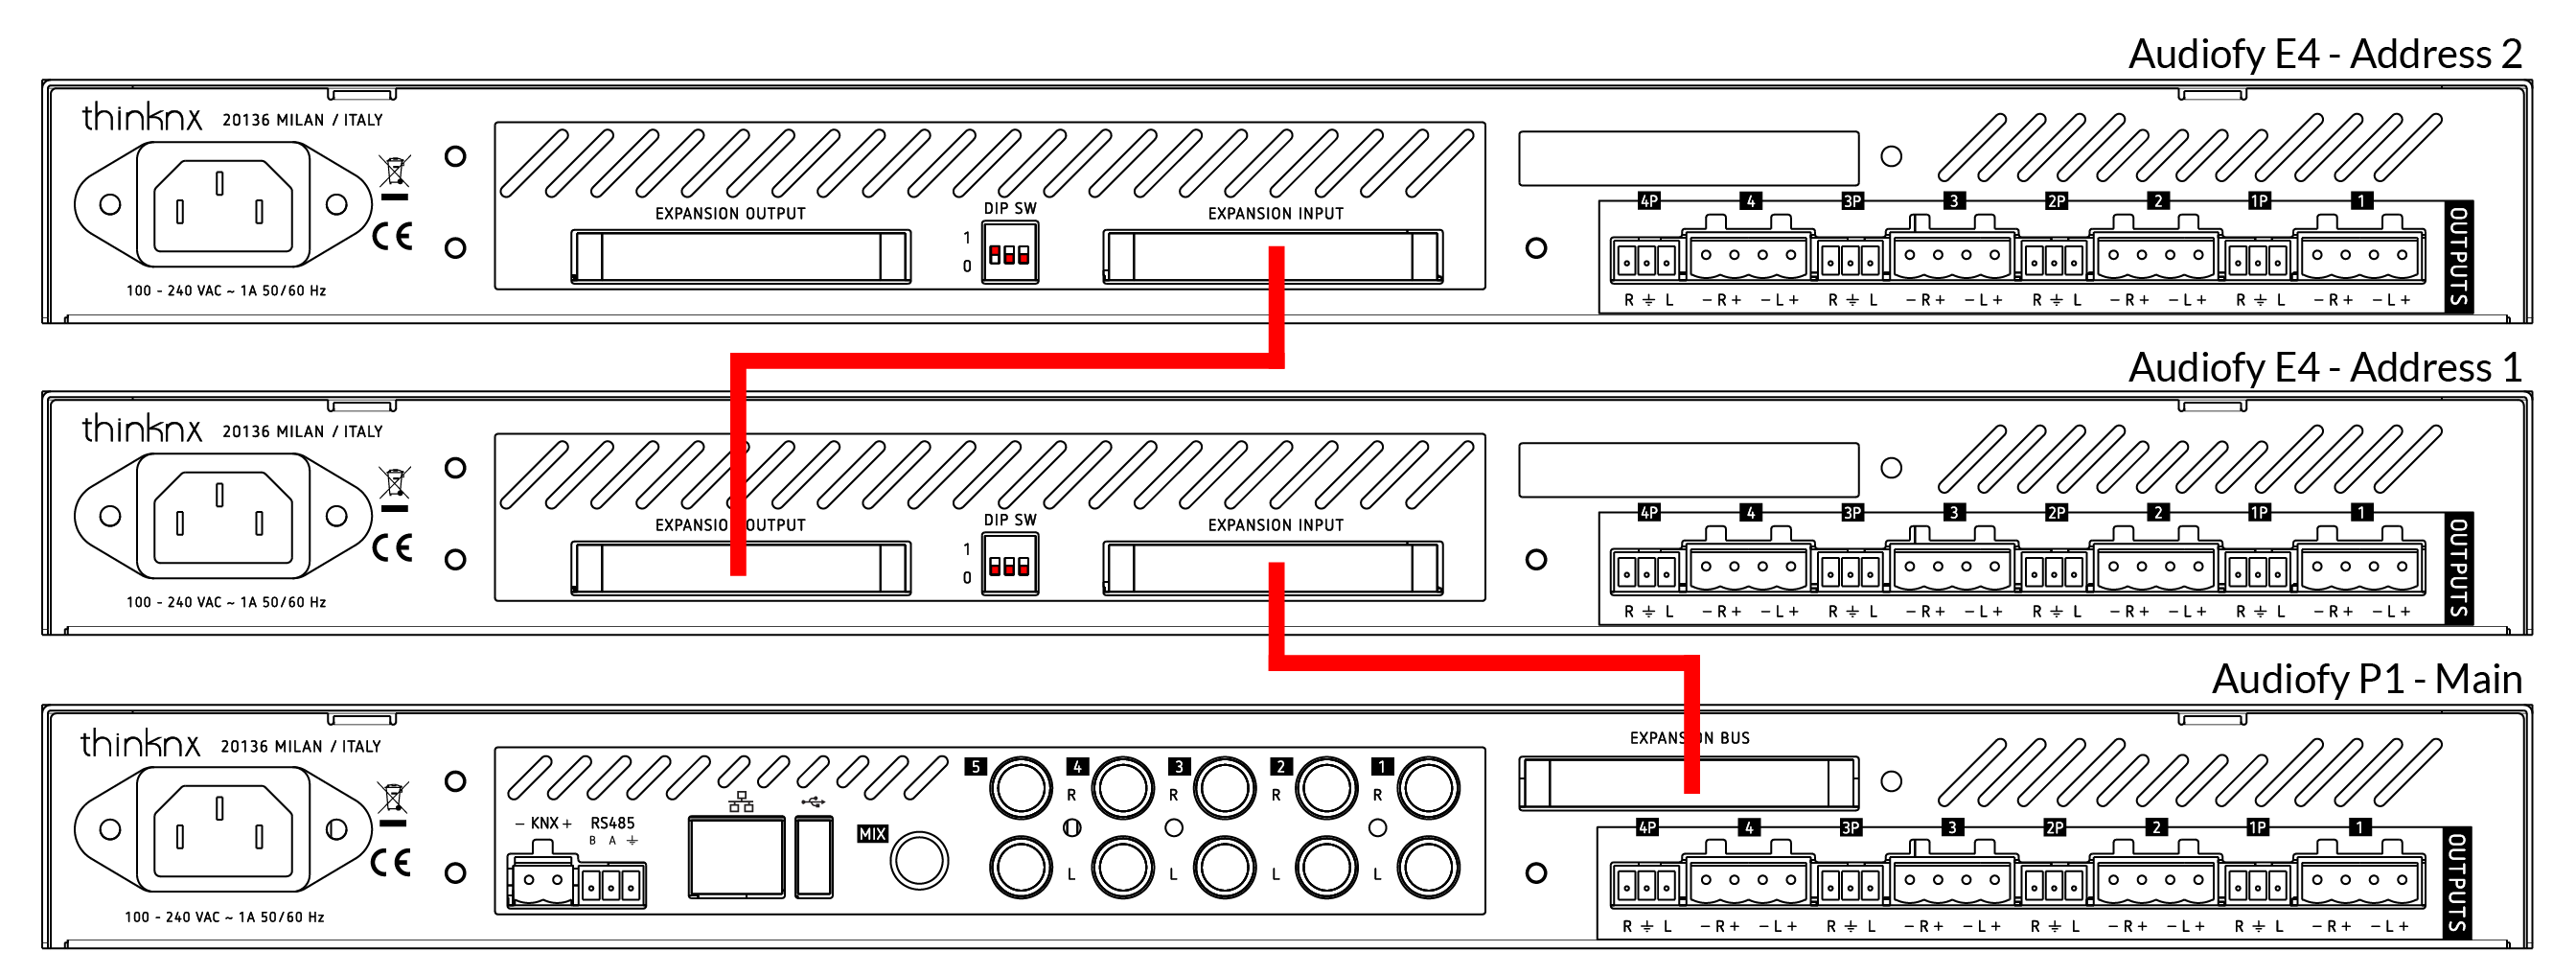
To expand the system and use the Audiofy E4, proper connections must be done between the master device (P1 or P4) and the expansions. The master device must be connected to the first expansion using the EXPANSION BUS connector and than all the other expansions must be daisy chained using EXPANSION IN - EXPANSION OUT connections like the picture below.
Figure 9: Expansions inter-connections
Use the provided flat cables to inter-connect the devices. Longer cables will carry degraded audio signals and the performance of the whole system will be worse.
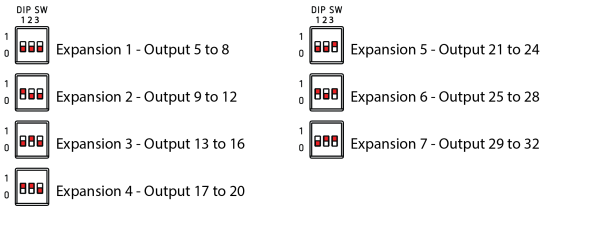
Each expansion must be set to a different address using the DIP switches on the back. Please follow the picture below to identify expansion properly.
Figure 10: Expansions DIP switches settings
How to start - Quick Setup Guide
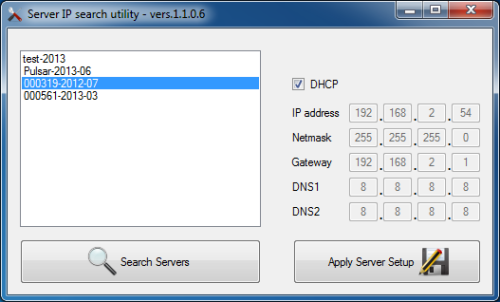
Once the Audiofy is connected to LAN it acquires an IP address given by the DHCP service. To discover the IP address assigned to the device, use the Thinknx UP Configurator by clicking on the bottom right section of the software where it reads “Click here to search for Thinknx devices”. After selecting the ThinKnx Audiofy installed, it is possible to disable the DHCP service and provide it with a static IP. Click on the ”Apply server setup” to confirm the changes. This step is recommended to avoid the loss of the IP address in case the connection is lost: in fact on connection recovery, the DHCP server could not assign the same address, causing problems between server and clients.
If the Audiofy is connected on a network where DHCP service is unavailable, it will acquire as default address: 192.168.0.200
If a static IP address was previously set, the device is always reachable at the address: 192.168.24.254 (with subnet mask 255.255.255.252).
It is highly recommended to disable DHCP service and use a static IP address. Otherwise, it is possible to run into clients connection problems when the DHCP lease expires.
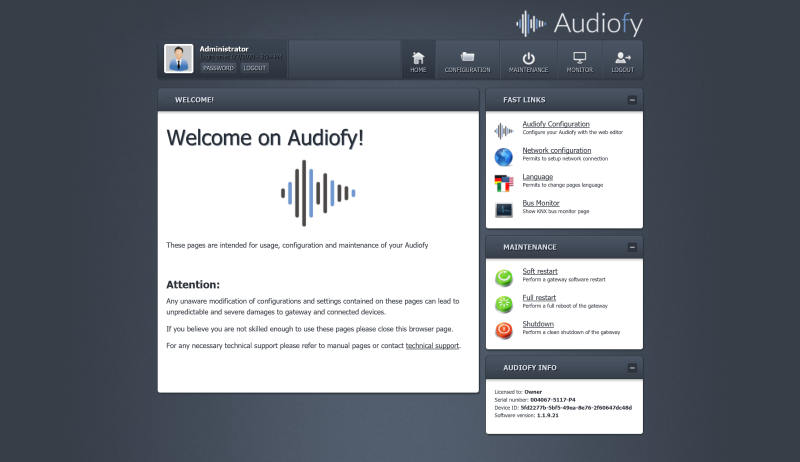
The Audiofy can be reached and configured from its web interface just like any Thinknx server. To open the server's web interface just launch your preferred internet browser (Firefox or Chrome are tested browser) and enter the following: http:\\serverip:5051
Figure 11: Server Manager: tool to discover servers on the network
You will be prompted for login. At the first access the following credentials must be used:
username: service
password: passwordYou will be request to change the password for the next access. Please take note of the new password as it will require an hard reset to recover it.
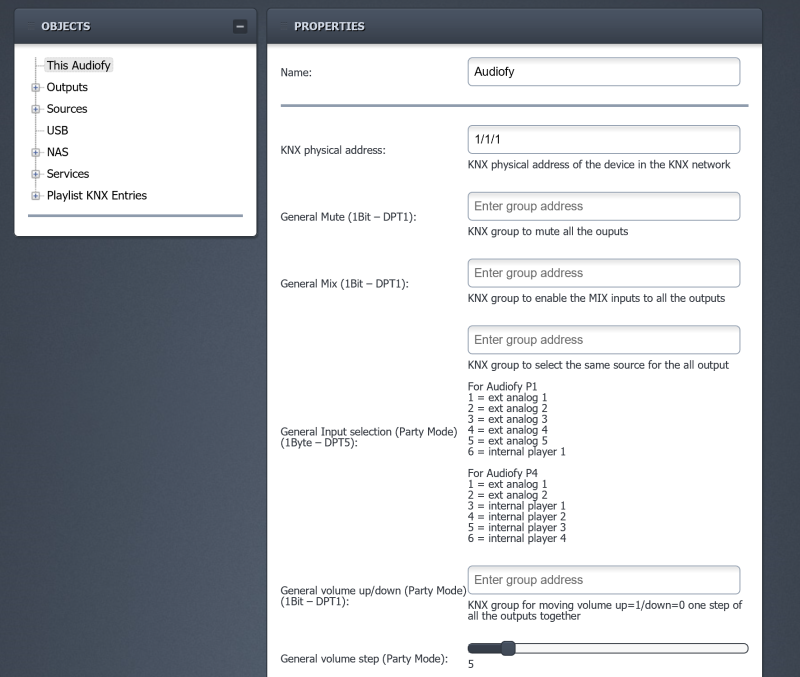
The webpage of the Audiofy is very similar to a Thinknx server but some menu items cannot be viewed unless the Audiofy has been upgraded to a server. You can start by configuring your KNX group addresses if needed, naming your outputs and inputs, in addition to configuring other services available.
Did you know? The Audiofy does not require an ETS file to be configured. All KNX group addresses can be entered manually from the webpage of the Audiofy.
Figure 12: Audiofy Webpage
Figure 13: Audiofy Configuration
Available control through KNX
- GENERAL
- General Mute 1-bit DPT1 - KNX group to mute all the outputs
- General Mix 1-bit - DPT1 - KNX group to enable the MIX inputs to all the outputs.
- General input selection 1-byte - DPT5. KNX group to select the same source for all the outputs.
- For Audiofy P1:
- 1 = ext analog 1
- 2 = ext analog 2
- 3 = ext analog 3
- 4 = ext analog 4
- 5 = ext analog 5
- 6 = internal player 1
For Audiofy P4:- 1 = ext analog 1
- 2 = ext analog 2
- 3 = internal player 1
- 4 = internal player 2
- 5 = internal player 3
- 6 = internal player 4
General volume up/down 1-bit - DPT1. KNX group for moving volume up=1/down=0 one step of all the outputs together. Step is defined in the General Volume Step slider below this field.Public Announce select 1-byte - DPT5. KNX group to launch a precise playlist to all the outputs (KNX values that will be used to recall the playlist must be defined in the “Playlist KNX Entries” node, association between playlists and KNX values must be defined in the Audiofy app). Player 1 will be used for playing the music.KNX group stop PA 1-bit - DPT1. KNX group for stopping alert playing or PA playlist playing.Alert tone selection 1-byte - DPT5. The following tones are available:- 1 = Dingdong
- 2 = Knock on door
- 3 = Gong
- 4 = Horn
- 5 = Sonar
- 6 = MusicBox
- 7 = Birds
- 8 = Jazz
- 9 = Organic
- 10 = Pizzicato
- 11 = Peace
- 12 = Scala
- 13 = Siesta
ZONE- Volume up/down (1Bit – DPT1) KNX group for moving volume up=1/down=0 one step. Step is defined in the slider below this field.
- Volume value (1Byte – DPT5) KNX group to change the volume to an absolute value [0-255]
- Volume value feedback (1Byte – DPT5) KNX group address to receive current volume absolute value [0-255]
- Volume move (4Bit – DPT3) KNX group address for moving volume up/down using standard dimming/shutters objects
- Mute (1Bit – DPT1) KNX group to mute=1/unmute=0 the output
- Mute status (1Bit – DPT1) KNX group to receive the current status of the output muting
- Input selection (1Byte – DPT5) KNX group to select the source for the output.
- For Audiofy P1:
- 1 = ext analog 1
- 2 = ext analog 2
- 3 = ext analog 3
- 4 = ext analog 4
- 5 = ext analog 5
- 6 = internal player 1
For Audiofy P4:- 1 = ext analog 1
- 2 = ext analog 2
- 3 = internal player 1
- 4 = internal player 2
- 5 = internal player 3
- 6 = internal player 4
Input selection status (1Byte – DPT5) KNX group that report the current selected the source for the outputMix enable (1Bit – DPT1) KNX group to add the content coming from the MIX analog input to the current output [1=mix enabled/0=mix disabled]Mix status (1Bit – DPT1) KNX group that report the current status the mixing from the MIX analog input to the current output [1=mix enabled/0= mix disabled]Bass value (1Byte – DPT5) KNX group to adjust the value of the Bass frequencies [0 = -20dB, 20 = 0dB, 40=+20dB]Bass status (1Byte – DPT5) KNX group that reports the current value of the Bass frequencies [0 = -20dB, 20 = 0dB, 40=+20dB]Middle value (1Byte – DPT5) KNX group to adjust the value of the Middle frequencies [0 = -20dB, 20 = 0dB, 40=+20dB]Middle status (1Byte – DPT5) KNX group that reports the current value of the Middle frequencies [0 = -20dB, 20 = 0dB, 40=+20dB]Treble value (1Byte – DPT5)KNX group to adjust the value of the Treble frequencies [0 = -20dB, 20 = 0dB, 40=+20dB]Treble status (1Byte – DPT5) KNX group that reports the current value of the Treble frequencies [0 = -20dB, 20 = 0dB, 40=+20dB]Mono enable (1Bit – DPT1) KNX group to transform the output into a mono output. The Left and Right output will be identical but the volume of each can be controlled separately as virtually two distinct outputs [1=mono enabled – 2 virtual outputs, 0=stereo]Mono enable status (1Bit – DPT1) KNX group that reports the status of the mono feature (see “Mono enable” for more info)Volume RIGHT up/down (1Bit – DPT1)KNX group for moving volume of the RIGHT channel up=1/down=0 one step (only valid if MONO=1)Volume RIGHT value (1Byte – DPT5) KNX group to change the volume of the RIGHT channel to an absolute value [0-100] (only valid if MONO=1)Volume RIGHT up/down (1Bit – DPT1) KNX group for moving volume of the RIGHT channel up=1/down=0 one step (only valid if MONO=1)Volume RIGHT move (4Bit – DPT3) KNX group address for moving volume of the RIGHT channel up/down using standard dimming/shutters objects (only valid if MONO=1)* Volume LEFT up/down (1Bit – DPT1)KNX group for moving volume of the LEFT channel up=1/down=0 one step (only valid if MONO=1)Volume LEFT value (1Byte – DPT5) KNX group to change the volume of the LEFT channel to an absolute value [0-100] (only valid if MONO=1)Volume LEFT up/down (1Bit – DPT1) KNX group for moving volume of the LEFT channel up=1/down=0 one step (only valid if MONO=1)Volume LEFT move (4Bit – DPT3) KNX group address for moving volume of the LEFT channel up/down using standard dimming/shutters objects (only valid if MONO=1)- SOURCE (only for Players)
- Shuffle (1Bit – DPT1) KNX group to enable shuffle play mode [1=shuffle/0=ordered play]
- Shuffle status (1Bit – DPT1) KNX group to receive the current status of the shuffle option [1=shuffle/0=ordered play]
- Repeat (1Bit – DPT1) KNX group to enable repeat play mode [1=repeat/0=single play]
- Repeat status (1Bit – DPT1) KNX group to receive the current status of the repeat option [1=repeat /0=single play]
- Airplay status (1Bit – DPT1) KNX group that reports the status of the Airplay usage [1=playing from Airplay/0=playing from other sources]
- Track title (14Bytes – DPT16) KNX group that report the current track title
- Track artist (14Bytes – DPT16) KNX group that report the current track artist name
- Track album (14Bytes – DPT16) KNX group that report the current track album name
- Playlist select (1Byte – DPT5) KNX group to launch a precise playlist (KNX values that will be used to recall the playlist must be defined in the “Playlist KNX Entries” node, association between playlists and KNX values must be defined in the Audiofy app)
- Play/stop (1Bit – DPT1) KNX group for starting play=1/stop=0 the current queue
- Play/stop status (1Bit – DPT1) KNX group that report the play status [playing=1/stop=0]
- Skip track (1Bit – DPT1) KNX group to skip to the next=1/previous=0 track in the queue
- PLAYLIST
- KNX Value to recall playlist Byte value [0 - 255] used to recall a playlist on the KNX group specified in the player properties
How to start with iOS and Android mobile devices
From the Google Playstore or from Apple App Store download and open the thinknx “Audiofy” app.
The app can be used only when the mobile/tablet is connected on the same network of the Audiofy via Wifi
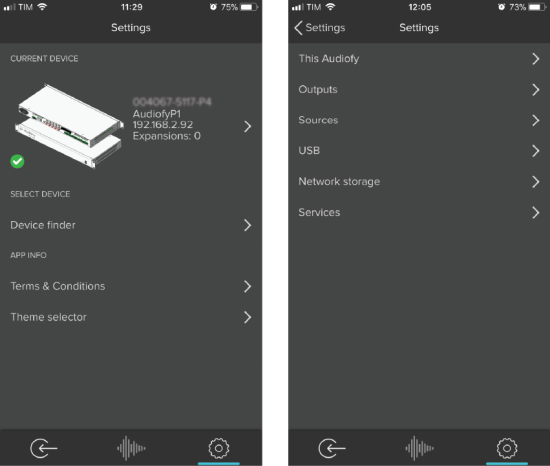
In the “device finder” section, tap on the refresh icon to detect the device. When the device has been detected, login to it using the following credientials: Username: service Password: password
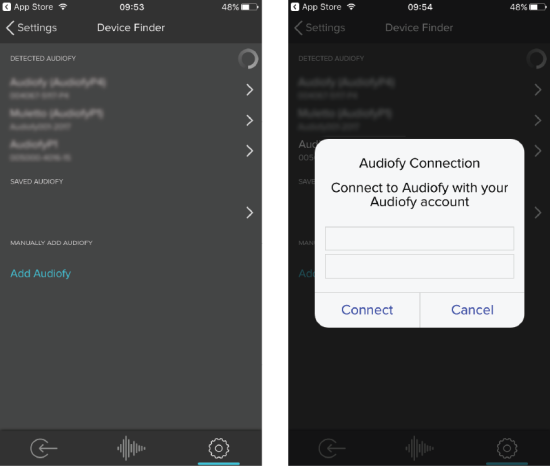
Figure 13: The device finder section and the login page
Upon sucessfull detection and connection, you will be able to see device info in the settings page From this page you can tune all the settings of the device like name of outputs, inputs, sources and network
Figure 14: The setting section
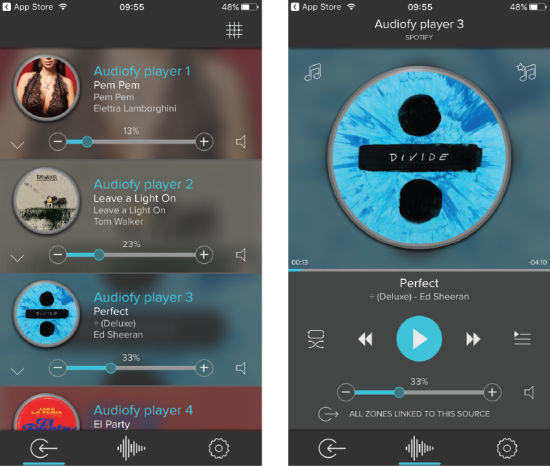
When the connection is successful all the outputs are displayed By selecting a player, the player control page appears and you can access music library, playlists, queue, etc.
Figure 15: The internal player section
How to connect the matrix to Spotify
If you want to enable the Spotify plugin on the Audiofy (to browse and play music from the Audiofy application), you must enter into the device configuration web page and follow the steps below.
A valid Spotify Premium account is needed for this purpose.
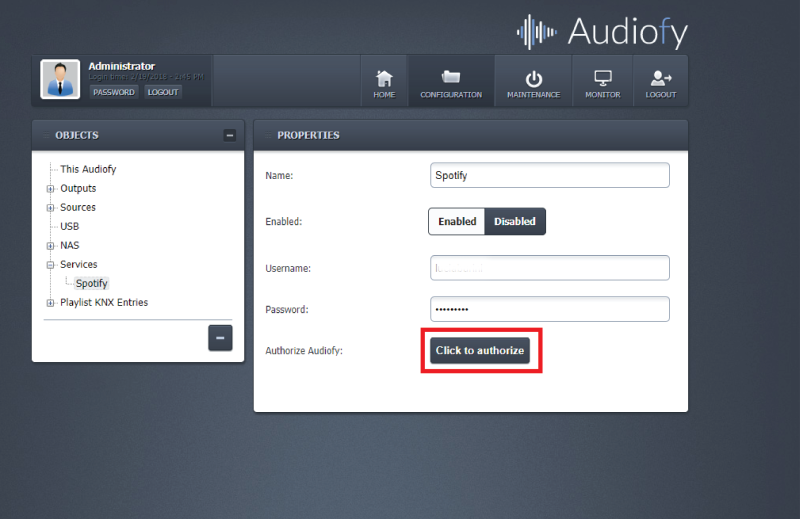
Figure 16: The configuration page of the Audiofy
Once inside the Audiofy web page, go to the section “Configuration→Audiofy” and inside the “Services” node add a Spotify service. Now you need to enable it and enter your credentials. As a final step, to pair the Audiofy with your account you need to click on the “Authorize” button.
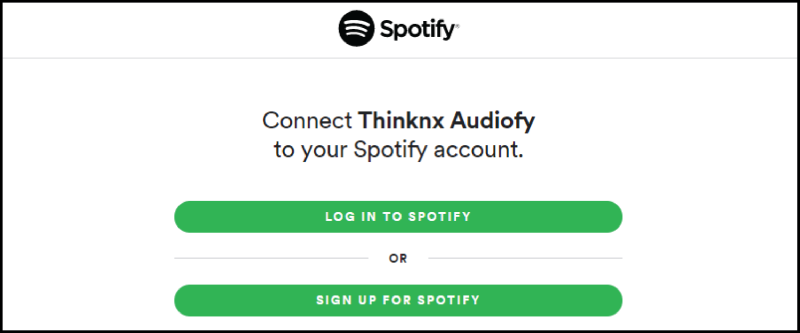
You will be redirected to the Spotify website to complete the pairing. Here you need to login and accept that Audiofy connect to your music.
Figure 17: The login page of Spotify
Another way to stream music from Spotify is through Spotify Connect. The song can be streamed directly from the Spotify application to the Audiofy, without the need to pair any account to the matrix.
- audiofy.txt
- Last modified: 2023/03/21 10:41
- by ingrid
